Front Control Panel Setup Button
From the Setup button on the
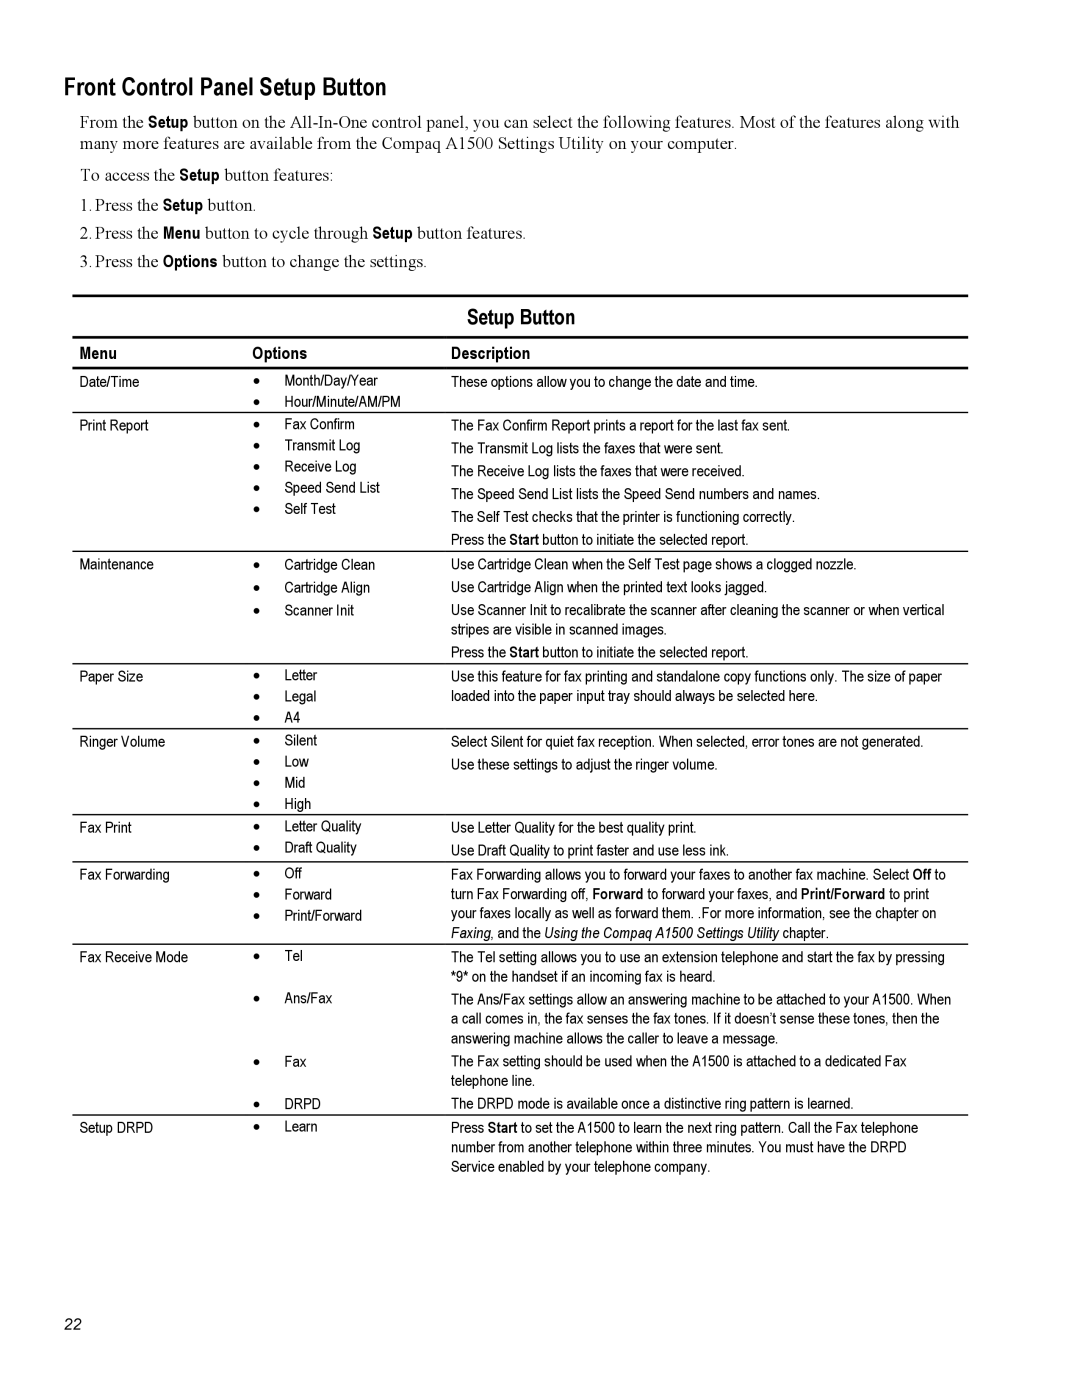
To access the Setup button features:
1.Press the Setup button.
2.Press the Menu button to cycle through Setup button features.
3.Press the Options button to change the settings.
|
|
| Setup Button |
Menu | Options | Description | |
|
|
|
|
Date/Time | • | Month/Day/Year | These options allow you to change the date and time. |
| • | Hour/Minute/AM/PM |
|
Print Report | • | Fax Confirm | The Fax Confirm Report prints a report for the last fax sent. |
| • | Transmit Log | The Transmit Log lists the faxes that were sent. |
| • | Receive Log | The Receive Log lists the faxes that were received. |
| • | Speed Send List | The Speed Send List lists the Speed Send numbers and names. |
| • | Self Test | |
| The Self Test checks that the printer is functioning correctly. | ||
|
|
| |
|
|
| Press the Start button to initiate the selected report. |
Maintenance | • | Cartridge Clean | Use Cartridge Clean when the Self Test page shows a clogged nozzle. |
| • | Cartridge Align | Use Cartridge Align when the printed text looks jagged. |
| • | Scanner Init | Use Scanner Init to recalibrate the scanner after cleaning the scanner or when vertical |
|
|
| stripes are visible in scanned images. |
|
|
| Press the Start button to initiate the selected report. |
Paper Size | • | Letter | Use this feature for fax printing and standalone copy functions only. The size of paper |
| • | Legal | loaded into the paper input tray should always be selected here. |
| • | A4 |
|
Ringer Volume | • | Silent | Select Silent for quiet fax reception. When selected, error tones are not generated. |
| • | Low | Use these settings to adjust the ringer volume. |
| • | Mid |
|
| • | High |
|
Fax Print | • | Letter Quality | Use Letter Quality for the best quality print. |
| • | Draft Quality | Use Draft Quality to print faster and use less ink. |
Fax Forwarding | • | Off | Fax Forwarding allows you to forward your faxes to another fax machine. Select Off to |
| • | Forward | turn Fax Forwarding off, Forward to forward your faxes, and Print/Forward to print |
| • | Print/Forward | your faxes locally as well as forward them. .For more information, see the chapter on |
|
|
| Faxing, and the Using the Compaq A1500 Settings Utility chapter. |
Fax Receive Mode | • | Tel |
| • | Ans/Fax |
The Tel setting allows you to use an extension telephone and start the fax by pressing *9* on the handset if an incoming fax is heard.
The Ans/Fax settings allow an answering machine to be attached to your A1500. When a call comes in, the fax senses the fax tones. If it doesn’t sense these tones, then the answering machine allows the caller to leave a message.
| • | Fax | The Fax setting should be used when the A1500 is attached to a dedicated Fax |
|
|
| telephone line. |
| • | DRPD | The DRPD mode is available once a distinctive ring pattern is learned. |
Setup DRPD | • | Learn | Press Start to set the A1500 to learn the next ring pattern. Call the Fax telephone |
|
|
| number from another telephone within three minutes. You must have the DRPD |
|
|
| Service enabled by your telephone company. |
22