Software Version
Page
Contents
Redefining Sun Keyboard Equivalent Hot Keys
Configuring Logging, Alarms, and Snmp Traps
Installation
117
116
119
120
Host Settings 228
Configuration 167 Software Upgrade 169
170
171
278
277
279
281
319
Network Configuration Screens OSD 366
321
325
390
389
394
396
Glossary
Xii
Audience
Before You Begin
This document contains the following chapters
Document Organization
Related Documents
Typographic and Other Conventions
Typeface Meaning Example
Term or Convention Meaning Examples
Chapter
Introduction
KVM Terminator Usage and Types
Description
Introduction
Connectors on the KVM/net
Guidelines for Using the KVM/net
Types of Ports
Port Types Connection Information
Console
1Port Types Connection Information Where Documented
COM port on a computer
Local area network LAN
2KVM/net Back Panel
Connectors on the Back
KVM Ports
Power Connector and Power Switch
5Management Ports
Management Ports Console, Ethernet, User 1, User
Introduction
Activity LEDs on the Back of the KVM/net
AUX Ports
Ethernet Console
7LEDs on the KVM/net Management Ports
VID
Number Label Function Color/Status
Model Number Part Numbers KVM Ports
AlterPath KVM/net Ordering Options
Types of Users
Username Responsibilities Default Password
Simultaneous KVM/net Logins
Simultaneous Server Connections
8Simultaneous Administrator Login Prompt
Administration Options
Local Users KVM-over-IP Inband Total
Cyclades Web Manager
Cyclades Web Manager
Prerequisites for Using the Web Manager
Task
TCP Ports
Cascaded Devices
9Cascaded KVM Devices from a KVM/net
AlterPath KVM
KVM Unit Management Ports Connectors KVM Expander
AlterPath
KVM/net
Default Access Types
Accessing Ports on Cascaded KVM Devices
Access Auth Type
KVM/net Port Permissions
Understanding KVM Port Permissions
Web Manager To Assign KVM Port Access to a User or Group on
Tools Where Documented
KVM Port Permissions Hierarchy
Decision 1 Check User’s KVM Port Permissions
Decision 3 Check Generic User’s KVM Port Permissions
Decision 2 Check Group’s KVM Port Permissions
Decision 5 Check Group’s Default Permissions
Decision 4 Check User’s Default Permissions
Server Access Inband and Out of Band
Decision 6 Check Generic User’s Default Permissions
In-band Out-of-Band Connection Type
In-band Out-of-Band Supported
Power
Source
Computers
Server Connection Description Labels
KVM + In-band
Server Connection Description Labels In-band
Administering Users of Connected Servers
Types of Access to Ports
Tasks Related to Access to Connected Devices
Task
Redefining Keyboard Shortcuts Hot Keys
Redefining KVM Connection Hot Keys
Redefining Sun Keyboard Equivalent Hot Keys
Part Web Where OSD Form Manager Documented
Disabling Mouse Acceleration
Summary of Tasks for Redefining Hot Keys
Resolution Refresh Rates Hz
Screen Resolution and Refresh Rate
15Levels of IP Filtering
Packet Filtering on the KVM/net
Rule
Options for Managing Power
Power Management
Controlling Power While Connected to KVM Ports
Task Where Documented/Notes
Setting Up and Configuring Power Management
17Tasks KVM-connected Power Management
Security Profiles
Security
Authentication
Choosing Among Authentication Methods
Encryption
Authentication All Type Description KVM/net KVM Ports
Ldap
Tools for Specifying Authentication Methods
Uses Terminal Access Controller Access Control System
Authentication TACACS+/Local Uses local Authentication if
Lockout Macro
Operating System Lockout Macro
Preference Keyboard Shortcuts
Go to Launch Preferences Desktop
Select Lock Screen and enter the desired
Hot key sequence, for example, Ctrl+Alt +
Default key sequence
Default key sequence is Ctrl+Alt +L
Regional & Accessibility Keyboard
Scroll down to Desktop to see the default
Shortcut Key
Notifications, Alarms, and Data Buffering
Syslog Servers
Example of Using Facility Numbers
Prerequisites for Logging to Syslog Servers
Facility Numbers for Syslog Messages
Snmp Traps
Configuring Logging, Alarms, and Snmp Traps
VPN and the KVM/net
Considerations When Choosing Whether to Enable Dhcp
Activity LEDs on the Terminator
KVM Terminator Usage and Types
Server Type Connection KVM Terminator Model Part Number
VGA and PS/2 ports APK4615 PC / Sun VGA and USB ports
KVM Expander
KVM Expander Features
ATP4208 ATP4216
KVM Expander Models and Components
11KVM Expander Back Panel Components
Port Type Use and Connection Information
Ports on the KVM Expander
KVM/net They allow the connection of a CAT 5 cable to a
Terminator, which is connected to a server
LEDs on the KVM Expander
Power Outlets on the KVM Expander
Cascading a KVM Expander
14Connecting a KVM Expander to the KVM/net
AlterPath KVM KVM Expander 512
KVM Unit Model Number KVM Expander Maximum Servers
15Devices Form on KVM/net Web Manager
Upgrading the Microcontroller Code
AlterPath KVM RP
User Access
17 KVM RP Front
Connectors on the Back of the KVM RP
Port Type Use and Connection Information
Installation
Page
Shipping Box Contents KVM/net
Description Purpose
Setting Up the KVM/net
Use a Phillips screwdriver to tighten the screws
To Mount the KVM/net
To Make an Ethernet Connection
Making an Ethernet Connection
2Connecting Servers to KVM Ports
Connecting Servers to the KVM Ports
To Prepare to Connect Servers to the KVM/net
To Connect Computers to KVM Ports
Installation
To Connect to the Console Port
Making a Direct Connection for Network Configuration
To Connect to the User 1 Management Port
Powering On the KVM/net and Connected Devices
Performing Basic Network Configuration
To Power On the KVM/net
To Power On Connected Devices
Configuring Basic Networking Using the wiz Command
To Change the Password Through the Console
To Log in to the KVM/net Through the Console
To Use the wiz Command to Configure Network Parameters
Enter the netmask for the subnetwork
Enter the IP address for the gateway
Enter y to save the changes
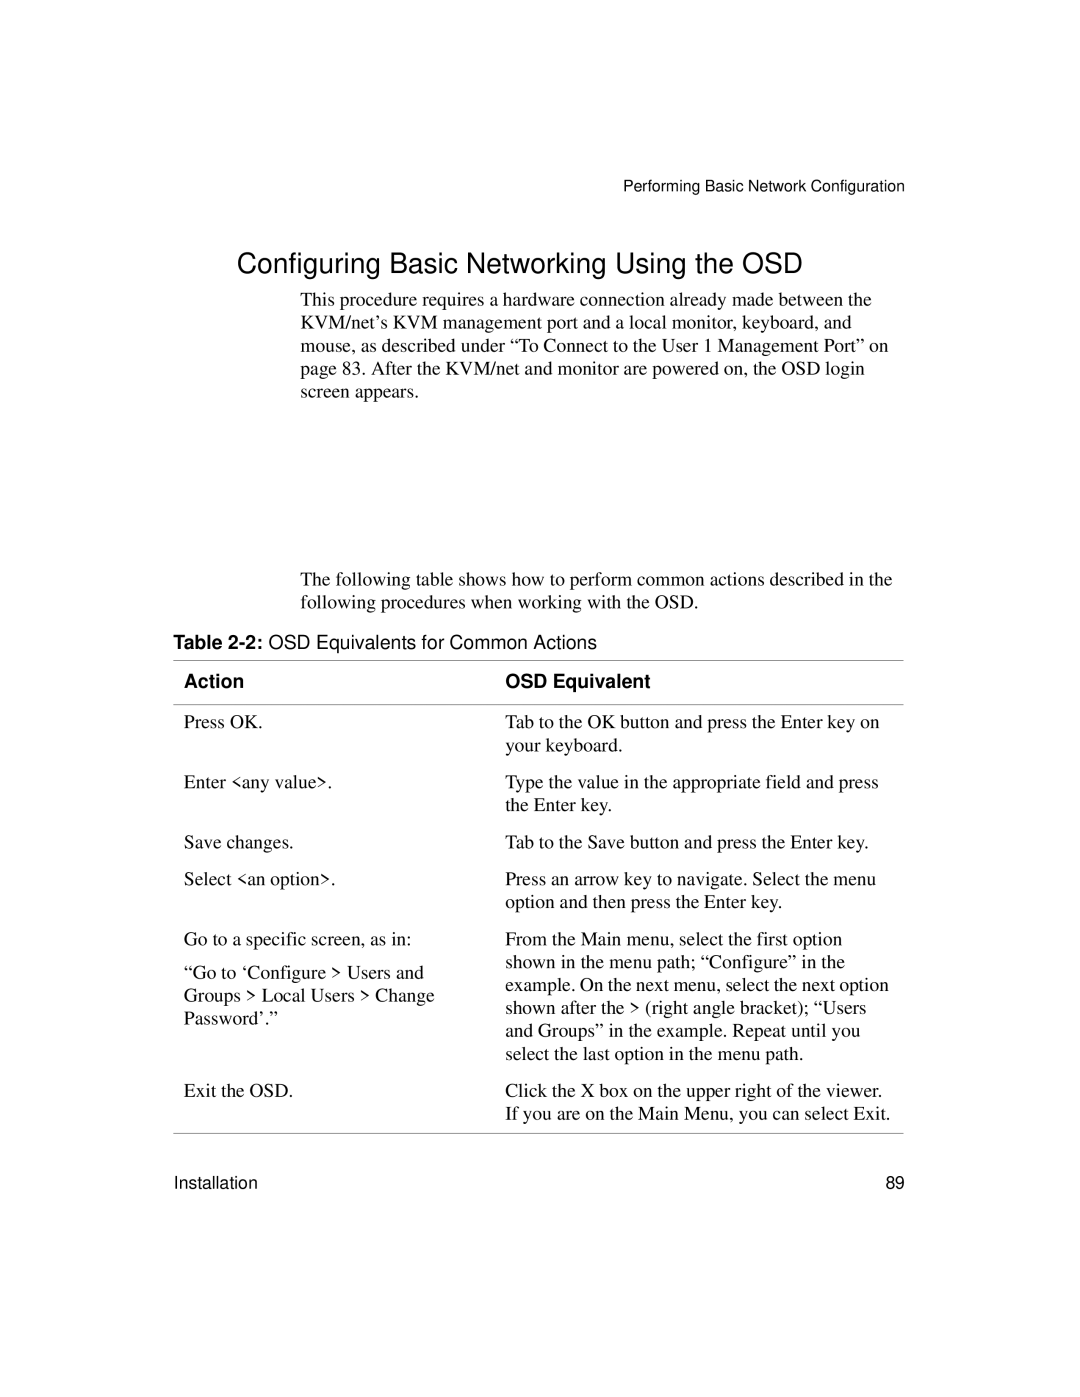
Action OSD Equivalent
Configuring Basic Networking Using the OSD
To Log into the OSD
To Change a Password Using the OSD
To Configure Network Parameters Using the OSD
Installation
Performing Basic Network Configuration
Installation
To Set the Time and Date Using the OSD
Installation
Completing Configuration Using the Web Manager
Changing admin’s Default Password Web Manager
Changing Default Passwords
Changing the Root Password Command Line
Password cyclades Enter the passwd command
Changing Default Passwords OSD
Save the new password by entering the saveconf command
Log out
To Use the Default IP Address to Access the Web Manager
To Use a Dynamic IP Address to Access the Web Manager
Inet addr192.168.50.72 Bcast192.168.51.255 Mask255.255.252.0
To Preconfigure the KVM/net
Preconfiguring the KVM/net for Remote Installation
To Set Up a Preconfigured KVM/net
Additional Configuration Tasks
Task Where Documented
See the following sections for other procedures
To Disable Mouse Acceleration Windows
To Disable Mouse Acceleration Windows XP/Windows
To Disable Mouse Acceleration Windows 95/ 98/NT
To Disable Mouse Acceleration Windows ME
Exit the AlterPath Viewer
To Disable Mouse Acceleration Linux
Required Security Settings For Internet Explorer
Modify IE Security Settings
To Modify Trusted Sites Settings
Click the Sites button to open the Trusted sites dialog box
To Modify Internet or Local Intranet Zone Settings
Download signed ActiveX controls
Installation 113
114
Advanced Installation Procedures
To Connect an External Modem to the AUX Port
Connecting an External Modem
To Connect an AlterPath PM to the AUX Port
Connecting AlterPath PMs to the KVM/net
To Connect Multiple PMs to the KVM/net
Installing the AlterPath KVM Expander
Shipping Box Contents KVM Expander
Setting Up the KVM Expander
To Mount the KVM Expander
Advanced Installation Procedures 123
Powering On the KVM Expander and Connected Devices
To Power On KVM-connected Devices
To Power On the KVM Expander
Connecting Cascaded KVM Units to the Primary KVM/net
To Connect a Secondary KVM Unit to the Primary KVM/net
To Connect a KVM Expander to the Primary KVM/net
Tasks
Installing the AlterPath KVM RP
Shipping Box Contents AlterPath KVM RP
To Connect the KVM RP to the KVM/net
Options for Accessing the KVM RP
Supplying Power to the KVM RP
To Power On the KVM RP
To Connect the KVM RP to the Local Work Station
Web Manager for Administrators
Common Tasks
Administrative Modes Wizard Mode Expert Mode
Web Manager for Administrators 135
Button Name Use
Common Features of Administrators’ Windows
Obtaining More Information
Logging In to the Web Manager and Saving Changes
Window Area Purpose
To Log In to the Web Manager as Admin
IPaddress/login.asp?portname=portnumber
To Save Configuration Changes
Wizard Mode
Administrative Modes
2Example Window in Wizard Mode
Procedures in Wizard Mode
Steps in Wizard Mode Wizard
Security Profile Wizard
Pre-defined Security Profiles
Default
Security Profile SSH Access Web Access Protocols Secured
Custom Security Profile
Moderate
To Select or Configure a Security Profile Wizard
Security Profile SSH Access Web Access Protocols Custom
SSH Options SSH Http Options
3Security Advisory Dialog Box
4Security Profile in Wizard Mode
5Custom Security Profile Dialog Box
3Configuring KVM/net in Expert Mode
Network Settings Wizard
To Change Network Settings Wizard
6Network Settings in Wizard Mode
Access Wizard
7User Access in Wizard Mode
To Add a User Wizard
Field Name Definition
To Change a Password Wizard
Wizard mode, go to Access. The Access form appears
To Delete a User Wizard
156
System Log Wizard
8System Log in Wizard Mode
To Add a Syslog Server Wizard
To Delete a Syslog Server Wizard
Expert Mode
10Access Form in Expert Mode
Access
Connect to Server
Ipdu Power Management
Outlets Manager
To View Status, Lock, Unlock, Rename, or Cycle Power Outlets
View IPDUs Info
Users Manager
To View and Reset Ipdu Information
To Configure Users to Manage Specific Power Outlets
Configuration
To Specify or Change the Alias of an Ipdu
To Configure Creation of Alarms and Syslog Files for IPDUs
Configuration
Software Upgrade
To Upgrade Firmware on an AlterPath PM
KVM
General
Web Manager Form Where Documented
Parameter Name Definition
Enabling Direct Access to KVM Ports
To Enable Direct Access to KVM Ports
Redefining KVM Connection Keyboard Shortcuts Hot Keys
ConfigurationKVMGeneral
Common Command Key Where Defined Escape Sequence Format
Defaults
To Redefine KVM Session Keyboard Shortcuts
Specifying Authentication for KVM Port Logins
Redefining Sun Keyboard Modifier Keys
To Redefine the Sun Keyboard Modifier Keys
Local Users and IP Users
18KVM Configuration User 1/User 2/IP Users Form
Sets the maximum time in minutes for the session to be idle
Value is 60 minutes. a value of 0 disables the idle timeout
To Configure Local User 1 and User 2 Sessions
IP Users only. The default is 5900+. You may need to change
More details, see TCP Ports on page 20. Port numbers
To Configure IP User KVM Over IP Sessions Expert
Web Manager for Administrators 181
Devices
19KVM Device Configuration Form
To Configure a KVM Port for Power Management
Configuring Individual KVM Ports
184
Web Manager for Administrators 185
To Specify or Change the Alias for a KVM Port
To Enable or Disable a KVM Port
Configuring Cascaded KVM Units
188
To Edit the Configuration of a Cascaded KVM Unit
190
Users & Groups
To Delete the Configuration of a Cascaded KVM Unit
To Add a User Expert
20KVM Users & Groups Configuration Form
Password associated with the user name
Name of the user to be added
For more details
To Delete a User or Group Expert
To Change a User’s Password Expert
To Add a Group
Click OK Click apply changes
To Modify a Group
To Select Users and Groups for Assigning KVM Port Access
To Assign KVM Port Access to a User or Group
Web Manager for Administrators 197
198
21Inband Configuration Form
Configuring Inband RDP Servers
Prerequisites for Inband Access to RDP Servers
To Add or Modify an inband RDP Server
202
Web Manager for Administrators 203
Security
To Delete an inband RDP Server
Configuring an Authentication Method
23KVM Unit Authentication Configuration Form
To Configure an Authentication Method for KVM/net Logins
To Configure an Authentication Method for KVM Port Logins
To Configure an NIS Authentication Server on
Method Variations Procedures
NIS, Local/NIS, NIS/Local, or NIS
DownLocal
To Identify a Kerberos Authentication Server
Group Authorization
210
24Kerberos Server Authentication Form
To Identify an Ldap Authentication Server
25LDAP Server Authentication Form
To Configure Group Authorization on a Ldap Server
To Configure an Smbntlm Authentication Server
To Configure Group Authorization on a Ntlm Server
Configuring Active Directory Schema
To Configure an NIS Authentication Server
27NIS Server Authentication Form
To Identify a Radius Authentication Server
28Radius Server Authentication Form
To Configure Group Authorization on a Radius Server
29Tacacs+ Server Authentication Form
To Identify a TACACS+ Authentication Server
Group Authorization on TACACS+
To Configure Group Authorization on a TACACS+ Server
222
30Security Profiles Configuration Form Expert
To Select or Configure a Security Profile Expert
31Custom Security Profile Dialog Box
8Configuring KVM/net in Expert Mode Security
Network configuration comprises eight forms
Form Use this form to Where Documented
Network
VPN
To Configure Host Settings Expert
Host Settings
Ethernet Port
DNS Service
Example, domainname.com
Name that identifies the domain for
Gateway numeric identification
Number
Syslog
33Syslog Configuration Form
232
Add Rule and Edit Rule Options
IP Filtering
Inverted Check Boxes
Source or Destination IP and Mask
Field/Menu Option Definition Source Port
Destination Port
TCP Flags
Specify a source or destination port number for filtering
Field Definition Source Port
Source Port or Destination Port field
Source Port field. If you specify a second number in the to
Field Definition Input Interface
Output Interface
Fragments
Field or Menu Name Definition
To Edit a Chain
To Add a Chain
To Edit a Rule for IP Filtering
To Add a Packet Filtering Rule
To Add a Chain for IP Filtering
To Add a Rule for IP Filtering
To Edit a Chain for IP Filtering
Web Manager for Administrators 245
Source network mask. Required when a
IP packet when it matches the rule. For
Indicates the action to be performed to
Example, the kernel can Accept Drop
Select the check box adjacent to
Destination network mask
Destination IP to invert the target action
For example, the action assigned to
Select box adjacent to Output Interface to
On the type of error message such as, alert
Invert the target action. For example,
Action assigned to the target will be
Check box to include TCP sequence
Prefix that will identify the log
Check box to include TCP options in the log
Check box to include IP options in the log
VPN
To Configure VPN
Web Manager for Administrators 251
Edit or complete the appropriate fields as follows
Any descriptive name you want to use to
Identify this connection such as
Boot action configured for the host, either
Field Name
Ignore, Add, Start
To Configure Snmp
Authenticate messages sent between an
Community name acts as a password to
Enter the following system information, as necessary
Snmp client and a router containing an
Physical location of the system for
Authenticate messages sent between an Snmp
Example, mydomain
Client and a router containing an Snmp server
Object Identifier
Notifications
To Configure Snmp Traps
260
Field Name Description
Define the event you want to trigger a
Notification for
Host Tables
To Configure Hosts
36Host Tables Configuration Form
To Add, Edit, or Delete a Static Route
Static Routes
12Add/Modify Static Routes Fields
Number of hops
AUX Port
13PPP Fields for Configuring the AUX Port
System
Time/Date
To Set The Time and Date With NTP
To Set the KVM/net’s Date and Time Manually
Setting up Customized Timezone Configuration
Creating a Custom Timezone Selection
Using the Custom Option to Set Daylight Savings Time
42System Boot Configuration Form
Boot Configuration
New IP address for the KVM/net
Field or Value Name Description
Change the Auto Negotiation default value
Appropriate Ethernet setting if you need to
Speed of the Ethernet connection. Select
100BaseT Half-Duplex
To Configure KVM/net Boot
Online Help
To Configure the Online Help Path
General
Viewing System Information
Station Status
To View General Information for Your KVM/net
To View Station Status
Field
Information
Field Information
Management
Configuration data
Menu Selection Use this menu to
Use a FTP server to save or retrieve your
Reset or kill sessions
Backup Configuration
Reboot the system
View the status of all active sessions as well as
Such as KVM8802config040406 in a directory called upload
Field Definition
IP address of the FTP server
To Back Up or Retrieve KVM/net Configuration Data
286
48Firmware Upgrade
Firmware Upgrade
Field/Menu Definition Name Type
Password
FTP Site
Username
ZImagekvm200.bin ZImagekvm200.bin.md5
Microcode Upgrade
To Upgrade Firmware
Target Name Used on Form Filename Format Component
IP modules
Modules
Field Name Definition Target
FTP Server
Directory
To Download Microcode From an FTP Server
To Reset the Microcode After Upgrade
Microcode Reset
Web Manager for Administrators 295
To View Active Sessions Information
Active Sessions
Column Definition
Name of the KVM port
To Kill an Active Session
To Reboot the KVM/net From a Remote Location
Reboot
Web Manager for Regular Users
Web Manager for Regular Users
1Example of Regular User Web Manager Form
To Log Into the KVM/net Web Manager as a Regular User
Prerequisites for Logging in to the Web Manager
Web Manager for Regular Users 303
Connect to Server
Ipdu Power Management
See Controlling Power of a KVM-connected Server on
To Change Your KVM/net Password
Changing Your KVM/net Password
Accessing Connected Devices
308
Who Can Access Connected Devices
Server Connections What You See
1AlterPath Viewer for KVM Connections
Viewing KVM Connections
312
2ActiveX Viewer for In-band Connections
Viewing In-band Connections
Prerequisites for Accessing Servers With KVM Connections
1Supported Screen Resolutions and Refresh Rates
Conditions
Web Manager Login Screen
Accessing Connected Devices 317
Connect to Server Drop-down List
Login Screen Direct Logins Not Enabled
Accessing Connected Devices 319
Login Screen Direct Logins Enabled, Only IP Address Entered
Connecting to Servers Remotely Through the Web Manager
322
Accessing Connected Devices 323
IPaddress/login.asp?portname=portnumber
Connecting to Servers Locally Through the OSD
To Connect to Servers Through the OSD Connection Menu
Accessing Connected Devices 327
Controlling KVM Port Connections
Key Combination Action
Hot Keys for KVM Connections
Hot Keys for Emulating Sun Keyboard Keys
Win Function Key Sun Key
Numeric Keypad
To View Connected Port Information
To Return to the Connection Menu After Connecting to a Port
To Initiate Cycle by Server
Cycling Between Servers
Default is Ctrl+k q
To Adjust Screen Brightness and Cable Length
To Reset the Keyboard and Mouse
Resetting the Keyboard and Mouse
To Power On, Power Off, or Reboot the Connected Server
Controlling Power of a KVM-connected Server
Closing a KVM Connection
To Close a KVM Connection
Sharing KVM Port Connections
Quit this session Connect read only
Connect read write Kill other session
AlterPath Viewer Settings
Recommended Settings
Menu Select the following options
Menu Selection Description
Options Menu
Field or Menu Item Function Horizontal Offset
Setting the Viewer Options
Vertical Offset
Quality ----Speed
Connection Menu
No Encryption
Menu Selection Function Encryption Type
High Color
Low Color
344
Accessing Connected Devices 345
Modem Connections
7Tasks for Configuring and Making Dial Up Connections User
To Configure a PPP Connection on a Remote Computer
To Make a PPP Connection From a Remote Computer
Accessing Connected Devices 349
350
On Screen Display
Navigating the OSD
Basic Navigation Keys
Key Action
Common Navigation Actions
Logging In Through the OSD
Tab to the OK button and press the Enter key
On your keyboard
To Log into the KVM/net Through the OSD
OSD Main Menu
To Invoke OSD Using Print Screen Button
Invoking OSD Using PrintScreen Key
Menu Selection Select the menu item to Where Documented
Reboot the KVM/net
Connection Menu
Power Management Menu
Configure Menu Overview
Network
Date/Time
User Station
Users
Notifications Authentication Save/Load Config Exit
Groups
Cascade
2OSD Configuration Series Screens
Understanding OSD Configuration Screen Series
Screen Description
General Configuration Screens OSD
Examples of using facility numbers as needed. In addition,
Syslog facility number that is used by the administrator
Escape sequence or keyboard shortcuts configuration
Default Ctrl+k, shown as Ctrlk in the screen. See
Manager login screen
Enables or disables direct access to KVM ports from the Web
Administrator
AlterPath Viewer. For example 5903+ means that the first
Network Configuration Menu Options OSD
Network Configuration Screens OSD
Active saves the changes to the configuration files. active
Enable or disable DHCP. When you select enabled, the screen
Save overwrites the backup configuration files and makes
Network Configuration menu
IP address for the DNS server
Domain name
Hostname for the KVM/net
On Screen Display 369
Snmp Configuration Screens OSD
370
Further defined by the type of access specified under
Email address for the KVM/net administrator, for example
Commonly known. By default, the public community cannot
Access Snmp information on the KVM/net
Information Base except for Snmp configuration objects
Read Only Read-only access to the entire MIB Management
Read/Write Read-write access to the entire MIB except for
Snmp configuration objects
On Screen Display 373
VPN Configuration Screens OSD
Connection such as MYCOMPANYDOMAIN-VPN
Any descriptive name you want to use to identify this
Hostname of the KVM/net, referred to as the local host
Negotiation and authentication
This is the hostname that a local system use for IPSec
It can be a Fully Qualified Domain Name preceded by @. For
Side sends packets to the KVM/net
VPN connection is ignored. Add means to wait for
Connections at startup. Start means to make the connection
On Screen Display 377
IP Filtering Configuration Screens
378
Configured chains, the Add Chain, and the Exit options
Lists the default chains along with any administratively
Only appears when Add Chain is selected. Entering the name
Appears when a user-added chain is selected from the Filter
Netmask of the subnetwork where an input packet originates
Target action to take when a packet’s characteristics match
Chosen from the Chain Chainname menu. Choices are
Accept or Drop
Netmask of the subnet to which an output packet is going
Choices are All, Numeric, TCP, UDP, Icmp
Appears only if Numeric is selected from the Protocol menu
Options are Any, Set, Unset
Appears only if TCP is selected from the Protocol menu
Are selected from the Protocol menu
Appears only if All, Numeric, TCP, UDP, or Icmp
Hosts Configuration Screens OSD
ScreenDescription
Static Routes Configuration Screens
Appears only when the Edit and Delete options are selected
Choices are default and any previously configured static
Routes
Appears only when net is selected from the Host or Net
Types of routes host, net, or default. Note a default
Listed in the routing table
IP address for the target host or network
Date/time Configuration Screens
Screen
Number of hops to the destination
User Station Screens
Period of inactivity before the user is logged out from
OSD. The default is 3 minutes
US Default
Default is 10 minutes
Redefine the command key for the KVM connection quit hot
Period of inactivity before the screen saver starts.
Mouse/keyboard reset hot key
12User Station Configuration Screens
Following table shows the KVM port configuration screens
KVM Ports Screens
Defined aliases
Command is sent to the server to lock the current user
Accepted. The new alias replaces the default port name
Display the new login window
Allows you to enter one or more numbers that identify power
AUX Port Screens
5AUX Port Configuration Screens
Choices are Disable, Power Management, and PPP
Following table shows the AUX port configuration screens
Aux port are enabled by default. If you need to disable a
Select the desired protocol Power Management or PPP
Local IP address
None, even, or odd
Cascade Devices
Device name
Options include Add device, Edit device, and Delete device
Edit Device
Screen Description Cascade Device
Device Choose an option screen
Appears when Delete device is selected from the Cascade
Device
Following confirmation screen appears once a cascaded
On Screen Display 403
Users and Groups Screens
7Users and Groups Configuration Screens
Appears only when Add User or Change Password are
Options are Add User, Change Password, Delete User
Selected. Note Passwords are case sensitive
When the password is successfully confirmed, the following
Confirmation screen like the following appears
Appears only when Change Password or Delete User are
Options are Add group, Add user to group, Del. user from
Group, Delete group, and Exit
When the user is successfully added, the following
When Add user or Add user to group are selected. To add
Multiple users, use a comma to separate each username
Confirmation screen appears
Admin and any users in the admin group. By default,
Generic Users, admin, and any administratively defined
Generic Users’ default permission is No Access, and no
Regular users that may be added cannot access any KVM ports
Default option defines access permissions for all KVM
Access list includes the Reset all, Default, Multiple
Ports, which apply unless the user has specific access
For a new user, because Default Access, is not defined,
Syslog Screens
Alarm Trigger
Notification Screens
Define the event you want to trigger a notification for
Trap Number
Community
Server IP
Screen Body Description
Authentication Screens
9Authentication Options and Screens
Authentication server Kerberos, Ldap, Radius, TacacsPlus
Method for KVM/net logins, or choose one
Authentication method options for KVM/net logins. Default =
Local. Other authorization type options are Kerberos
IP address of the Kerberos or Ldap server
Choices are Yes or No
Login attribute
IP addresses of one or two optional accounting servers
Radius or TACACS+ authentication server
23Smb Ntlm Configuration Screens
Choose the NIS authentication server
Authentication servers. The second server IP is
IP addresses for one or two SMB Ntlm
Optional
On Screen Display 421
Save/Load Configuration Screens
When Save Configuration is selected, the following two
When Save to FTP is selected, the following five screens
25Save/Load Configuration Screens
FTP Login Username and Password. The last screens
Confirm the save to FTP succeeded
Information Type Example
System Info Menu
RP local
RP main
To Access System Information
Reboot
To reboot the KVM/net
Select Reboot from the Main Menu Following message appears
Select Yes to reboot the KVM/net
Controlling the OSD Through the AlterPath KVM RP
To Use to the KVM RP to Access the KVM/net
On Screen Display 429
430
How to Replace the KVM/net’s Boot Image
To Boot From Tftp
Appendix a
Select the boot type at the following prompt
Press ESC when the Testing Ethernet prompt appears
IP address assigned to Ethernet interface
434
Table A-1Boot Message
Exit ftp when the download is completed Reboot the KVM/net
To Save the zImage into the KVM/net’s Flash Memory
From this directory, ftp to your FTP server
How to Upgrade the Firmware on KVM/net
FTP Method
SSH/SCP Method
Following md5 file is generated and displayed
439
How to Boot the KVM/net Over the Network
Firmware boot from Flash or Network F N
How to Boot the KVM/net in Single User Mode
To Boot the KVM/net in Single User Mode
Type spsingle spacebar, then the word single
System reboots and displays the following message
If the password is forgotten execute the following command
Root@none root# saveconf Root@none root# reboot
How to Disable Mouse Acceleration Using Windows Registry
446
Appendix B
Technical Specifications
Dimensions WxDxH Certifications
Appendix C
General Safety Precautions
450
Rack or Cabinet Placement
Table Placement
Safety Guidelines for Rack-Mounting the KVM/ net
Temperatur
Circuit Overloading
Safety Precautions for Operating the AlterPath KVM/net
Sicherheitsvorkehrungen beim Betrieb des AlterPath KVM/net
455
456
Baud Rate
Basic In/Out System
Bootp
Boot
BogoMips
Bonding Linux
Cluster
Cidr Notation
DNS Server
Domain Name
Ethernet
Escape Sequence
Flash
Flow control
Hot-Swap
IP address
IP packet filtering
Kerberos
IPsec
Network Mask
Packet
Port
Parity
Root Access
Routing Table
Secure Shell SSH
Snmp Traps
Server Farm
Stop Bit
Subnet Mask
Sudo
Rack Height Unit
Telnet
Watchdog timer
Index
268
Adding 240, 243 editing 240
OSD
Authentication servers 208 AUX 1 port Basic networking
CPU 424
Domain Name 416, 419, 420 download microcode 293 downloading
477
478
209
LEDs
LAN Ldap Ldap authentication server, configuring an
IP address and port entered 320 IP address entered
Netmask 367, 388 network 226 Network bits/sec
410
484
485
Conventions for showing how to navigate to screens
200
Target 380
489
VPN 56