HP LaserJet 9040/9050
Page
User Guide
Copyright and License
Contents
Advanced printing tasks
Problem solving
Appendix C Printer memory and expansion
Features and benefits of the printer
Resolution
Speed and throughput
Memory
User interface
Language and fonts
Print cartridge
Paper handling
Environmental features
Firmware updates
Connectivity
Optional HP EIO hard disk
Security features
Parts or accessories
Type of item Description or use Order Number
Optional output
Memory, fonts,
Cable and interface EIO cards
External view of printer and accessories
121 1111
Layout and basic operation of the control panel
Callout Button Function Number
Using control-panel menus
To change a control-panel setting
Interpreting control-panel lights
To print a control-panel menu map
Paper-handling status LED interpretation
Off
Driver Autoconfiguration
Software features
Printer software
Update Now
HP Driver Preconfiguration
Printer drivers
Operating system PCL 5e
Choose the correct printer driver for your needs
Additional drivers
Printer driver Help
Gaining access to the printer drivers
Document Defaults
Software for Macintosh computers
To install the printing system software
Installing the printing system software
HP LaserJet Utility
Installing Windows printing system software for networks
Installing Macintosh printing system software for networks
Uninstalling the software
To remove software from Windows operating systems
To remove software from Macintosh operating systems
Click Add Printer
Software for networks
HP Web Jetadmin
Utilities
Features
Windows Macintosh OS Network administrator
Embedded Web server
HP Toolbox
Communicating by using an optional HP Jetdirect print server
To print a configuration
To gain access to the embedded Web server
Using the embedded Web server
Embedded Web server
HP Toolbox
Supported operating systems
To view the HP Toolbox
HP Toolbox sections
Device Settings button
Status tab
Alerts tab
HP Toolbox links
Help system
Other links
Printer basics
Printing tasks
Loading optional Tray
Loading input trays
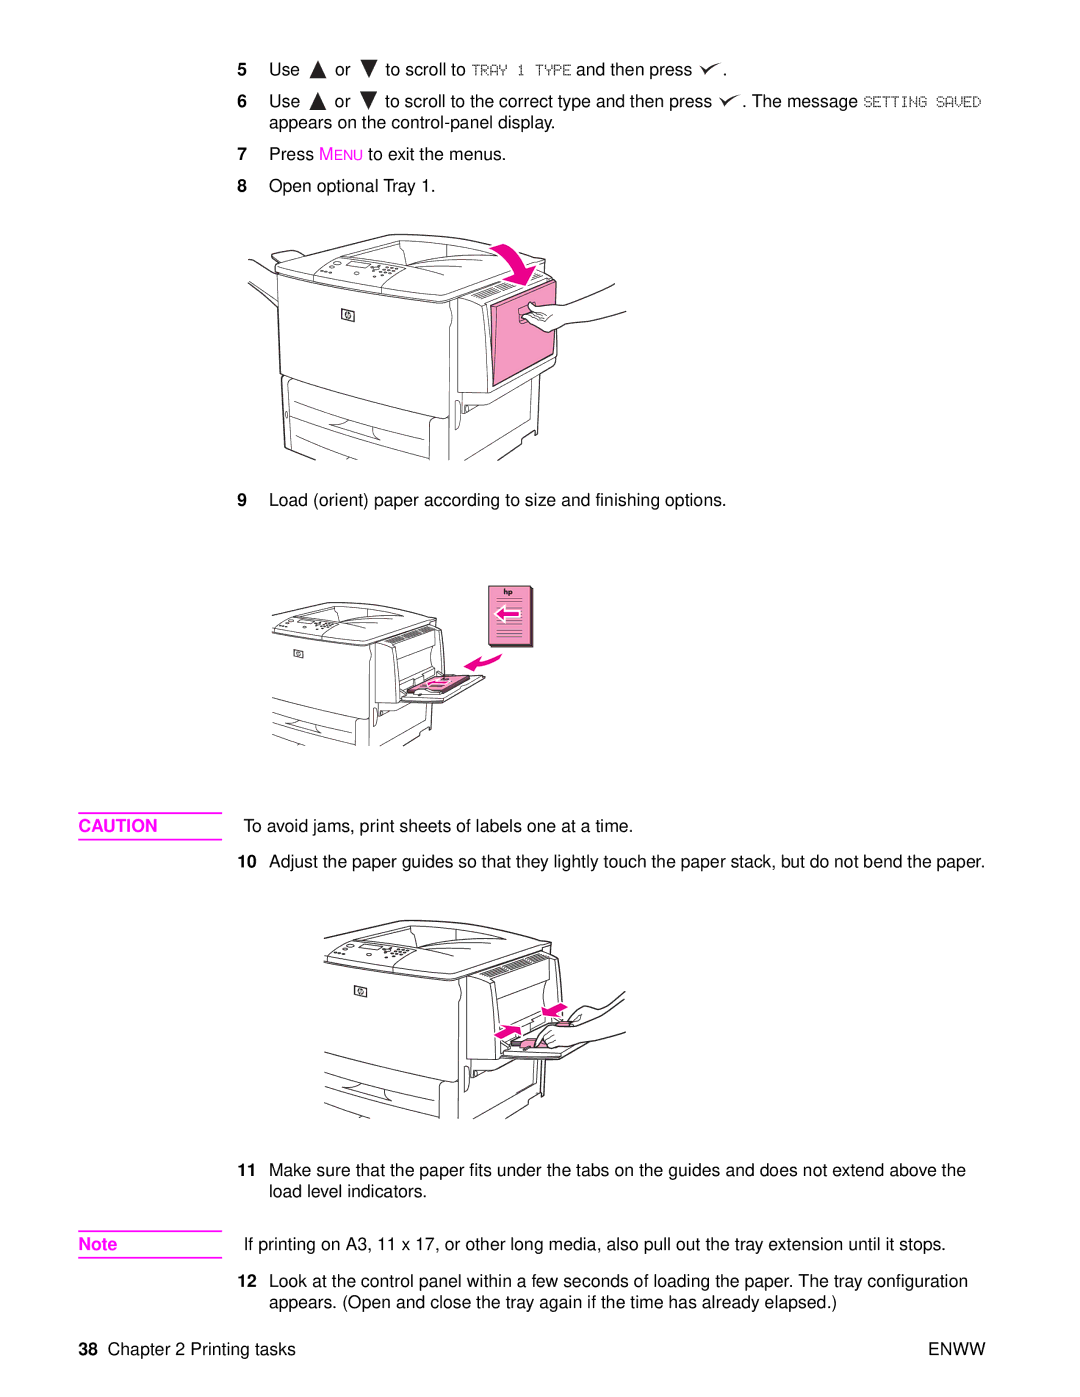
To load optional Tray 1 for occasional one-time use
Loading input trays
To avoid jams, print sheets of labels one at a time
Loading Trays 2, 3,
To load detectable, standard-size paper in Trays 2, 3,
Enww
Enww
To load undetectable standard-size paper in Trays 2, 3,
Enww
Enww
Loading custom-size paper in Trays 2, 3,
Close the tray Printing tasks
Configuring the trays by using the Paper Handling menu
To configure the paper size for the tray
To configure the paper type for the tray
Orienting media
Type of media Tray Duplexed Media Orientation
Short edge toward feed direction side to be
Short edge toward feed direction first side
Prepunched Letter or Either
Alternate Letterhead mode
To print
Basic printing instructions
Custom
Selecting the output bin
Stacker or stacker/stapler output bins
Selecting an output location
Bin mailbox output bins
Multifunction finisher output bins
To select an output location from the control panel
Printing envelopes
To load envelopes in optional Tray
To change the fuser levers
To print envelopes from a program
Using the optional 3,000-sheet stacker
Using the optional stacker/stapler
Output features
To select stapling as the default from the control panel
Loading staples
To load staples
Enww
Using the stapler
Using the optional multifunction finisher
Selecting stapling
Loading staples
Damage the finisher
Making booklets
Enww
Printing both sides of paper duplexing
Using the optional 8-bin mailbox
To print on both sides of paper
Layout options for printing on both sides of paper
Printing right-to-left
Printing on special paper
Printing labels
Printing on transparencies
Printing full-bleed images
Printing tasks
Advanced printing tasks
Overview
Using features in the printer driver
Saving printer setup information
New printer driver features
Printer collation
Setting the registration
To set the registration
Using a different first
To print a different first
Including a blank back
Printing multiple pages on one sheet of paper
Customizing optional Tray 1 operation
Manually feeding paper from optional Tray
Benefits of printing by type and size of paper
Specifying paper to print on
To print by type and size of paper
Using the job-storage features
To gain access to the job storage features
Printing a private job
To create private jobs
Deleting a private job
Releasing private jobs
Storing a print job
Deleting a stored job
Printing a stored job
QuickCopying a job
Printing additional copies of QuickCopy jobs
Deleting a QuickCopy job
Proofing and holding a job
To print more copies of a QuickCopy job
Printing the remaining copies of a held job
Deleting a held job
To create a proof and hold job
To print a proof and hold job
Security features
Gaining access to Secure Disk Erase
Secure Disk Erase
Affected data
Additional information
Job storage features
Security lock
Security features
Printer maintenance
General cleaning
Cleaning the printer
To clean the printer
Cleaning the printer
To reset the printer maintenance count
Printer maintenance kit
To print a configuration
Print cartridge authentication
Managing the print cartridge
Non-HP print cartridges
Print cartridge storage
Using printer software
Using HP Web Jetadmin
Print cartridge conditions
Order the print cartridge
Recycling Using the printer cleaning
Configuring alerts
Replace the print cartridge
Rocking the print cartridge
See Using the embedded Web server for general
Problem solving
Clearing jams
Jam locations
To clear jams in optional Tray
Clearing jams from the input tray areas
To clear jams inside the right door
To clear jams in Trays 2
To clear jams in optional Tray
Enww
Clearing jams from the duplex printing accessory duplexer
To clear jams in the duplex printing accessory
Enww
To clear jams in the standard output bin
Clearing jams from the output areas
To clear jams in the left door fuser area
Enww
To clear jams in the multifunction finisher
Enww
Enww
To clear a staple jam from the optional stacker/stapler
Enww
To clear a staple jam from the multifunction finisher
Remove the staple cartridge
Enww
Enww
Paper specifications
To clear jams in the 8-bin mailbox
Situation Solution
Solving repeated paper jams
Understanding printer messages
Using the printer online Help system
If a message persists
Resolving control-panel messages
Message Explanation or recommended action
Printer is processing the cleaning
Was requested
Data until the memory is full
Expansion
Communications protocol might be in use
Fuser error has occurred
No System
Lj9050lj9040
Correcting output quality problems
Light print or fade
Specks
Dropouts
Lines
Toner smear
Loose toner
Repeating defects
Misformed characters
Curl or wave
Skew
Wrinkles or creases
Preventing wrinkles on envelopes
To prevent wrinkles on envelopes
Solving common printer issues
Troubleshooting checklist
SituationSolution
Jams
Stacker/stapler
Support/lj9050lj9040
Tray
USE Requested Tray to Exclusively
SituationSolution
Printer driver icon does not appear in the Chooser
Using the embedded Web server
Home pages
Device pages
Networking pages
Printing information pages
To print an information
Checking the printer configuration
Menu map
Configuration
HP LaserJet 9050 series printer
Supplies status
HP LaserJet 9050 series printer
Usage
PCL or PS font list
Jetdirect
Event log
To print an event log
Printing a paper path test
To print a paper path test
Paper weight equivalence table
Tag Metric Bond Text Cover Bristol Index Weight Book
HP Premium Choice LaserJet
Printing supplies Part Description or use Number
Paper
Part Description or use Number
HPJ113H
Envelope margins
Paper specifications
Type of address Top margin Left margin
Supported sizes of paper for input and output
Tray or Bin Capacity Paper
ISO A3, ISO A4, ISO A4-R
ISO A4, ISO A5, JIS B4, JIS B5
Guidelines for using paper
Resolving issues with paper and other print media
Symptom Problem Solution
Supported types of paper
Labels
Transparencies
Envelopes
Label construction
Card stock and heavy paper
Environmental specifications
Electrical specifications
Power requirements
Power consumption
Acoustical specifications
Operating environment
Control-panel menus
Information menu
Retrieve job menu
Explanation
Paper handling menu
Values Explanation
Configure device menu
Printing submenu
Configure device menu
PCL submenu
Print quality submenu
ItemValues Explanation
System setup submenu
For more information, see Managing the print cartridge
Timeout submenu
Submenu
Parallel input submenu
EIO X Jetdirect submenu
Embedded Jetdirect submenu
Options Values
Options Values Explanation
Diagnostics
Resets submenu
Diagnostics menu
Service menu
Printer memory and expansion
Installing memory and fonts
To install DDR memory DIMMs
Slot label on Description Configuration Formatter board
Determining memory requirements
To install memory
Enww
To install a flash memory card
Enww
Enww
Checking memory installation
Installing EIO cards/mass storage
Saving resources permanent resources
Appendix C Printer memory and expansion
Environmental product stewardship program
Plastics
HP LaserJet printing supplies
Material restrictions
US returns Non-US returns Paper
Material safety data sheet
For more information
Appendix D Regulatory information
Using F6 to switch between the Navigation and Topic Panes
Shortcut keys for the Help Viewer
Shortcut keys for the Index tab
Shortcut keys for the Contents tab
Shortcut keys for the Search tab
Shortcut keys for the Favorites tab
LT +A
Enww
Getting more out of help
To find a help topic
To find topics using the toolbar buttons
To create a list of favorite help topics
To copy a help topic
To print the current help topic
Using the shortcut menu commands
Command Description
Appendix F Using the Html Help Viewer
Index
Index
EIO
Index
Enww
175 Status Manual feed Information 166
Enww
Index
Enww
Index
Unix
Index
Page
Q3721-90940