Extended User Guide
KODAK HERO 2.2 All-in-One Printer
Eastman Kodak Company Rochester, NY Eastman Kodak Company
Specifications are subject to change without notice
2 Networking Your Printer
1 Printer Overview
3 Online Printer Management Tool
4 Handling Paper
7 Copying
6 Mobile Printing
8 Scanning
9 Faxing
1 Troubleshooting
1 Maintaining Your Printer
Cleaning the scanner glass and document backing
1 Product and Safety Specifications
Components
Printer Overview
Control panel
Feature
Home Centre Software
Printer Overview
Ordering supplies
Configuring printer settings
KODAK HERO 2.2 All-in-One Printer
Date and Time
Time to Low Power
Button Sounds
Language
Connecting to a wireless network using the Wi-Fi Set-Up Wizard
Connecting to a wireless network
Connecting to a non-WPS wireless router
Networking Your Printer
Connecting to a WPS wireless router
Using Push Button Configuration
Setting up an IP Address
a. With Push Button Configuration selected, press OK
Entering WPS PIN
Dynamic DHCP Manual Static
Viewing the network configuration
Networking Your Printer
Installing your printer on additional computers on the network
Printing the network configuration
Connecting to another KODAK All-in-One Printer
On a computer with WINDOWS OS
Changing from USB to a wireless connection
Adding a wireless network connection to a USB-connected computer
1. Select Apple System Preferences
If your printer is connected to a computer with WINDOWS OS
Online Printer Management Tool
Accessing the Online Printer Management Tool
Directly from Home Centre Software v7.x or higher
Configuring printer settings
Using the Online Printer Management Tool
c. Press to select View Network Configuration, then press OK
Online Printer Management Tool
3. Select General Friendly Name
Changing the printer name
KODAK HERO 2.2 All-in-One Printer
Changing fax settings
Adjusting fax settings
Editing the fax phonebook
3. Select Fax Phonebook
Creating the outgoing e-mail profile
Setting up Scan To E-mail
3. Select Scan To E-mail E-mail Profile
KODAK HERO 2.2 All-in-One Printer
Online Printer Management Tool
4. Click Add New Outgoing E-mail Profile
KODAK HERO 2.2 All-in-One Printer
Setting up the e-mail address book
3. Select Scan To E-mail Address Book
Setting options for scan to e-mail
3. Select Scan To E-mail E-mail Option
Online Printer Management Tool
You can enter a Filename Prefix of your choice
KODAK HERO 2.2 All-in-One Printer
Before you create a network folder profile
Setting up Scan To Network Folder
Adding a network folder profile
3. Select Scan To Network Folder Network Folder Profile
1. Select Scan To Network Folder Scan Settings
Setting scan settings for scan to network folder
KODAK HERO 2.2 All-in-One Printer
Changing Copy Document and Copy Photo settings
Changing printer settings for copying and printing
3. Select Copy & Print Copy Document or Copy Photo
Online Printer Management Tool
3. Select Copy & Print Print Photo
Changing Print Photo settings
KODAK HERO 2.2 All-in-One Printer
3. Select Cloud Printing Google Cloud Print 4. Click Edit Settings
Setting up Cloud Printing
Editing a Google Cloud Print Account
Online Printer Management Tool
Printer Settings
Editing the settings for KODAK E-mail Print Service
Changing the E-mail address for your printer
Allowed Users
Paper types
Handling Paper
Paper sizes
Minimum size
Loading paper
Envelope sizes
Loading plain paper
Do not load envelopes with cutout or clear windows
Handling Paper
Loading photo paper
Loading originals
Using the scanner glass
Loading envelopes
KODAK HERO 2.2 All-in-One Printer
Imperial units 9.8 x
Using the Automatic Document Feeder ADF
11 x
Remove all paper clips and staples from the originals
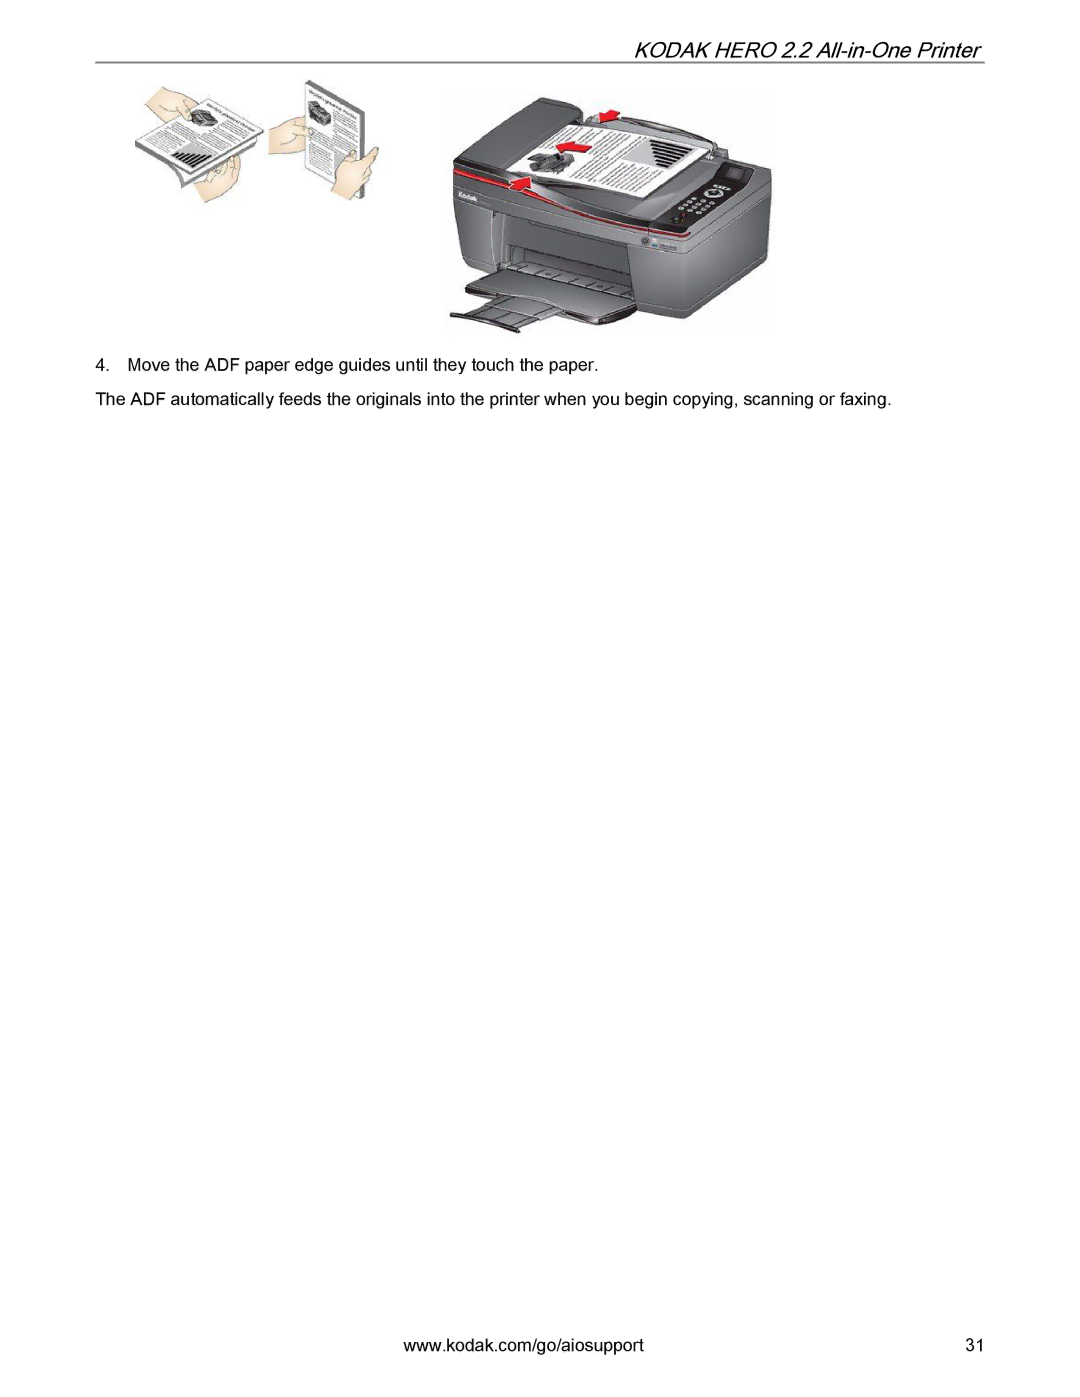
4. Move the ADF paper edge guides until they touch the paper
KODAK HERO 2.2 All-in-One Printer
Printing documents
Printing
Printing one-sided documents
Printing two-sided documents
Manual two-sided printing
Automatic two-sided printing from a computer with MAC OS
Manual two-sided printing from a computer with WINDOWS OS
Manual two-sided printing from a computer with MAC OS
Printing forms from the control panel
Printing pictures
Viewing pictures on a memory card
Printing
Changing the settings and printing pictures
Using default settings to print a picture
Printing from a memory card
KODAK HERO 2.2 All-in-One Printer
Print Photos Option
Settings
Printing
Description
Settings
Printing tagged pictures
KODAK HERO 2.2 All-in-One Printer
Print Photos Option
3. Press for Remote Printing Settings
Printing from a wireless device
Transferring pictures to a computer
Printing panoramic pictures
Transferring pictures to a computer with MAC OS
Transferring pictures to a computer with WINDOWS OS
KODAK HERO 2.2 All-in-One Printer
Mobile Printing
Printing using Google Cloud Print
To print from a Chromebook
To print from an iOS mobile device iPhone, iPad, iPod Touch
Printing pictures from a mobile device
Printing using KODAK E-mail Print Service
Printing e-mails, documents and pictures
Printing pictures from an iPhone, iPad or iPod Touch device
Printing pictures and documents from an ANDROID OS Device
Printing pictures from a BLACKBERRY Device
Mobile Printing
Adjusting the settings and copying a document
Using the default settings to copy a document
Copying
Loading originals for copying
Enlarging or reducing the size of a copy
Changing the number of copies of a document
Copying
Settings
Adjusting the settings and copying a photo
Using the default settings to copy a photo
Copying a photo
Darkening or lightening a copy
Settings
Copy Photo Option
Copying
Do not load photos in the Automatic Document Feeder ADF
Enlarging or reducing the size of a copy of a photo
Changing the number of copies of a photo
KODAK HERO 2.2 All-in-One Printer
Do not load photos in the Automatic Document Feeder ADF
Manual two-sided copying
Two-sided copying
Copying
Before you begin scanning
Scanning
Scanning
Setting
Options
Setting
Scanning from the printer control panel
Loading originals for scanning
Scanning to a computer
Setting
Scan Option
Scanning to a memory card
Settings
Settings
Scanning to e-mail
Scanning from the computer
Scanning to network folder
Settings
Scanning from the Online Printer Management Tool
Scanning multiple pictures when connected to a computer with MAC OS
Scanning multiple pictures simultaneously
5. Click Scan Application
KODAK HERO 2.2 All-in-One Printer
a. Select Picture or Document b. Select Colour or Black & White
Faxing
Connecting the printer for faxing
Before you begin faxing
Selecting the country/region
KODAK HERO 2.2 All-in-One Printer
Determining whether your phone line is dedicated or shared
Entering fax sender information
If you have an answering service
Faxing
If you share the line with an answering machine or telephone
Fax Setting
Selecting fax settings
KODAK HERO 2.2 All-in-One Printer
Options
Faxing
Fax Setting
Fax Print Fax Speed Redial if No Answer Busy Redial Attempts
Options
Fax Setting
Setting the answer mode auto answer or manual
KODAK HERO 2.2 All-in-One Printer
Options
Working with the phonebook
Using symbols in phonebook entries
Response by fax
Adding a new phonebook entry
Deleting a phonebook entry
Editing a phonebook entry
KODAK HERO 2.2 All-in-One Printer
Using the Online Printer Management Tool to edit the Fax Phonebook
Changing resolution and brightness
Preparing a fax for transmission
Printing a fax cover page
Using Quick Dial to send a fax
Using the phonebook to send a fax
Using the numeric keypad to send a fax
Sending a fax
Dialling a recently faxed number
Receiving a fax
Sending a fax from your computer
Receiving a fax automatically
Printing fax reports
Fax settings report
Receiving a fax manually
Fax confirmation page
Faxing
Cancelling a fax
Cleaning the scanner glass and document backing
General care and cleaning
Maintaining Your Printer
4. Dry the glass with a lint-free cloth
Maintaining Your Printer
6. Dry the document backing with a chamois or soft, lint-free cloth
Do not use non-Kodak brand or refilled ink cartridges
Replacing ink cartridges
KODAK HERO 2.2 All-in-One Printer
4. Lift the ink cartridge out of the printhead
Maintaining Your Printer
5. Remove the new ink cartridge from its bag
6. Remove the cap
KODAK HERO 2.2 All-in-One Printer
Replacing the printhead
3. Remove both ink cartridges and set them aside
Maintaining Your Printer
4. Unlatch the existing printhead by lifting the button
5. Lift the printhead out of the carriage
KODAK HERO 2.2 All-in-One Printer
8. Install the new printhead in the carriage
6. Remove the new printhead from its bag 7. Remove the cap
10. Insert the black ink cartridge into the printhead
Maintaining Your Printer
11. Press down on the ink cartridge until you hear a click
12. Repeat steps 10 - 11 for the colour ink cartridge
To update the printer firmware
To update the software
5. Under Printer Resources, select Check for Printer Firmware Updates
Updating the software and printer firmware
Resetting factory defaults
Monitoring and adjusting printer performance
4. Click Check for Software Updates
To update the firmware
KODAK HERO 2.2 All-in-One Printer
3. Press to select Reset All Settings, then press OK
Basic troubleshooting
Troubleshooting
Problem
Possible Solutions
Ink cartridge errors Too much paper curl after printing Print quality
Problem
Possible Solutions
KODAK HERO 2.2 All-in-One Printer
Getting help on the Web
Troubleshooting
Problem
Possible Solutions
Wi-Fi status light
Power status light
Wi-Fi status light
Status lights
Features and Specifications
Product and Safety Specifications
Photo printing features
Copy document features
Scanning features
Copy photo features
Input paper tray
Output paper tray
Fax resolution
Product and Safety Specifications
Automatic document feeder ADF for originals
Fax system
Power
Physical specifications
Storage dimensions
Ink cartridges
Warranty
Safety information
Operating dimensions
Weight
Ink cartridge safety
LCD screen safety
KODAK HERO 2.2 All-in-One Printer
FCC statement
Regulatory compliance
Canadian statements
European compliance statement
ENERGY STAR Qualified
Power supply information
German compliance statement
REACH Article 33 declarations
Warranty
Warranty Information
Warranty Coverage
Declaration of Conformity