Page
Important Safety Instructions
Handling of the internal hard drive
Data handling
Iii
Conventions in this manual
About this manual
Table of Contents
Basic functions
Disk
Vii
Viii
Programs and combinations
Main features
Overview
HI Hyper Integrated synthesis system
Dual polyphonic arpeggiator
Sampling
Sequencer
Song Play
Front panel
Front and rear panel
Disk key
Sampling key
Play key
Global key
Locate key
Pause key
REW key
FF key
Rear panel
Midi in connector
Scsi connector
Midi Thru connector
Midi OUT connector
Names and functions of objects in the LCD Screen
Menu button
Check box
Radio buttons
Tab
Analog audio input connections
Connections
Analog audio input connec- tions
Connecting the power cable
Connecting pedals
Analog audio output connec- tions
Connections to Midi equipment
Installing options
Scsi device connections
Connections to Midi equip- ment/computers
Overview of the modes
Program mode
Combination mode
Basic concepts
Global mode
Sequencer mode
Song Play mode
Sampling mode
About polyphony
Number of voices in each mode
Tone generators and oscillators
Selecting modes
Basic operation
Selecting pages
Bank INT-A-INT-G, EXB-A-EXB-G keys
Setting a parameter
Value controllers
Numeric keys 0-9, Enter key, key, ./10’s Hold key
Keyboard input
Popup buttons and popup menus
Press the rear panel Power switch to turn on the power
Turning the power on/off
Turning the power on
Turning the power off
Listening to a demo song
Loading the demo song data in Disk mode
Playing a cue list
Contents of the disk
Selecting the program bank
Selecting and playing a program
Selecting a program
Selecting a program number
Selecting programs from the Program Select popup menu
Using 10’s Hold to select programs
Using a connected switch to select programs
Selecting programs by category
Selecting the combination bank
Selecting and playing a combination
Selecting a combination
Selecting a combination number
SW1, SW2
Using controllers to modify the sound
Joystick
Ribbon controller
Knob 1 LPF Cutoff
Mode controls
Realtime Controls 1, 2, 3
Lock function
After Touch
Value slider
Keyboard
Velocity
Assignable Foot Pedal
Foot pedals/Switch
Assignable Foot Switch
Damper Pedal
Adjusting the arpeggiator tempo
Using the arpeggiator while you play
Using the arpeggiator in Program mode
Settings using controllers
Settings in the LCD screen
Select the arpeggiators that will run
Using the arpeggiator in Combi- nation mode
Synchronizing the arpeggiator to your key- board timing
Sounding both the arpeggio notes and the notes you play
Creating a user arpeggio pattern
Other settings for the arpeggiator
Checking the structure of a user arpeggio pattern
Linking the arpeggiator to program, combinations
Press a key
Shutdown Keys
Pattern Assignable
Make sure that the Rppr check box is checked
Writing a program
Simple program editing
Performance Edit
Realtime controls
Press the Prog. Select tab
Simple combination editing
An example of editing
Selecting the program for a timbre
Adjusting the volume
Adjusting the stereo position
Writing a Combination
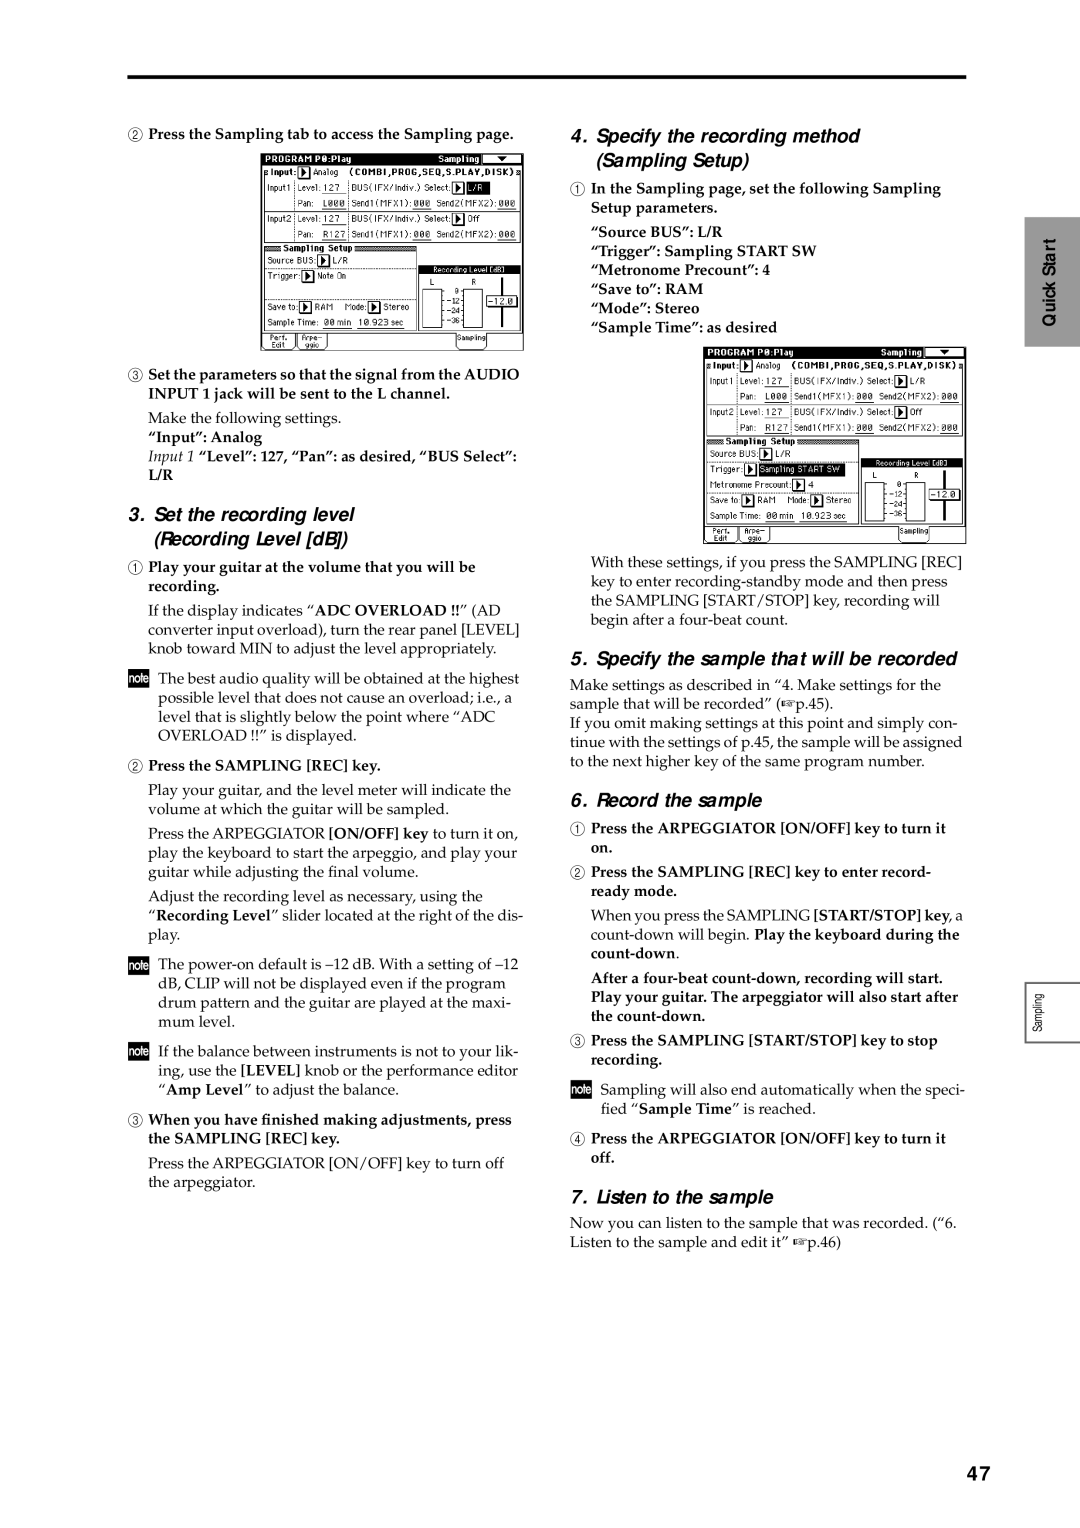
Press the Sampling REC key
Connect a mic and make input settings Input
Sampling recording a sample
Set the recording level Recording Level dB
Create a multisample and indexes
Specify the recording method Recording Setup
Play consecutive notes on the keyboard
Record a sample
Press the Create button to create a new index
Play the keyboard
Assigning a name to the sample or multisample
Naming a multisample
Naming a sample
Converting a multisample into a program
Saving sample data
Sampling and looping a drum phrase
Play back the audio source that you want to record
Make loop settings
Specify the recording method Recording
Record the sample
Button
Select the page menu command Grid to access the dialog box
Set End
Make settings for the sample that will be recorded
Resampling an arpeggiated phrase in Program mode
Adjust the recording level Recording Level dB
Specify the recording method Sampling Setup
Press the Sampling START/STOP key to stop recording
Listen to the sample and edit it
Select the program that you want to sam- ple
Connect your guitar and make input set- tings
Input Analog Input 1 Level 127, Pan as desired, BUS Select
Play your guitar at the volume that you will be recording
Specify the sample that will be recorded
Listen to the sample
Using the metronome
Examples of sampling settings
Press the OK button to copy the pattern
Producing a song
Creating the basic song
Press the OK button to load the template song
Recording the bass track
Press the Sequencer REC/WRITE key
Recording arpeggio patterns
Set From Measure to
Recording other tracks
Step recording
Set Track Select to Track 08 Lead Synth
Naming a track
Using controllers to record tonal changes
Naming the song and tracks
Naming a song
Press the OK button to save the data
Saving the song
Saving to various types of media
Saving data
Types of data that can be saved
Writing to internal memory
Writing a program or combination
Using a page menu command to write
About preloaded data and preset data
Writing to internal memory
Assigning a name Rename
Using the Sequencer REC/WRITE key to write
Memory protect
Write Select
About the Edit Buffer
Types of media that can be used
Saving on media
Press the Disk key to enter Disk mode
How to save data
Formatting media
Other ways to save
If the data does not fit on one volume of media floppy disk
Midi data dump
Types of data that can be loaded
Loading data Restoring the factory settings
Loading data/Restoring the factory settings
Loading data
Drum Kits
Loading individual banks from a .PCG file
Programs
Combinations
EXB-PCM series
Contents of the included floppy disk
Loading data by individual item or bank
Insert the included floppy disk, and select the .PCG file
Select the page menu command Load Selected to load the data
How a program is organized
Program settings
Basic program editing
Program Basic
Oscillator settings
OSC Basic
Rev Reverse check box
When Oscillator Mode = Double
When Oscillator Mode = Drums
Selecting a multisample
Velocity Zone
Pitch settings
Controller Setup
P2 Edit-Pitch
Filter1
Filter settings
P3 Edit-Filter
Pitch EG
Filter1 EG
Amplifier settings P4 Edit-Amp
Filter1 Mod.
Filter1 LFO Mod.
Amp Mod.
Amp1 Level/Pan
Amp1 EG
Master Effect settings P9 Edit-Master Effect
LFO settings
Arpeggiator settings P7 Edit-Arpeggiator
Insert Effect settings P8 Edit-Insert Effect
Basic combination editing
Combination settings
Suggestions for editing procedure
How a combination is organized
Edit-Program/Mixer
Timbre 1-8 program, pan and volume P1 Edit-Program/Mixer
OSC
Midi Ch
Pitch
Other
Midi filter settings P3 Edit-MIDI Filter
Key Zone page Key zone settings
Delay ms
Vel Zone page Velocity zone settings
Arpeggiator settings P7 Edit-Arp
Insert Effect settings P8 Edit-Insert FX
Master Effect settings P9 Edit-Master FX
Producing songs
Features of the sequencer
Cue List
Structure of Sequencer mode
Songs
Patterns
Preparations for recording
Recording a pattern
Recording methods
Realtime recording on a track
Recording a track
Manual punch-in
When you finish playing, press the Sequencer START/STOP key
When you finish recording, press the Sequencer REC/WRITE key
Overdub
Multi multitrack recording
Loop All Tracks
Realtime-recording to a pattern
When the song ends, stop the external sequencer
Step recording
Event Edit and Create Control Data
Control data in pattern recording
Using the arpeggiator for pattern recording
Naming a song
Setting the number of measures in the song
Song editing methods
Copying a song
Changing the key transposing/ modulating
Select the page menu command Shift/Erase Note
Mute tracks
Add a song to the Step area
Creating and playing a Cue List
About editing
Select Sequencer P1 Cue List
Creating multiple songs for use in a cue list
Using a foot switch to switch the Step
Create a new song. p.88 Specify the program for each track
Select the Sequencer P6 Pattern/RPPR, Rppr Setup
Converting a song
Creating Rppr data
Select Sequencer P0 Play/REC Check the Rppr check box
Rppr playback
Play Rppr while a song plays back
Take your finger off the C#2 key, and press the D2 key
Select the P0 Play/REC, Program T01-08
Realtime-recording an Rppr performance
For each Rppr pattern, set Sync to SEQ
Do not check Key Sync
Record the Rppr pattern playback and arpeggio per- formance
Recording the sounds of a combi- nation
Press the OK button to execute the copy
Correction required*2
Compare function
Triton Studio song data and its compati- bility
Operations for which Compare is available
Track status status
Memory Protect
About Midi
Operations for which Compare is not available
Sampling in Program, Combination, and Sequencer modes
Sampling settings
Features of sampling on
Editing in Sampling mode
Link with Crossfade function allows you to join
How Sampling mode is organized
Sampling frequency and bit resolution
100
Samples
Using multisamples
Samples and Multisamples
101
Preparations for sampling
Connecting an input device and making Input settings
Connecting an input device
Input settings
Basic
Setting the recording level Recording Level dB
103
Functions
Use Trigger to specify how sampling will begin
Sampling mode
104
Source BUS, select the source that you want to sample
Program, Combination, Sequencer modes
105
Recording level and Auto +12 dB On
Optimizing the sample memory RAM
Creating multiple samples
Sampling and editing in Sampling mode
Creating multisample indexes and sampling
106
107
Applying an insert effect to a sample and resampling it
Verify the region that will be ripped
Ripping
108
Ripping digital data from an audio CD as a sample
Execute sampling
Specify the recording method in Recording Setup
Adjust the recording level. Press the Sampling REC key
109
Grid display
Loop settings
Select the sample for which you wish to make loop settings
110
Editing the indices
Sample waveform data editing
Multisample editing
111
112
Modifying the settings of an index
Using samples in a drum kit
Converting a multisample to a program
If you want to create the performance data in a pattern
113
Press the Save button
Press the Save button to save the data
Press the Sequencer START/STOP key to start playback
114
Song Select, choose
Set the recording level
Sampling in Program, Combina- tion, or Sequencer modes
115
Connect your guitar to the rear panel Audio Input 1 jack
116
117
To add the file, press the Insert button
Access the Disk mode Make Audio CD
Creating an audio CD from Wave files Sampled to hard disk
118
119
SMF Standard Midi File playback
Structure of Song Play mode
120
Starting/stopping playback for each song
Playing SMF data
121
Direct playback from external media such as a floppy disk
Saving a Jukebox list
Playback using the Jukebox func- tion
Saving procedure
Loading procedure
Arpeggiator
Playing along with SMF data
123
Minus-one play
124
Settings for the entire Triton Studio Global settings
Tuning to another instrument/ Transposing
Bypassing the effects
125
Recalling the last-selected mode and page at power-on
126
Creating original scales
Changing the scale
Multisample programs and drum kit programs
Drum kit settings
About drum kits
127
128
Editing a drum kit
About the ROM drum samples
Use BUS Select to specify the output routing
Use the page menu command Write Drum Kits to save the data
129
Set the Exclusive Group
Arpeggiator on/off
Arpeggiator settings
Arpeggiator settings for a pro- gram
Arpeggiator settings
131
Adjust the settings of the various parameters
Linking the arpeggiator to a program
132
Arpeggiator settings in Combina- tion and Sequencer modes
Combination INT-C005 In The Pocket
133
Linking the arpeggiator to the combination
Combination INT-D080 Old Vox Organ
134
Creating an user arpeggio pat- tern
About user arpeggio patterns
Editing a user arpeggio pattern
Creating an example pattern
135
Tone10 key
Program mode, select a drum kit program
136
Drum pattern
Chordal pattern
Set the parameters for each step
Make settings for Tone No. and Fixed Note No
Dual arpeggiator editing
137
Synchronization between arpeggiators a and B
Synchronizing the arpeggiator
138
Categories of the 102 effect types
Effects settings
Effects in each mode
139
Routing
Routing settings and effect set- tings
Effect settings for a program
140
Master EQ
Effect settings in Combination, Song, and Song Play modes
141
Master effects
142
Effect settings in Sampling mode
Master effects Master EQ
143
Effect settings for Audio Input
Set the parameters for Input1
About dynamic modulation Dmod
Setting example
Using Dmod to modify the feedback level from SW1 key
Rotate the Tempo knob, and the delay time will change
145
Setting the function of SW1 and SW2
Adjusting the contrast brightness of the LCD screen
Other functions
Shortcuts
Sounding a beep when the LCD screen is pressed
Using the Triton Studio as a data filer
Setting the calendar function
Audio input and output
Troubleshooting
Power supply
LCD screen
Can’t input sound
148
Can’t output sound from an audio CD
149
Program, Combination
Song
Sampling
150
Drum kits
Arpeggiator
Effects
Internal hard drive, external devices
Media
151
Floppy disk
Other
Wave files
152
Specifications
Specifications and options
153
154
Options
155
Midi implementation Chart
[Music Workstation/Sampler]
Numerics
Index
156
LPF Cutoff
157
81, 99, 102, 112, 115, 138
158
Korg INC