User Guide
Page
Table of Contents
Copy
117
101
103
105
143
139
140
141
This manual uses the following symbols
How to Read the Manuals
Symbols Used in the Manuals
Code Xxxx
Model-Specific Information
Names of Major Features
Page
You can search for a description by what you want to do
Saving Paper
Converting Documents to Electronic Formats Easily
Registering Destinations
Operating the Machine More Effectively
Icons of each function are displayed on the Home screen
Customizing the Home Screen as You Like
Making Copies Using Various Functions
Printing Data Using Various Functions
Utilizing Stored Documents
Using the Scanner in a Network Environment
Preventing Information Leakage Security Functions
Monitoring and Setting the Machine Using a Computer
Preventing an Unauthorized Copy
Front
This chapter describes how to start using this machine
Guide to Names and Functions of Components
Getting Started
Rear
Guide to Functions of the Machines External Options
Guide to Functions of the Machines Options
CPL005
Login/Logout key Press to log in or log out
Page
How to Use the Home Screen
Adding Icons to the Home Screen
Adding icons to the Home screen using the User Tools
Adding icons to the Home screen using Web Image Monitor
How to Use the Home Screen
Getting Started
Registering Functions in a Program
Press the Program key
Example of Programs
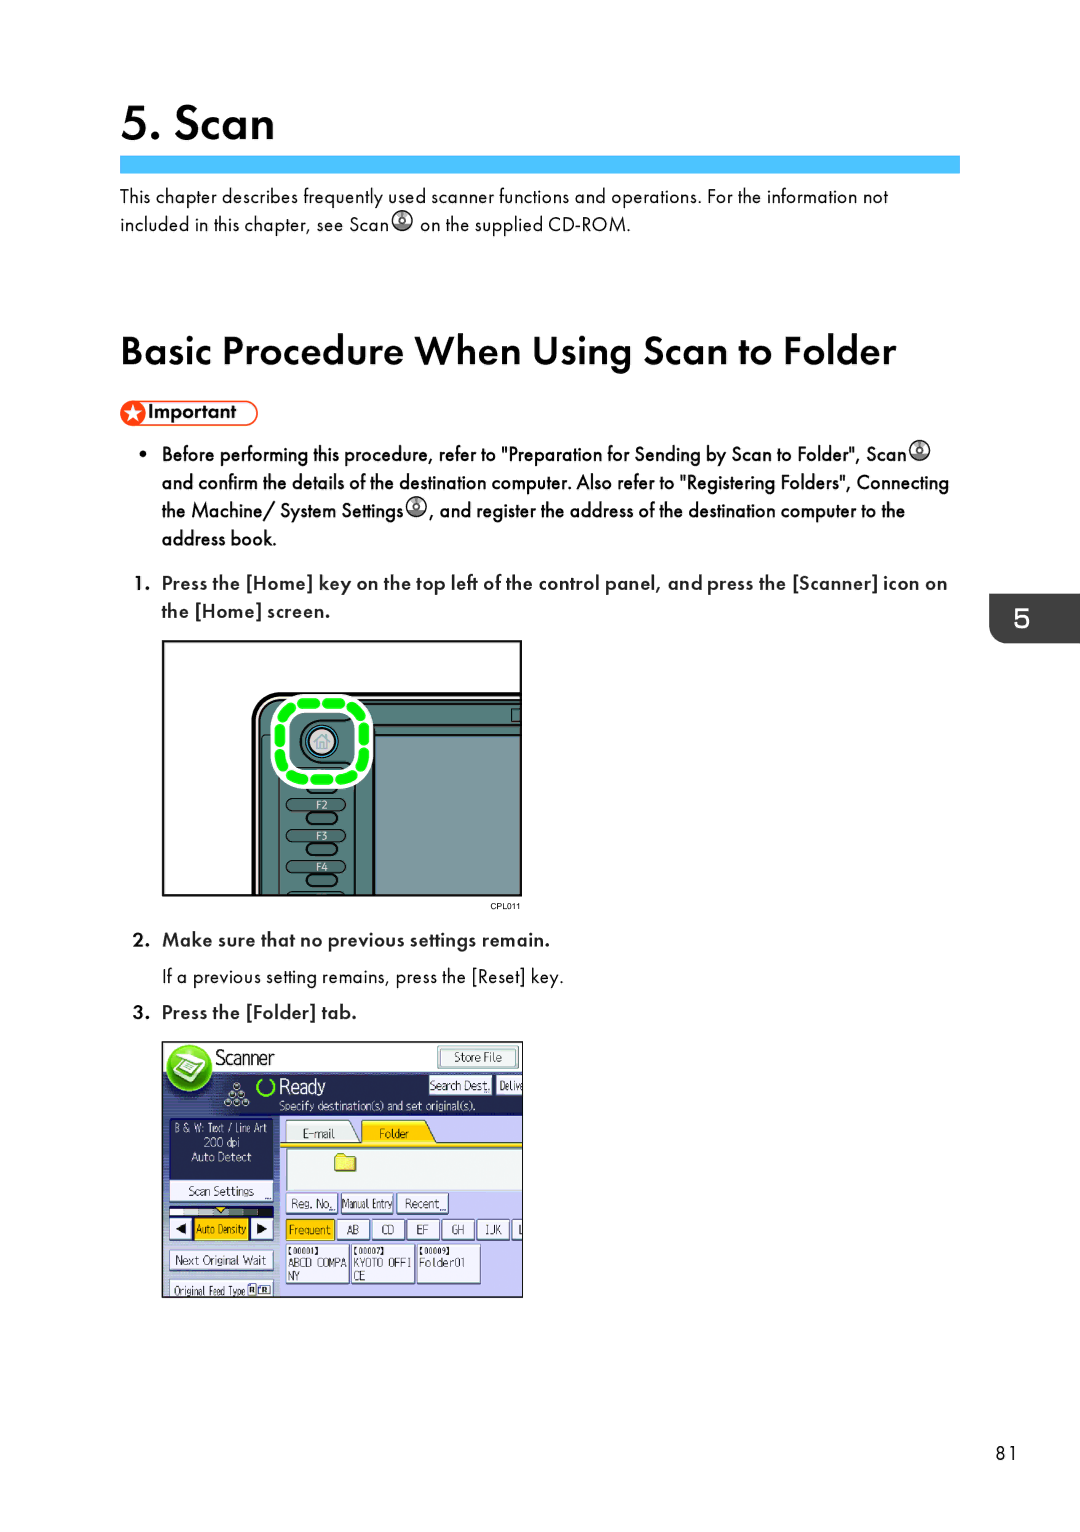
Scan An important document such as a
Program name Program description Effect Long-term storage
Scan Name Suitable for long-term storage Unified-size scan
You can add a digital signature to
Turning Off the Main Power
Turning On/Off the Power
Turning On the Main Power
Getting Started
Logging In Using the Control Panel
When the Authentication Screen is Displayed
User Code Authentication Using the Control Panel
Logging Out Using the Control Panel
Placing Originals on the Original Table
Placing Originals
Align the original with the fold of the carrier sheet
Scanning an Original Using a Carrier Sheet
Stopping originals from feeding
Placing Rolled Originals
CPT035
Copy
Basic Procedure
Place the original on the original table
Reducing or Enlarging Originals
Preset Reduce / Enlarge
You can specify the reproduction ratio in increments of 0.1%
Zoom
You cannot use the paper bypass location with this function
Auto Reduce / Enlarge
User Auto Reduce / Enlarge
JIS, B4 JIS B1 JIS B2 JIS B3 JIS
Copy
Landscape originals
Combined Copying
CKN016
Synchro Cut
Preset Cut
Specifying the Length of Copy Paper Cut
Synchro Cut
364 mm
515 mm
Variable Cut
Copy
, select Matches
Copying from the Paper Bypass Location
Copy
Copying from the Paper Bypass Location
Storing Data in the Document Server
Using the SmartDeviceMonitor for Client port
Installing the Printer Driver for a Network Connection
Installing the Printer Driver for the Selected Port
Using the Standard TCP/IP port
Click Finish
Using the IPP port
Installation starts
Using the LPR port
Proceed to step
Using the SmartDeviceMonitor for Client port
Windows Vista, Windows Server
Changing the port settings for SmartDeviceMonitor for Client
Windows 7, Windows Server 2008 R2
Using Windows Print Server as a Network Printer
Windows XP, Windows Server 2003/2003 R2
Installing the Printer Driver for USB Connection
Windows 7, Windows Server 2008 R2
Windows Vista, Windows Server
Click Next
Displaying the Printer Driver Properties
Standard Printing
Sending a Locked Print File
Printing a Locked Print File Using the Control Panel
Locked Print
Locked Print
You can optionally set a file name of a Hold Print file
Printing a Hold Print File Using the Control Panel
Hold Print
Sending a Hold Print File
Hold Print
Sending a Stored Print File
Printing a Stored Print File Using the Control Panel
Stored Print
Press Print
Print
Scan
Basic Procedure When Using Scan to Folder
You can specify multiple destinations
Confirming the user name and computer name
User name is displayed under Username
Configure the access permissions for each group and user
Keys you can select are as follows
Specifying access privileges for the created shared folder
Registering an SMB Folder
Press Connection Test to check the path is set correctly
Locating the SMB folder manually
Locating the SMB folder using Browse Network
Deleting an SMB Registered Folder
You can press Up One Level to switch between levels
Entering the Path to the Destination Manually
Basic Procedure for Sending Scan Files by E- mail
Registering an E-mail Destination
Deleting an E-mail Destination
Entering an E-mail Address Manually
User Name
Basic Procedure for Storing Scan Files
Checking a Stored File Selected from the List
Specifying the File Type
Specifying Scan Settings
Storing Data
Document Server
Document Server
Press the Start key
Printing Stored Documents
100
Web Image Monitor is divided into the following areas
Displaying Top
102
Adding Paper and Ink
Precautions for Loading Paper
104
Loading Paper into the Paper Input Location
106
107
108
Make sure that Ready appears on the screen 109
110
111
Make sure the edge of the paper feeds out of the machine
112
Insert the spool into the left flange
114
When loading a 76.2 mm 3 inches paper roll, proceed to step
115
Replace the bars of the output basket
Adding Paper and Ink
Press the User Tools/Counter key
118
Loading Paper into the Paper Bypass Location
Open the front cover
Close the front cover
Specifying regular sizes using the control panel
123
If a custom size is already specified, press Change Size
124
Specifying paper type using the control panel
125
Mm, 880 mm, 914 mm 36 inches 126
Recommended Paper Sizes and Types
This section describes recommended paper sizes and types
Inches, 620 mm, 625 mm, 660 mm
Mm, 880 mm, 914 mm 36 inches 127
Inches, 36 inches 128
Inches, 36 inches 129
660 × 420 mm , 625 × 880 mm , 625 ×
A0 , A1 A3 , A4 B1 JIS Thin Paper-Plain Paper B2 JIS
800 ×
B2 JIS B3 JIS B4 JIS Thin Paper-Plain Paper 880 × 1230 mm
880
× 615 mm
Film Matted Cut paper Sheet 51-190 g/m 2
A0 , A1 A3 , A4 B1 JIS
Plain Paper-Thick Paper B2 JIS B3 JIS B4 JIS 880 × 1230 mm
A0 , A1 A3 , A4 B1 JIS Plain Paper-Middle Thick B2 JIS
A0 , A1 A3 , A4 B1 JIS Thin Paper-Middle Thick B2 JIS
22 × 34 , C
Thin Paper-Thick Paper 34 ×
80-125 g/m 2 Regular size Engineering
22 × 34 , C
Paper Roll
Straighten curled or warped paper before loading
Cut Paper
Translucent Paper
Adding Ink
CPW008
Ink
Sending Scanned Documents When Ink Has Run Out
Storing ink
Handling ink
145
Used print cartridges
Replacing an Ink Collector Unit
CPW009
148
Maintenance
Indicators
This chapter describes basic troubleshooting procedures
Jammed Paper, Troubleshooting
Check Status screen
When an Indicator for the Check Status Key Is Lit
Administrator
Status Error Occurred Error has occurred. Then check
When Messages Are
For details about connecting to
Panel Tone
When You Have Problems Operating the Machine
Minutes, contact your service
Your service representative
Main power switch while
Switch and make sure the main
Frequency and duration
Problem Causes Solutions Please wait. appears
For details about how to log in when
Displayed Code Authentication
Cover before setting the paper
Authentication is set Getting Started
Entered Login User
Name and Login Password, see
Cannot specify the paper
Problem Causes Solutions
Paper Specifications and Adding
Switch to the Copier screen,
Print is disabled
Print is disabled Ink has run out
Disabled if only one of the four ink
Replacement procedure, see
Power, Getting Started
Power indicator goes out, and then
Wait. Main power will be
Details about turning the main power
To view the status of a print job
Canceled
Limit. is specified, users
Cannot print beyond their Guide
Checking Whether a Nozzle is Clogged
When Print Results Are Not Satisfactory
Checking Whether the Print-heads Scratch the Paper
Troubleshooting
Print Nozzle Check Pattern
Maintenance
If a nozzle is not firing
If a nozzle is not firing, perform head cleaning
Normal print results
Clean Print-heads
Flush Print-heads
Auto Adjust Head Position
Adjustment
Press the User Tools/Counter key
169
Manual Adjust Head Position
170
+1 +2 +3
171
Adjust Print Position
172
173
Adjust Paper Feed
Machine has run out of paper
175
Press the User Tools/Counter key
When Messages Are Displayed on the Control Panel
An appropriate number of pages
Message Causes Solutions
When the message appears on
Max. number of pages per
With this paper size
Message Causes Solutions Please wait
Access privileges. Only You are not authorized to delete
Size of paper for which
Status messages
Messages Displayed When Using the Printer Function
Stop key was pressed
Message Status Setting change
Power switch off, then
While this message is displayed. Wait a while
Cancel a print job. For details
Size, Paper Specifications
Are incorrect Settings are correct, and then
Job, press Job Reset
Select a paper input location
Message Causes Solutions Paper size of n is
Font settings Selected files
Access privileges. Only
Normally
That features password protection or
When the size of selected file
Exceeds 1 GB, print by using a
Other messages
To compress the data is
Authentication or Windows Authentication failed
Information has failed Information for Ldap
Full Classification Code is Classification code
Files of Document Server
Error has occurred Syntax error, etc Occurred
Send
Maximum file capacity
Exceeded max. pages Number of pages
Maximum Delete some of the files stored
Maximum page capacity
Was exceeded
Information for user
Size to a larger value
Reduce the number of files being
Sent to the machine
Logged in user is not For details about how to set
Job Reset is automatically Specify the correct paper type,
Login Password are correct
Has been cancelled Not correct
Messages Displayed When Using the Scanner Function
Path. Please check Name or folder name is
Computer Machine If you are using anti-virus
Address exclusion settings. For
Details about the procedure for
Names, see Specifying the File
Incorrectly configured Cannot write on
Character that cannot be
Device and machine Used
Specify the scan size and resolution
Ldap server, Connecting
Machine/ System Settings
Settings, Scan
Files. For details about how to delete
Different orientation may enable
Details about the settings for scan
Resolution and Scan Size, Scan
As 1 file? File
File being stored has Specify whether to store the data or
Exceeded the maximum Not. Scan the pages that were not
Number of pages for one
Memory is full. Cannot
Resolution. For details about
Resolution, see Various Scan
Cancel to delete To the memory device 197
Free hard disk space
Message Causes Solutions Memory is full. Scanning
Was canceled Later
For details about how to set Smtp
Use. File name cannot be
Use. Password cannot be Password of a file whose
Then change the password
You cannot change
Folders function cannot contain
Check the current status Network error occurred
Status Correctly Network error, contact your Administrator
Specifying the File Name, Scan
Function Selected function 201
Updated from the network
Destinations or senders Using Web Image Monitor
Name again
Data is too small
Check the resolution Specified in Specify Size Again
Capacity Too large for the scale ratio
Start key again Size of the scanned Data being scanned is
Mime or the certificate
Device certificate is invalid
New device certificate S/MIME
Certificate is not currently Expired
User certificate
Selected because its
For details about the user certificate
Misaligned Specify the scan size Scanning size 205
When Messages Are Displayed on Your Computer Screen
Scanning mode
Contact your administrator
Machine is not Check that the previously used
Main power switch
Maintenance Using telnet
Scanner used for the previous
Restart scanning Computer Uninstall the Twain driver,
Message Causes Solutions Error has occurred
Error has occurred Application-specified
Setting range of the machine
Relationship between scan
When using halftone or high
Settings, see Relationship
Between Resolution and Scan
Processed. For example, press
Cancel the job that is being
Follow the instructions to cancel
As the Copier function
Connection Tool
Check the scanner Not available because
Connection Tool. For the WIA
Address in the Network
Product names of Windows Server 2008 are as follows 211
Trademarks
This chapter describes the trademarks
Appendix
Index
179
214
211
215
216
2012
EN GB EN US