CommanderTM
California Proposition 65 Warnings
Safety
Electric Shock can kill
Iii
Welding Sparks can cause fire or explosion
Sûreté Pour Soudage a L’Arc
Précautions DE Sûreté
Master Table of Contents for ALL Sections
Table of Contents Installation Section
Technical Specifications Commander 500 K1639-1
Installation
Location / Ventilation
Safety Precautions
Storing
Stacking
Lifting
High Temperature Operation
Towing
High Altitude Operation
PRE-OPERATION Engine Service
Spark Arrester
Muffler Outlet Pipe
Standby Power Connections
Auxiliary Power Receptacles
Welding Output Cables
Machine Grounding
Company
Table of Contents Operation Section
Operation
Safety Instructions
Operating Instructions
General Description
Recommended Applications
Design Features and Advantages
Welding Capability
Controls and Settings
K1639-1 Commander 500 Standard Model
Idler Switch
RUN/STOP Switch
Start Pushbutton
Fuel Level Gauge and Light
Welding Terminals Switch
Weld Mode Output Control
Table B.1 Weld Mode and Output Control Functions
Hour Meter
Auxiliary Power Controls
Starting the Engine
Engine Operation
BREAK-IN Period
Typical Fuel Consumption
Stick Welding
Welder Operation
Constant Current CC Welding
TIG Welding
Commander 500 Settings When Using the K930-1 TIG Module
Commander 500 Settings When Using the K799 HI-FREQ Unit
Table B.3 Typical Current RANGES1 for Tungsten ELECTRODES2
TIG Torch
Wire Feed Constant Voltage Welding
Auxiliary Power Operation
Simultaneous Welding and Auxiliary Power Loads
ARC Gouging
Permissible Permissible Auxiliary
Extension Cord Recommendations
Table of Contents Accessories Section
OPTIONS/ACCESSORIES
Accessories
Field Installed Options
Stick Welding Accessories
Connection of Lincoln Electric Wire Feeders
Semiautomatic Welding Accessories
Other Wire Feeders for the Commander
High Frequency Generators for TIG Applications
To Work Electrode Cable To Wire Feed Unit
ING CV
ING CV
ING CV
Figure C.5 Commander 500/LN-23P Connection Diagram
ING Terminals Always on
Table of Contents Maintenance Section
Routine and Periodic Maintenance
Maintenance
Engine Maintenance
Daily
Figure D.1 OIL Drain and Refill
Fuel Filters
Figure D.2 Fuel PRE-FILTER/WATER Separator Assembly
Figure D.3 Secondary Fuel Filter
AIR Filter
Maintenance
Table D.2 Engine Maintenance Parts Manufacturer Part Number
Frequency Maintenance Required
Connecting a Battery Charger
Battery Maintenance
WELDER/GENERATOR Maintenance
Figure D.5 Major Component Locations
Table of Contents Theory of Operation Section
Commander
Theory of Operation
Commander
Weld WINDINGS, RECTIFIER, Power Modules and Feedback
Analog Control Power Supply Board and Weld Control Board
Insulated Gate Bipolar Transistor Igbt Operation
6E-6
Pulse Width Modulation
Minimum Output
Maximum Output
70-80VDC
External DC Solid State Inductor ARC Source Switch Diode
Chopper Technology Fundamentals
Section F-1
Table of Contents
Troubleshooting & Repair Section
HOW to USE Troubleshooting Guide
Troubleshooting & Repair
PC Board can be damaged by static electricity
PC Board Troubleshooting Procedures
Detailed in the beginning of this manual
Troubleshooting Guide
Observe Safety Guidelines
Perform the Rotor Resistance
Justment Test
Function Problems
Charging Circuit Test
Engine Problems
Shutdown
Perform the Idler Solenoid
Symptoms Misadjustments Course of Action
Problems Possible Areas
Engine Starting Diagnostic Chart
Return
START-UP and OCV Diagnostic Chart
Materials Needed
Case Cover Removal and Replacement Procedure
Description
Procedure
Case Cover Removal Replacement Procedure
Figure F.1
Removal
Case Front Knobs Removal and Replacement Procedure
Power Module Capacitor Discharge Procedure
Procedure
Test Description
Idler Solenoid Test
Figure F.5 Idler Solenoid Leads
Test Procedure
Shutdown Solenoid Test
Figure F.6 Shutdown Solenoid Lead Terminals
Engine Throttle Adjustment Test
Strobe-tach Method
Figure F.7 Strobe Mark Location Mark Blower Paddle Here
Locking NUT
Oscilloscope Method
28F-28
Frequency Counter Method
Rotor Resistance Test
Test Procedure
Flashing and Rotor Voltage Test
Lead # 201A
10 11 12 13 14 15
Troubleshooting & Repair
Stator Voltage Test
Figure F.13 Front Control Panel Removal Screws
Troubleshooting & Repair
Behind Panel
Auxiliary Power and Weld Windings Test
Auxiliary Leads #5B, #5E, #8, #9, #11, #12
Weld Winding Lead Connections
W6W1
Analog Power Supply PC Board Voltage Test
J41
Control Circuit Input Power
40F-40
Test Points Component Tested Voltage Reading
Analog Control Power Supply PC Board Test
Output Rectifier Bridge Test
Perform the Power Module Capacitor Discharge Procedure
Troubleshooting & Repair
Figure F.20 Diode Lead Removal
Power Module Test
W10
Temperature Switch
Power Module PC Board Diode Lead D4 Positive + Strap
Check Igbt For Shorts
Check Diode Module
When all tests are complete
Charging Circuit Test
#239 #281 #238
Figure F.24 Engine Alternator Location
Normal Open Circuit Voltage Waveform 115VAC Supply
Scope Settings
High Idle no Load
15.8 ms Volts 50V5ms
Volts 50V5ms
Normal Open Circuit Voltage Waveform Stick
MAX TAP MAX Control POT High Idle no Load
Volts 20V0.1ms
Normal Weld Voltage Waveform Stick CC
Machine Loaded to 500 Amps AT 40 Volts
Normal Weld Voltage Waveform Wire CV
Volts 10V50ms
Normal TIG Mode Voltage Waveform
Loaded to 200A 16 Volts
MAX Control POT High Idle no Load
Normal Open Circuit Voltage Waveform Wire CV TAP
Shutdown Solenoid Removal and Replacement
Figure F Shutdown Solenoid Lead Connections
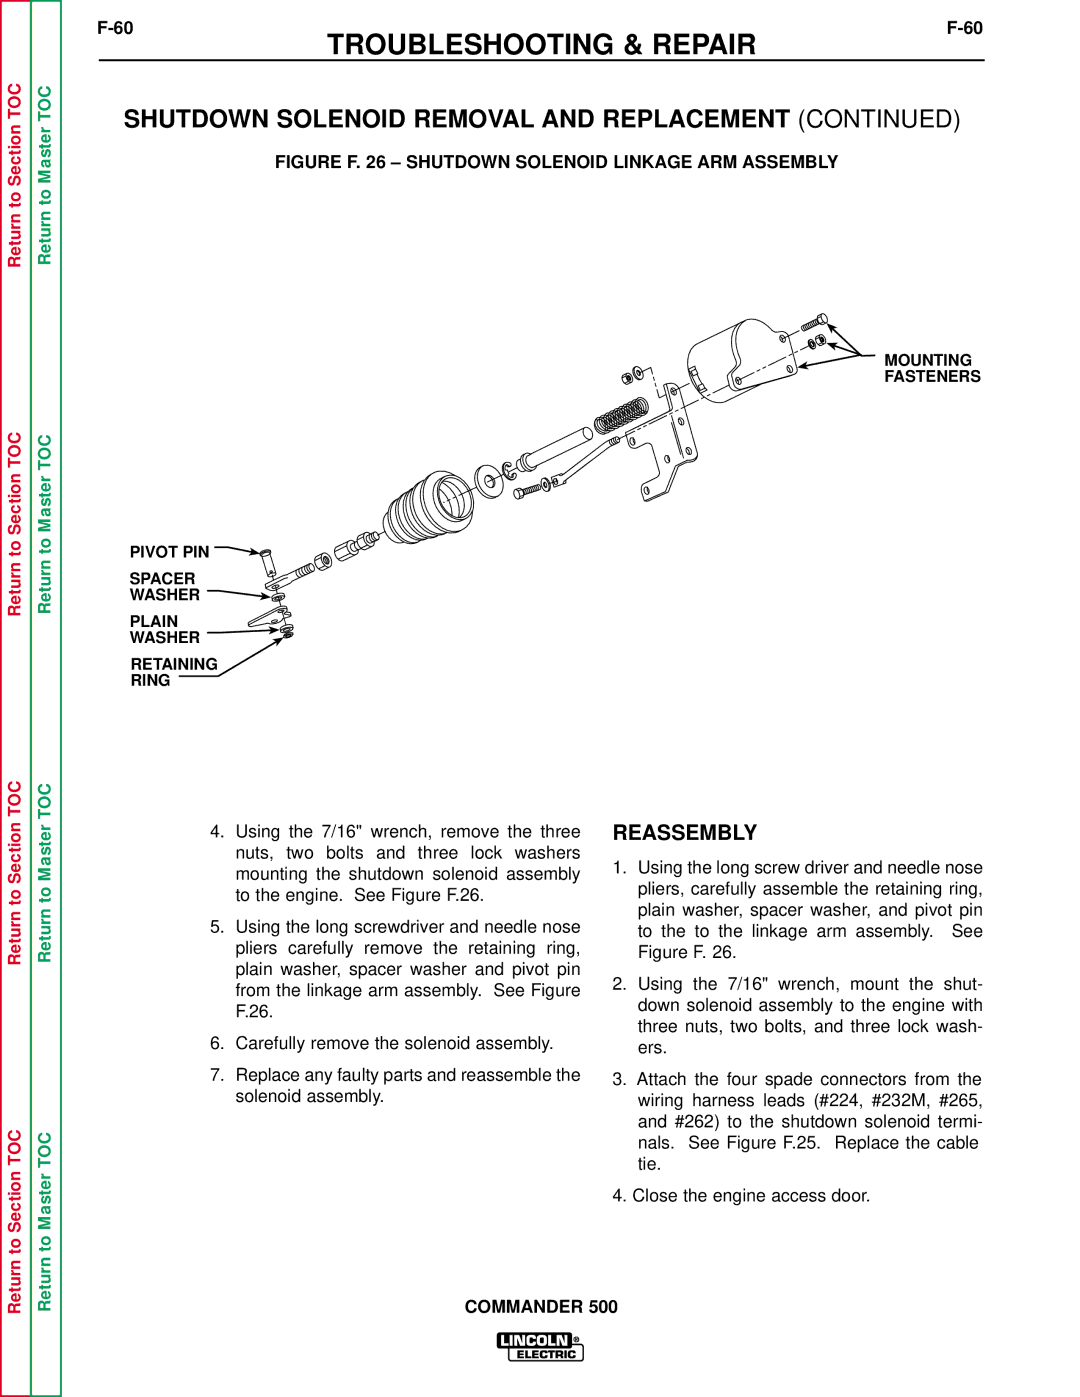
Figure F Shutdown Solenoid Linkage ARM Assembly
Reassembly
Description
Control Panel Removal Screws Front Green Ground Lead
Figure F Power Module Capacitor Lead Removal
Troubleshooting & Repair
Replacement Procedure
Description
Figure F.30 Power Module PC Board
Power Module PC Board Removal
Power Module PC Board Replacement
Diode Module Removal
Diode Module Replacement
Output Rectifier Bridge Diode Removal and Replacement
Refer to Figure F.32 Turn the engine off
Diode Stud Size Foot Pounds Inch Pounds
Return Section TOC
STATOR/ROTOR Removal and Replacement
Plug Fuel Lines Bolts
Preparation and Lead Removal Procedure
Leads #229 #242D
Filter Field Diode Capacitor
#200D #5P #201 #201A
#232M
Figure F.35 Brush Holder and Lead Removal
Figure F.37 Alternator Shroud Removal Screws Acoustical Foam
Figure F.38 Lift Frame and Associated Component Removal
Figure F.39 Stator Removal
Stator Removal Procedure
Reassembly Notes
Rotor Removal Procedure
Output Panel and Control BOX
Lead Reconnection Checklist
Engine
Retest After Repair
Welder CV Wire Output
Engine RPM
Welder DC Stick Output
Auxiliary Power Output
Touch Start TIG Mode Output
Table of Contents Electrical Diagrams Section
Electrical Diagrams
Electrical Diagrams
G3834
Schematic Complete Machine Commander
Schematic Battery PC Board
Return to Section
PC Board Assembly Battery PC Board
PWM Input
Schematic Chopper PC Board
Return to Section Return to Section TOC
PC Board Assembly Chopper PC Board
Schematic Peripheral PC Board
Return to Section
PC Board Assembly Peripheral PC Board
Schematic Power Supply Analog PC Board
PC Board Reference QTY Designators Description
PC Board Assembly Power Supply Analog PC Board
Schematic PULL-COIL PC Board
MOSFET/HEATSINK ASBLY,T12704-82&S1810
PC Board Assembly PULL-COIL PC Board
Schematic Weld Control PC Board Sheet
Electrical Diagrams
Electrical Diagrams
Electrical Diagrams
Electrical Diagrams
RESISTOR,SMD,METAL FILM,1/10W,150OHMS
PC Board Assembly Weld Control PC Board
SVM Error Reporting Form