7530 G2 Hand-Held Computer
Page
Copyright 2006 by Psion Teklogix Inc., Mississauga, Ontario
Return-To-Factory Warranty
Service
2002/96/EC
Disclaimer
RoHS Logo
Page
Table of Contents
Contents
Getting To Know Your 7530 G2
Configuration
Working With Windows CE
Peripheral Devices & Accessories
Contents
Appendix C USB Setup Application
Specifications
Appendix a Support Services And Worldwide Offices
Appendix B Port Pinouts
Program License Agreements
Microsofts End User License Agreement
Psion Teklogix Inc. End User License Agreement
License Agreement
Grant of License
High Risk Activities
COPYRIGHTS, Ownership and Proprietary Rights
Page
Approval and Safety Summary
FCC Declaration of Conformity DoC
Approvals And Safety Summary
CE Marking
TTE Directive 1999/5/EC
FCC Information To Users
Important Note
Emissions Information For Canada
Laser Warnings
Do not Remove Covers or Open Enclosures
To Prevent the battery from leaking acid, generating heat or
Important Charger and AC/DC Adaptor Safety Instructions
Approvals And Safety Summary
Page
Introduction
Page
About This Manual
About This Manual
7530 G2 Features
Text Conventions
Text Conventions
7530 G2 Features
Ansi
7530 G2 Features
About The 7530 G2 Hand-Held Computer
About The 7530 G2 Hand-Held Computer
7530 G2 Hand-Held Computer
7530 G2 Hand-Held Computer
Regulatory Labels
Regulatory Labels
Page
Basic Checkout
Page
Equipment You Need To Get Started
Charging The Battery
Preparing The 7530 G2 For Operation
Preparing The 7530 G2 For Operation
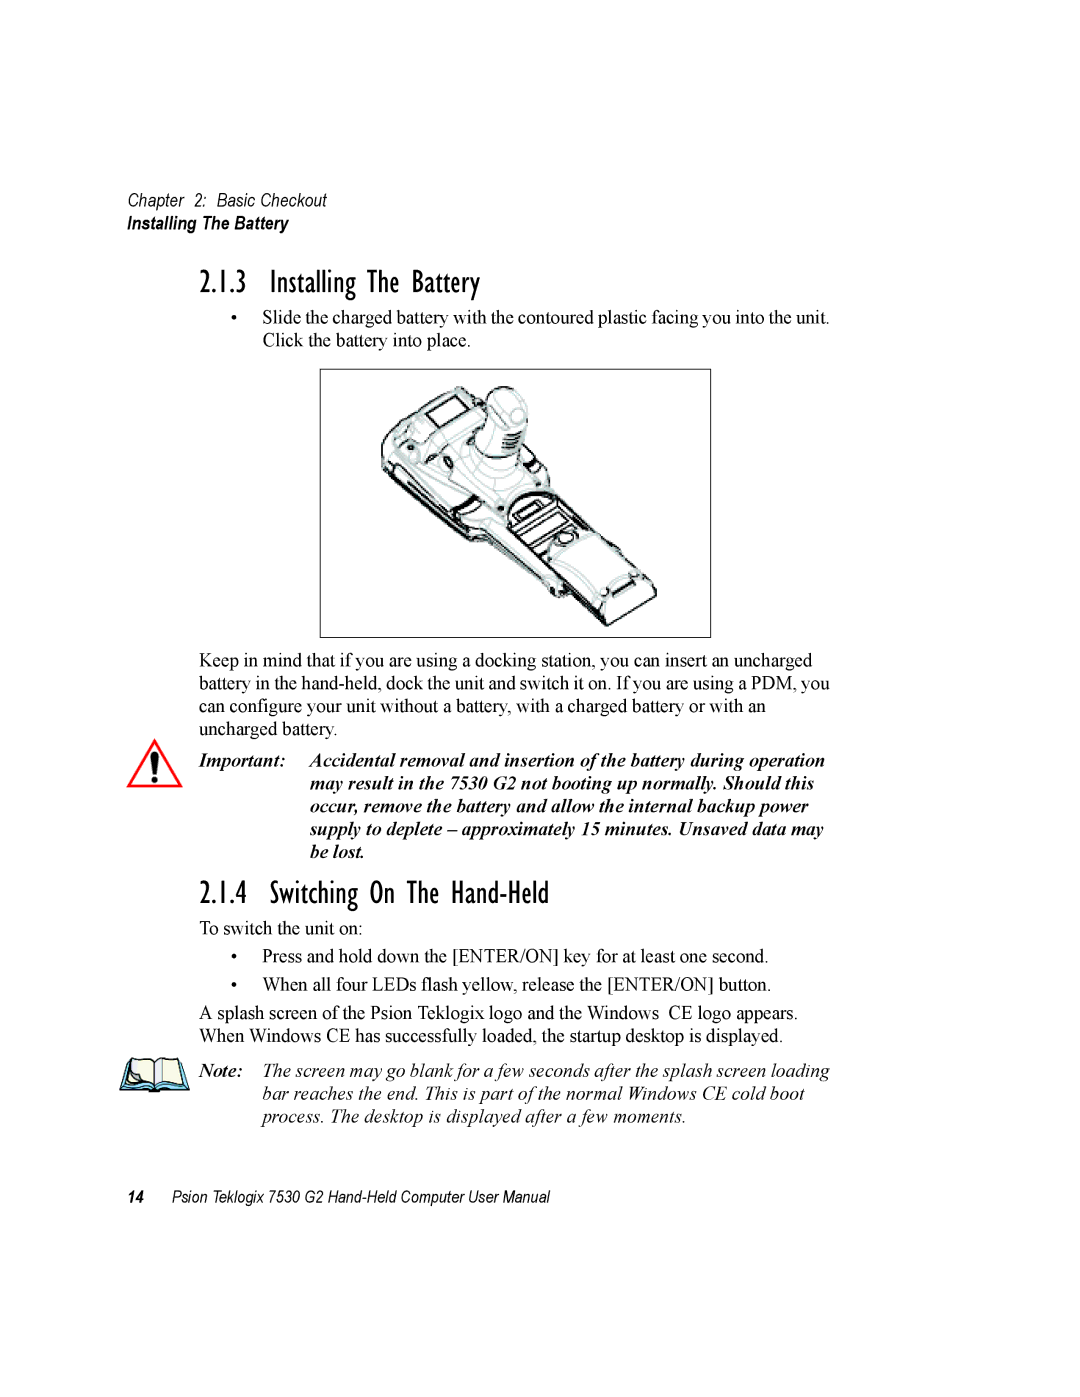
Installing The Battery
Switching On The Hand-Held
Installing The Battery
Attaching Carrying Accessories
Attaching Carrying Accessories
Attaching The Handstrap
Calibrating The Touchscreen
Attaching The Pistol Grip
Attaching The Pistol Grip
Configuring An Ieee 802.11 Radio In The Unit
Configuring An Ieee 802.11 Radio In The Unit
802.11 Wireless LAN Settings Window
Wireless Information Tab
Wireless Properties Dialog Box
Authentication
Accessing Network Key And Key Index
Assigning An IP Address
Assigning An IP Address
Name Servers Tab
Name Servers Tab
Rearranging Preferred Networks
Advanced Features
Advanced Features
Deleting a Preferred Network
Changing Network Properties
Using Microsoft ActiveSync
Checking The Scanner
Changing Network Properties
Cold Reset
Resetting The Hand-Held
Warm Reset
Resetting The Hand-Held
Page
Getting to Know Your 7530 G23
Getting To Know Your 7530 G2
Features Of The 7530 G2
Features Of The 7530 G2
Removing And Installing The Battery Pack
Battery
Battery Safety
Battery Chargers
Keyboard
Keyboard
Activating Modifier Keys
Modifier Keys
Keys
Locking Modifier Keys
Ctrl And ALT Key
Arrow Keys
BKSP/DEL Key
TAB Key
Key Keyboard Function Keys
Function And Macro Keys
Function Keys
Function And Macro Keys
Macro Keys
Key Keyboard Macro Keys
Macro Keys
Choosing a Single Alpha Character
Alphanumeric Keyboard 63-Key
Numeric Keyboard 37-Key
Alphanumeric Keyboard 63-Key
Creating Uppercase Letters
Choosing More Than One Alpha Character From The Same Key
Numeric Keyboard 37-Key
Keypad Backlight
Choosing Multiple Alpha Characters From a Range Of Keys
Keypad Backlight
Display
Adjusting The Display Backlight
Adjusting The Contrast
Calibrating The Touchscreen
Stylus Icon
Calibrating The Touchscreen
LEDs
7530 G2 Indicators
7530 G2 Indicators
Charge LED
Radio Traffic LED
Scan LED
User Application LED
Onscreen Indicators
Onscreen Indicators
Modifier Key Indicators
Windows Start Button
Radio Signal Quality
Battery Gauge
Battery Charge
Narrow Band Radio Signal Quality
Tethered Devices
Audio Indicators
Bluetooth Radio
Docking Device
Adjusting The Beeper Volume
Adjusting The Beeper Volume
Internal Scanners
Scanning Techniques
Scanning Techniques
Operating One Dimensional 1D Internal Laser Scanners
Scan LED Indicators
Troubleshooting
Scan LED Indicators
Operating Internal Two Dimensional 2D Imager Scanners
Connecting & Disconnecting Tethered Peripherals
Connecting & Disconnecting Tethered Peripherals
Monitoring The Battery And Maximizing Run Time
Monitoring The Battery And Maximizing Run Time
Storing Batteries
Storing Batteries
Monitoring The Network Connection
Uploading Data In a Docking Station
Monitoring The Network Connection
General Maintenance
General Maintenance
Cleaning The 7530 G2
Caring For The Touchscreen
Working with Windows CE
Page
Operation
Navigating Using a Touchscreen And Stylus
Navigating Using The Keyboard
Navigating In Windows CE And Applications
Keyboard Navigation
Working With Files, Folders And Programs
Startup Desktop
Startup Desktop
Desktop Icons
Taskbar
Using The Taskbar
Using The Taskbar
Customizing The Taskbar
Taskbar General Tab
Taskbar Advanced Tab
Customizing The Taskbar
Start Menu
Taskbar Security Tab
Start Menu
Assigning The Supervisor Security Level
Security Settings
Desktop
Desktop
Changing a Password
Configuring Security
Changing a Password
ActiveSync
Command Prompt
Programs
Demo
System Tray
Shortcuts
Windows Explorer
Shortcuts
Cycle Tasks
Task Manager
Control Panel
Settings
Settings
Network And Dial-Up Connections
6 Run
Shutdown
Run
Using a Dialog Box
Using a Dialog Box
Suspend
Using a Dialog Box
CONFIGURATION5
Configuration
Configuration
Configuration
Configuration
Page
Remote Desktop Connection
TekTerm Application Pocket PC Compatibility
Remote Desktop Connection
Control Panel
Control Panel
Control Panel Icons
IPv6 Support
Input Panel
Internet Options
Keyboard
Owner
Password
Power
PC Connection
Storage Manager
TweakIT Settings
Remove Programs
Stylus
Wireless WAN
Basic Setup
Volume & Sound
Display Properties
Display Backlight
Display Properties
Intensity
External Power Checkbox
On Threshold
Bright For
Keyboard Properties
Display Appearance
Keyboard Properties
Repeat Delay
Key Repeat
Repeat Rate
Keyboard Backlight
On For
Keyboard One Shot Modes
Lock
OneShot
Keyboard Macro Keys
OneShot/Lock
Recording And Saving a Macro
Executing a Macro
Deleting a Macro
Unicode Mapping
Unicode Mapping
Adding And Changing Unicode Values
Removing Unicode Values
Scancode Remapping
Scancode Remapping
Adding a Remap
Virtual Key, Function And Macro
Editing a Scancode Remap
Volume And Sound Properties
Volume And Sound Properties
Removing a Remap
Volume Adjustments
Sound
Power Management Properties
Battery Capacity
Power Management Properties
Power Saving Schemes
Power Scheme
Switch State To Suspend
Suspend Threshold
If the users application does not save data to RAM
Advanced Power Properties
Calibrate
Allow Suspend With
Built-In Devices Power Status
Low Power Warning
Slot Power Status
Devices
Setting Double-Tap Sensitivity
Stylus Properties
Stylus Properties
Touchscreen Calibration
Disabling The Touchscreen
Manage Triggers
Manage Triggers
Trigger Mappings
Add And Edit Trigger Mapping
Source
Add Source
Trigger Type
Trigger Owner
Certificate Assignment
Certificate Assignment
Bluetooth Setup
Bluetooth Setup
Devices Tab
Scan
Devices Tab
Services
Set PIN
Servers Tab
Outgoing Tab
Servers Tab
Active Conn. Tab
Active Conn. Tab
Properties Tab
Properties Tab
Bluetooth Gprs Connection
Bluetooth Gprs Connection
18 Setting Up The Connection
20 Port Settings
22 Setting The Phone Number
24 Setting Up Dialing Properties
Creating a Backup Profile
Total Recall
Total Recall
Creating a Backup Profile
Profile Information
Add Files
27 Selecting Files
28 Adding Files
View Selections
Performing The Backup
Restoring a Profile
Restoring a Profile
IPv6 Support
IPv6 Support
Info Tab
Narrow Band Radio Setup
Narrow Band Radio Setup
Statistics Screen
Description
Protocol Statistics Descriptions
Info Tab
Low Level Screen
Channel Tab
Default All Parameters
Power Up Channel
Channel Number
Channel Enable List
Channel Switch Speed
Manual Switch Table
Channel Selection
Editing The Channel List
Enable Cellular Protocol
Protocol Tab
Protocol Tab
Auto Radio Address
Cellular Radio Address
Polling
Manual Radio Address
Test Polling Values
Window Delay
Poll Timeout
Late TX Limit
Power Off Time
Power Tab
Enable Power Saving
Power Tab
Data Squelch
Radio Tab
Modulation/Baud Rate
Test Squelch
Frequency Table
Scanner Settings
Scanner Settings
Statistics
Bar Codes
Scanner
Bar Codes
Non-Decoded Scanners
Non-Decoded Scanners
Short Code
Non-Decoded Options
Dot Time msec
Verify
Code
Mod Checks
Field Size/Chars
Strip Trailing
Include Sym
Variations
Standard
Include Country
Enable Bookland EAN
11.2.4 EAN
Addendum
11.2.5 EAN
Prefix/Suffix
Include Number Sys
UPC a
UPC E
Convert to UPC-A
Codabar
Strip Start/Stop Chars
Mod 10 Check
Interleaved 2
Check Digits
ITF Check
MSI Plessey
Discrete 2
One Check Digit
Decoded Internal Scanners
Iata 2
Decoded Internal Scanners
Decoded Internal Options
Decoded Internal Advanced Options
Linear Security Level
Low Power Timeout
Parameter Scanning
Length
Raster Height And Raster Expand Rate
Scanning Mode
Bi-Direction Redundancy
Decoded Internal 2D Scanning Options SE2223 only
Decoded Internal Data Options
Convert To Code
Enable
Enable Trioptic Code
Code 32 Prefix
Decode Performance SE2223 only
Check Digit Verification
Transmit Check Digit
Decode Perf. Level SE2223 only
Enable UCC/EAN-128
Enable Isbt
EAN-8 Zero Extend
11.3.7 EAN
11.3.8 EAN
UPC-A, Check Digit
UPC-E And UPC-E1 Check Digit
Enabled UPC-E
Enabled UPC-E1
UPC-E And UPC-E1 Preamble
Supp. Redundancy
11.3.11 UPC/EAN Shared Settings
Supplementals
Linear Decode SE2223 only
2D UPC Half Block Stitching SE2223 only
Clsi Editing
Notis Editing
Interleaved 2
Convert To EAN
Enable Field Size/Chars
Check Digit Algorithm
RSS Code Reduced Space Symbology
Enable Code 128 Emulation
Enable CC-C And Enable CC-AB
Enable TLC-39
Decoded Intermec Advanced Options
Decoded Intermec Iscp
Decoded Intermec Options
Decoded Intermec Iscp
Same Read Validate
Same Read Timeout
Diff Read Timeout
Reading Range
Accepted Start Char
Minimum Length
EAN
Isbt Concat Transmit
Gtin Compliant
FNC1 Conversion
Isbt Concat Any Pair
11.4.5 EAN
Isbn Conversion
11.4.6 EAN
Transmit Number System
11.4.9 UPC/EAN Shared Settings
Enable UPC-E1
Addendum Add-on 2 And Addendum Add-on
Addendum Security
Clsi Library System
Length Mode
Set Length L1, Set Length L2, And Set Length L3
Field Size/Char
Interleaved 2
Enable Plessy
Matrix 2
Plessy Transmit Check Digit
Plessy Minimum Length
Standard 2 of 5 Format
Enabled Field Size/Chars
Enabled Code 128 Emulation
11.4.19 2D Codablock
Telepen
Imager Options
TekImager Enabled
Imager
Center Bar Code Only
Window Width
Max Number Barcodes
Barcodes Must Decode
Window Height
Min Scan Duration
Default Dev. On Reboot
Imager Advanced Options
Captures Per HW Trigger
Decoder Timeout
Fast Converge
Max Gain, Max Integration And Max Illumination
Adaptive Windowing
Constant Illumination
11.5.5 UPC/EAN
Postal Korean
Postal Australian
Postal Japanese
Postal PlaNET
11.5.16 2D DataMatrix
Postal PostNET
Postal Royal
11.5.17 2D Maxicode
11.5.20 2D QR Code
11.5.21 2D Aztec
Composite
Click Time msec
Options Tab
Double Click Parameters
Click Data
Display Parameters
Output
Translations
Input
Translations
Ports
Type
Ports
Tether Port COM1
Baud
Data Bits
Console Port COM3
Parity
Stop Bits
Port Replicator Tether COM6
Port Replicator Port a COM5
Snmp Simple Network Management Protocol Setup
Snmp Simple Network Management Protocol Setup
Location
Contact Tab
Contact
Contact Tab
Adding a Community
Enable Snmp
Communities Tab
Communities Tab
Name
Modifying a Community Setting
Removing An Existing Community
Rights
Adding a Destination
Enabling Authentication Traps
Trap Destination Tab
Trap Destination Tab
Changing a Destination
Removing a Trap Destination
Permitted Hosts Tab
Adding a Host
Permitted Hosts Tab
Changing a Host
Page
Peripheral Devices & Accessories
Peripheral Devices & Accessories
Batteries
External Bar Code Readers
RD7950 Integrated UHF Rfid Reader
Entering Data With The Bar Code Reader
Battery Charging
Battery Charging
Installation
Gang Charger
Operator Controls
Charge Indicators
Gang Charger Indicators
Charging Batteries
Indicator Flashing Red
Troubleshooting
Excessive Charge Duration
Power LED Does Not Light Up
Power LED Does Not Light Up
Indicator Does Not Light When Battery Installed
Combo Charger
Using the Combo Charger With The 7530 G2
Charging The Spare Battery
Combo Charger Indicators
Charge Indicators
Combo Dock
Using The Combo Dock
Network Access
Combo Dock
Indicators And Controls
Quad Dock
Quad Dock
Using The Quad Dock
Using The Quad Dock
Battery Charging
Network Addressing
Network Link Unsuccessful
6.2 7530 G2 LED Does Not Light When Docked
Portable Docking Module PDM
Network Link Unsuccessful
Attaching The PDM To The Base Of The 7530 G2
Portable Docking Module PDM
PDM Ports And Connectors
Bluetooth Peripherals
Bluetooth Peripherals
7530 G2 Picker Cradle
Picker Cradle Mounting Recommendations
Mounting Template
Picker Cradle Mounting Recommendations
Wiring Guidelines
Wiring Guidelines
Using The Picker Cradle
Maintaining The Picker Cradle
Powered Cradle Installation
Powered Cradle Installation In High Voltage Vehicles
Powered Cradle Installation In High Voltage Vehicles
Wiring Vehicle Power To The Cradle
Wiring Vehicle Power To The Cradle
Port Replicator
Port Replicator
Tether Adaptor Cables
Specifications
Page
Size
Weight
7530 G2 Hand-Held Computer Specifications
Operating System
Environmental
External Ports
Internal Expansion Slots
Approvals
Radio Specifications
Radio Specifications
RA1001A Narrow Band Radio
Rfid Applications
Internal Scanner Specifications
Scanner Port
External Scanners
Parameter SE 1200ALR
1 SE 1200 High Performance & Long Range Specs
Parameter SE 1200HP SE 1200LR
SE 1200 High Performance & Long Range Specs
Decode Zones SE 1200HP, LR and ALR
Decode Zones SE 1200HP, LR and ALR
3 SE 1224HP Scanner Specifications
Parameter SE 1224HP
Decode Zone SE 1224HP
Parameter SE 1524ER
Decode Zone SE 1224HP
Parameter EV15
5 EV15 Imager Specifications
Decode Zones SE 1524ER
Decode Zones SE 1524ER
Decode Zone- EV15
Decode Zone- EV15
Decode Zone SX5303
1900 mAh Lithium-Ion Battery Pack
6 SX5303 Imager Specifications
Parameter SX5303
2400 mAh Lithium-Ion Battery Pack
MAh Lithium-Ion Battery Pack
Appendix a
Worldwide Offices
Worldwide Offices
Appendix B
Battery Contacts
Battery Contacts
JB5 To USB Type B Cable PN CA1020
Page
Appendix C
System Requirements
Launching The Application
Welcome Dialog Box
Launching The Application
Installation Complete Dialog Box
Installation Complete Dialog Box
Page
Index
Index
XII
Conv. UPC-E To UPC-A
Enable CC-C
Laser On Time 157 Late TX Limit Polling
Notis Editing
Scanning Mode 2D Scan Result Scan Result Time
Communities Contact
UPC-A Check Digit UPC-A Preamble