Instruction Manual
Hazardous Area Oxymitter 4000
|
|
|
| TOUCH |
| b. Lockout | ||||
|
|
|
|
|
| |||||
SELECTION |
| CONFIRMATION |
| The Local Operator Interface (LOI) has | ||||||
| LED |
| SELECTION | |||||||
|
|
|
|
|
|
|
|
|
| |
ARROW |
|
|
|
| ARROW |
| a lockout feature that prevents nuisance | |||
|
|
|
|
|
|
|
|
| LCD | actuation by someone brushing against the |
|
|
|
|
|
|
|
|
| glass window, raindrops, dirt, insects, etc. | |
|
|
|
|
|
|
|
|
| DISPLAY | |
|
|
|
|
|
|
|
|
| WINDOW | This lockout mode is automatically estab- |
|
|
|
|
|
|
|
|
|
| lished when no buttons are pushed for 30 |
|
|
|
|
|
|
|
|
|
| |
|
|
|
|
|
|
|
|
|
| seconds (default). This countdown to lock- |
|
|
|
|
|
|
|
|
|
| out is configurable. |
|
|
|
|
|
|
|
|
|
| |
|
|
|
|
|
|
|
|
|
| In order to unlock the display, input a "Z" |
|
|
|
|
|
|
|
|
|
| pattern. First, push the top left (gray) arrow, |
|
|
|
|
|
|
|
|
|
| then the top right, followed by the bottom |
|
|
|
|
|
|
|
|
|
| |
|
|
|
|
|
|
|
|
|
| left and finally the bottom right. The "LK" |
|
|
|
|
|
|
|
|
|
| notation in the upper right corner of the |
|
|
|
|
|
|
|
|
|
| |
|
|
|
|
|
|
|
|
|
| display will now disappear. Push the gray |
|
|
|
|
|
|
|
|
|
| arrow at the top left hand corner once more |
|
|
|
|
|
|
|
|
|
| to enter into the menu structure. Once one |
|
|
|
|
|
|
|
|
|
| moves deeper into the menu structure, |
|
|
|
| SELECTION | 37260054 | additional time is provided to the user so | ||||
|
|
|
| ARROWS |
|
|
|
| that the lockout initiation does not become | |
|
|
|
|
|
|
|
|
| ||
|
|
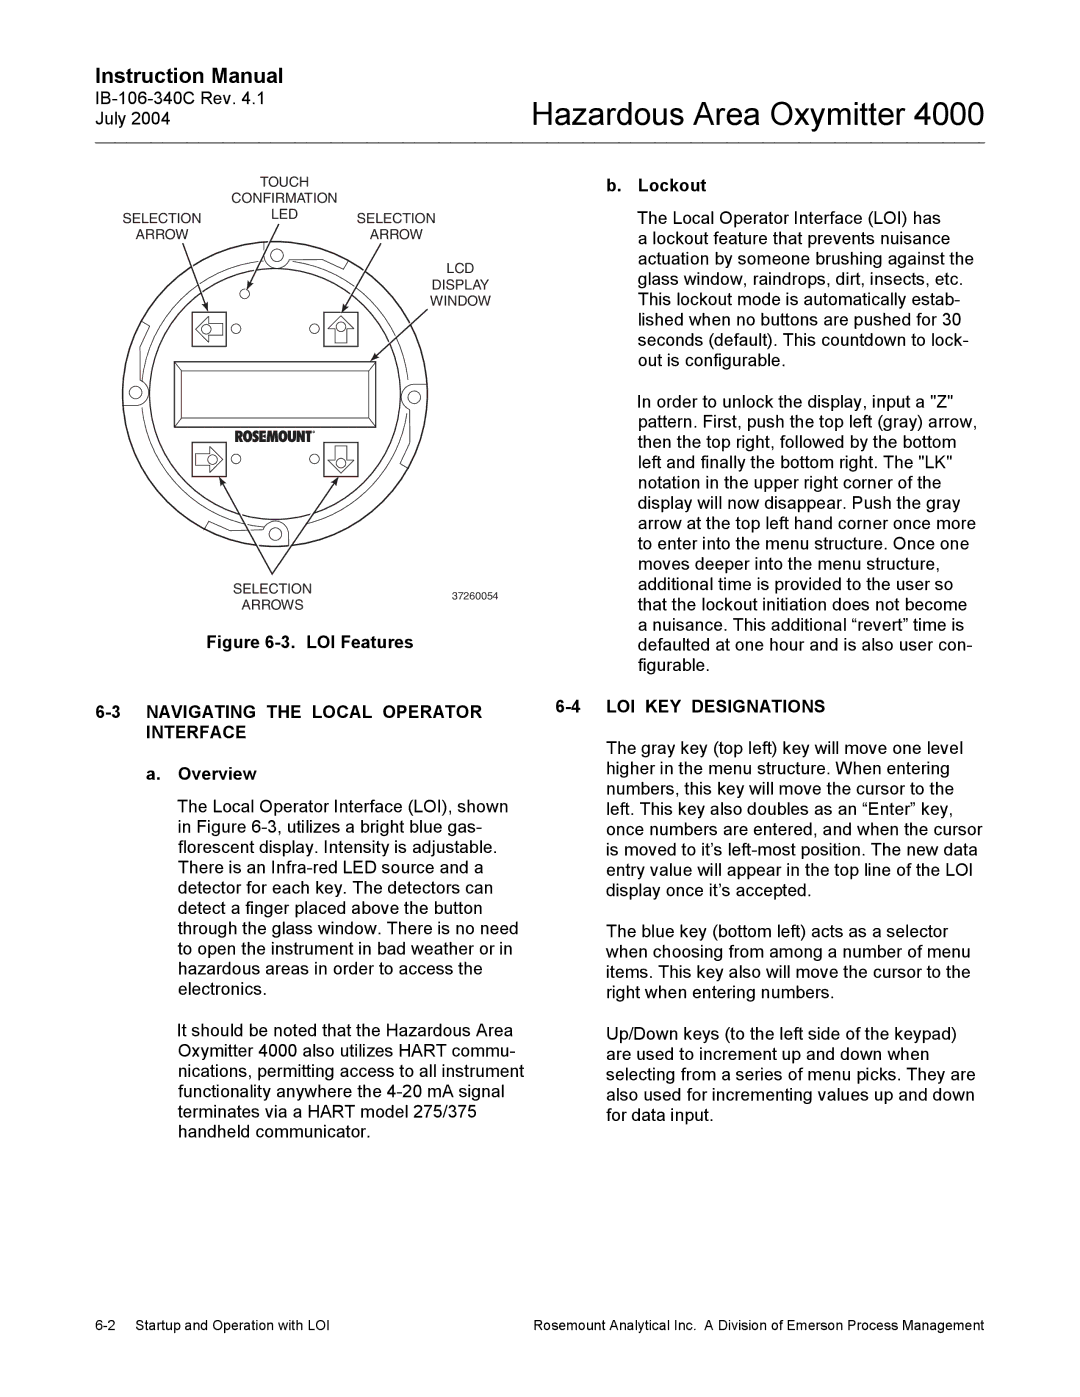
| Figure | LOI Features |
| a nuisance. This additional “revert” time is | ||||
|
|
|
| defaulted at one hour and is also user con- | ||||||
|
|
|
|
|
|
|
|
|
| figurable. |
INTERFACE |
|
|
|
|
| The gray key (top left) key will move one level | ||||
|
|
|
|
|
|
|
|
|
| |
a. Overview |
|
|
|
|
| higher in the menu structure. When entering | ||||
| The Local Operator Interface (LOI), shown | numbers, this key will move the cursor to the | ||||||||
| left. This key also doubles as an “Enter” key, | |||||||||
| in Figure | once numbers are entered, and when the cursor | ||||||||
| florescent display. Intensity is adjustable. | is moved to it’s | ||||||||
| There is an | entry value will appear in the top line of the LOI | ||||||||
| detector for each key. The detectors can | display once it’s accepted. | ||||||||
| detect a finger placed above the button |
| ||||||||
| through the glass window. There is no need | The blue key (bottom left) acts as a selector | ||||||||
| to open the instrument in bad weather or in | when choosing from among a number of menu | ||||||||
| hazardous areas in order to access the | items. This key also will move the cursor to the | ||||||||
| electronics. |
|
|
|
|
| right when entering numbers. | |||
| It should be noted that the Hazardous Area | Up/Down keys (to the left side of the keypad) | ||||||||
| Oxymitter 4000 also utilizes HART commu- | are used to increment up and down when | ||||||||
| nications, permitting access to all instrument | selecting from a series of menu picks. They are | ||||||||
| functionality anywhere the | also used for incrementing values up and down | ||||||||
| terminates via a HART model 275/375 | for data input. | ||||||||
| handheld communicator. |
|
| |||||||
Rosemount Analytical Inc. A Division of Emerson Process Management |