User guide
Page
HP Color LaserJet 9500mfp
Trademark Credits
Copyright and License
Page
Chapter
MFP basics
Digital sending and e-mail
Contents
Enww
Printing
Control panel menus
Managing and maintaining
Service and support
Specifications and regulatory information
Enww
Contents
MFP components
MFP components
Rev
Enww
Control panel
Features and buttons Function
Light State Indication
Interpreting control-panel lights
To specify other numeric values
Light State Indication
Control-panel home screen
Setting the MFP defaults
Setting the MFP defaults
Setting the MFP device defaults
To set device defaults at the control panel
Loading input trays
Loading input trays
To load media in tray
Rev
To load tray 1 when the same paper is used for multiple jobs
Rev
Pull the tray open until it stops
Loading tray 2 and tray
To load detectable standard-size media in tray 2 and tray
Tray 2 and tray 3 hold up to 500 sheets of standard media
Rev
Enww
That tray
To load undetectable standard-size media in tray
Tray
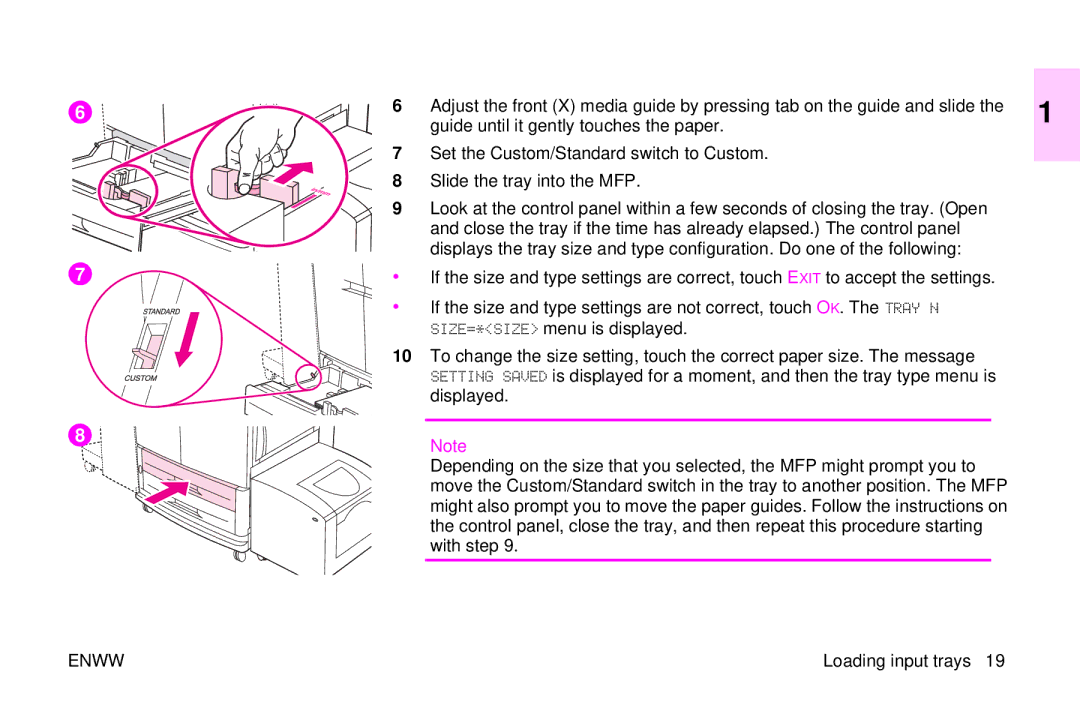
SIZE=*SIZE menu is displayed
Set the Custom/Standard switch to Custom
Guide until it gently touches the paper
Rev
To load custom media in tray 2 and tray
Rev
Enww
Rev
To load the 2,000-sheet side input tray tray
Rev
Press the Menu button
Changing and setting the media size and type for a tray
To set or change media size for tray
Than ANY
To set or change a custom size for tray 2 and tray
Touch Exit to exit the menu
To set or change a media type for any tray
MFP basics
Copying
Copy-screen layout
Copy-screen layout
Features and buttons Function
Previous screen
Simplex/duplex, and stapling
Starts copying the document
Moves back one screen on the control-panel display
Copying instructions
Copying instructions
Setting is Letter or A4 only if no media size is detected
Copying by using the default settings one-touch copying
To make color copies by using the default settings
Copying by using user-defined settings
Select 1-sided or 2-sided
Job Mode
Basic tab What to select
Select Portrait or Landscape
Description of use
Sheet Copying
Ordering
Select Collated or Uncollated
Copying from the scanner glass
Copying by using the ADF
Select Book as the size Touch OK
Copying books
Color copies or black and white copies
Creating a job to be copied later
Enhance the document
Adjust the lightness/darkness
Reduce or enlarge
Sharpness
Background Removal
Copy setting Description
Setting copy defaults
Indicates the sharpness of the image when it is copied
Touch Sending Touch E-MAIL
Network or e-mail administrator for this information
Rev
Sending documents
Sending documents
Color
Scan Preferences Select Black and White or Color
Changing the settings
Sending a document to multiple recipients
Using the auto-complete function
Added to the local address book
Using the address book
Using the address book
Creating a recipient list
Faxing
Country/region support
Support Guide
Connecting the fax to a phone line
Verifying the fax operation
Verifying the fax operation
Name is a legal requirement
Establishing the required fax settings
Establishing the required fax settings
Using the Fax Settings menu
Utility to disable the LAN fax
To verify or change the date and time settings
Setting or verifying the date and time
Setting or verifying the location
To verify or change the phone number and the company name
Setting or verifying the fax header
To verify or change the location
Type a phone number and then touch OK
Status message bar
Fax feature screen
Configuration Utility
Fax feature screen
From memory
Sending faxes
Sending a fax by typing the number manually
Send a FAX under the list of help topics
Sending faxes
Fax
Speed-dial group, see To create a speed dial onpage
Sending a fax by using speed dial
Then deleted from memory
Contact list
Sending a fax by using phone book numbers
Rev
Press the Menu button Touch FAX
Canceling a fax
Canceling the current fax transmission
Canceling a fax
Touch the FAX option
Canceling all pending faxes
Speed dial
To create a speed dial
Speed dial
To delete a speed dial
Touch the Edit tab Touch the Delete Speed Dial option
Touch Delete Touch YES Touch OK
To change the sharpness setting
Changing the sharpness setting
To change the background setting
Changing the background setting
Receiving faxes
Changing the light/dark setting
To change the light/dark setting
Establishing optional fax settings
Establishing optional fax settings
Options might not be available or configurable
Use the following procedure to set the modem volume
Setting the modem volume
To set the modem volume
Reduce the transmission time
Setting the ringer volume
Setting outgoing fax resolution
To set the ringer volume
To set the outgoing fax resolution
To set a dialing prefix
Setting dialing and detection options
Setting a dialing prefix
Setting dialing and detection options
To set redial-on-busy
Setting the redial-on-busy feature
To select the paper tray
Setting the paper tray
Setting the paper tray
To set the destination bin
Setting the destination bin
Setting the destination bin
Troubleshooting fax
What type of phone line are you using?
Are you using the phone cord that came with the MFP?
Roll-over lines
Are you using a phone-line splitter?
Are you using a surge-protection device?
Checking fax status
Checking fax status
MFP fax feature or has enabled LAN fax. When
Analog fax is installed and ready
Fax is installed and operational. However
HP Digital Sending utility has either disabled
Fax feature is not operating
Fax feature is not operating
Problem Cause Solution
Fax is installed but the option
Does not appear
Formatter board is faulty
Service
Graphics or Text and Graphics. See
General fax problems
Problem Cause Recommended action
Fax settings do not seem to be available in HP Web Jetadmin
Middle of faxing ADF cover on
Schedule printing of faxes does
Receiving fax problems
Receiving fax problems
Problem Cause Solution
MFP is out of toner
Faxes will not print until the lock is disabled
Will be printed after the tray is refilled
Schedule printing of faxes is set
Sending fax problems
MFP is receiving faxes but is
Disable the detect dial-tone setting see
Sending fax problems
Sent faxes are not arriving at the receiving fax machine
32-63 Transmit negotiation errors
Error codes
Value Description Connection enablement failure errors
16-31 Call establishment errors
Value Description
64-79 Data transmit errors
80-111 Transmit termination errors
144-159 Receive data errors
112-143 Receive negotiate errors
192-223 Undefined 224-255
160-191 Receive termination errors
Fax product specifications
Fax product specifications
Environmental specifications
Fax specifications
Rev
Customizing tray 1 operation
Printing from tray 1 when the loaded paper is requested
Customizing tray 1 operation
Manually feeding paper from tray
For Windows all versions
Using the job-storage features
To gain access to the job storage features
Using the job-storage features
To print a private job
Private jobs
To delete a private job
Stored jobs
To delete a stored job
To print a stored job
QuickCopy jobs
To delete a QuickCopy job
To print additional copies of a QuickCopy job
Option
Proof and hold jobs
To delete a proof and hold job
To print a proof and hold job
Enww
Printing
121
Control panel menus
To navigate through the control-panel menus
Retrieve job menu
Retrieve job menu
Explanation
Jobs for that user
User Name
Information menu
MFP
Features
Installed mass storage devices
Paper handling menu
Paper handling menu
Appear for tray 1 only
Values Explanation
Substitute the tray number for N
Media sizes
This message appears when the custom switch is
Where you select millimeters or inches as the unit
Measure and set the X and Y dimensions
Originals submenu
Configure device menu
Configure device menu
Describe the size of the original document. If media is not
Use this item to specify the media size of the original
Document
MFP uses the media sensors to automatically
Whose weight is more than 100 g/m² 26-lb bond
Mixed is set as the default. You can select from nine
If Heavy Paper is set to ON, the scanner will adjust
Area. The setting can impact output quality for media
Not collated
Copying submenu
Color copies
One side or both sides of the copy
Number of copies
Produced when you press Start without selecting
Factory default setting is
Use this item to indicate the number of copies that are
That is attached
Values vary
Depending on
=maximum sharpness
Use this item to specify the sharpness setting
Enhancement submenu
=minimum sharpness
Sending submenu
Mail submenu
Use this item to automatically search the network for
Use this item to test the configured gateways for correct
Functionality. If the configured gateways are functional
Image
Number from 1 to 32,000. Use the numeric keypad to specify
Printing submenu
Default Paper Size Letter
That is installed
Media size using the ruler labels in the trays
Simplex of a sheet of paper
Control-panel settings
HP LaserJet 4 Series printers
This item also applies to A3- and 11 x 17 size media
Use this item to select the version of Courier font to use
Regular The internal Courier font that is available on
Select on to print the PS error page when PS errors occur
Print quality submenu
Media type that you want to use. For each of the following
Position OFF. For more information about optimize values
ON. The default value of each item is OFF. The Restore
Optimize option resets all options to the factory default
Adjustments
Hard disk
System setup submenu
Factory default setting is Control panel menus
Controls on the control-panel display
Connected to a network
Monochrome mode. Auto switches between modes based on
Most cost-effective option for switching modes
Deleted from the queue
Options opens its own submenu
Use this item to specify the behavior of the trays. Each
Mode
Sleep mode. Sleep mode minimizes the amount of power that
MFP consumes when it is idle and reduces wear on the MFP
Electronic components turns off the display backlight
Interrupt
Appears on the control panel
Installed in the MFP
It receives specific software commands
Possible values are determined by which valid languages are
Goes offline for 10 seconds before returning online
Determine how the MFP reacts to errors
To stop printing when the MFP is out of staples, set Auto
CONTINUE=OFF on the control-panel System setup menu
Performance might increase with this setting
Use this item to determine how the MFP functions when a jam
Auto The MFP automatically selects the best mode for jam
Recovery usually ON. This is the default setting
Appears. Touch the language that you want
Available values include all languages in the list, and all
Supported languages appear
159
Selecting high-quality media
Ordering supported media
Using non-HP-brand media
Selecting and using media
Setting media size and type
Standard media size
Custom media size
Second
Supported types of media
Recycled High gloss images Color Tough paper
165
Recommended media
Ordering recommended media
HP Color Laser Paper
HP Premium Cover Paper
167
Recommended media Type Characteristics HP Color Laser Paper
HP Soft Gloss Laser Paper
Finish on both sides, 98 bright
105 g/m2 28-lb bond
HP Premium Choice
LaserJet Paper
HP Office Recycled Paper
Recommended media Type Characteristics HP Premium Choice
HP LaserJet Paper
Transparencies
Recommended media Type Characteristics HP Tough Paper
HP Color LaserJet
Determining media type
Weight Finish Type
Matte versus glossy
Determining weight
Up to 100 sheets Standard sizes 64 to 220 g/m2
Tray or bin Capacity Media Weight
Supported media sizes for input and output
Device
Tray or bin Capacity
Media Weight
Tray or bin Capacity Media
Long edge between 210 mm and 470 mm
Up to Standard sizes for face-down bin
Sheets
Custom sizes face up
177
Sheets stacked up
To 50 sheet 8K, 16K Stapled Standard sizes for face-up bin
Finsiher
179
Up to 2,000 sheets Standard sizes for face-down bin
Inches x 8.25 inches maximum
Mm x 470 mm 12 inches x 18.5 inches
See Determining media type on
Media-related copy-quality and print-quality issues
Issue Recommended action
181
Few more pages in order to remove the excess toner
183
Preprinted form melt under the temperature of the fuser
Smeared toner
Fan the media to separate the individual sheets
Its maximum capacity
Loading input trays on
185
Selecting and using media
Managing supplies
Using the MFP control panel
Managing supplies
Checking supplies levels
Press the Status button
Ordering supplies
Ordering directly through the embedded Web server
Storing the print cartridges
Storing supplies
Storing the image transfer kit
Storing the image drums
Print cartridges
Replacing and recycling the supplies
Print cartridge Part number
Replacing the print cartridges
Rev
Enww
C8563A
Using the image drums
Image drum Part number
Black C8560A Cyan C8561A Yellow C8562A
Replacing the image drums
Open the door completely
Enww
Rev
Enww
Image transfer kit
Replacing the image transfer kit
Open the upper door on the right side of the MFP
Enww
Rev
Slot
Stops completely
Swing the green lever up. Close all of the doors
Transfer belt are pushed into the MFP completely
Rev
Enww
Rev
Roller. Slide the blue cover to the right
Remove the bottom roller
Rev
Image cleaning kit
Replacing the image cleaning kit
Enww
Rev
Close the front doors
Cleaner handle and the green lever are in the up position
Reattach the finishing device
Image fuser kit
Replacing the image fuser kit
Enww
Rev
Enww
To clean the glass
Cleaning procedures
Cleaning the ADF
Locate the white, vinyl ADF backing
To clean the ADF delivery system
Cleaning procedures
Open the ADF Locate the top and bottom ADF glass strips
Rev
To clean the top ADF glass strip
Close the ADF cover
To clean the ADF rollers
Rev
Cleaning the post charger
Rev
Enww
Cleaning the fuser input
Enww
Rev
Relocating the MFP
Relocating the MFP
Managing and maintaining
Clearing jams
Clearing jams
Clear up after a few pages are printed
Jam clearing locations
Problem solving
Jam in the automatic document feeder ADF cover
Jam in tray
Clearing jams from the input-tray areas
Load media in tray
Jam in tray 2 or tray
Enww
Rev
Jam in the 2,000-sheet side input tray tray
Rev
Enww
Jam inside the upper right door
Enww
Rev
Jam at the upper right door or the front doors
Open the front doors Lower the green lever Problem solving
Enww
Rev
Enww
Jam inside the duplexer
Clearing jams from the duplexer
Enww
Rev
Jam in the fuser area at the lower left door
Clearing jams from the output areas
Rev
Enww
Jam in the top output bin
Remove loose toner
Step
Jam in the stacker or stapler/stacker
Handle
Carefully pull out any media from the flipper area
Avoid touching the flipper area. It can be hot
Open doors. Push the finishing device back into place
Jam in the 8-bin mailbox face-up bin
Rev
Jam in the multifunction finisher
Rev
Enww
Rev
Solving repeated jams
Situation Solution
Be fed from tray
Understanding MFP messages
Using the MFP help system
Understanding MFP messages
Submenu on
If a message persists
Solving output-quality problems
Solving output-quality problems
Output-quality problem Short edge
Output-quality troubleshooting procedures
Output-quality-defect chart
Solving persistent output-quality problems
Vertical lines Repetitive defects
Horizontal lines or streaks
Fingerprints and media dents Loose toner
Color fade in all colors Color fade in one color
White areas dropouts on
Smeared toner
Specks or stray toner
Media damage wrinkles, curl, creases, tears
Misaligned colors
Skewed, stretched, or off-center
Print Quality Troubleshooting Pages
To print the Print Quality Troubleshooting Pages
MFP hardware issues
Solving MFP problems
Solving MFP problems
Situation Solution
Media-handling issues
Situation Solution
Network documentation that came with your MFP network cards
Occur
Situation Solution
Situation Solution
Make sure that no data extends into the unprintable area
MFP-output issues
Printed with
Clipped margins
SituationSolution
Job is not sent to the correct MFP
Job prints with
Print a PS or PCL font list see Information menu on
Be printed facing down
SituationSolution
Duplexer issues
Situation Solution
Warranty information
Warranty information
Service during and after the warranty period
Extended warranty
Spare parts and supplies availability
Color print cartridge/image drum warranty
Service and support
Warranty information
Ownership
No Disassembly or Decryption
HP software license terms
License Grant
Government Restricted Rights
Transfer
Termination
Export Requirements
About on the Basics tab
Information Specific to your products How to find
Customer support options worldwide
Information from the MFP
Customer support options worldwide
Customer support and MFP repair assistance
World Wide Web Mail
Service and support
HP Color LaserJet 9500mfp
Physical specifications
Physical specifications
Specifications and regulatory information
Enww
Volt models
Power requirements and circuit capacity
Power consumption
Power consumption
Rev
Sound pressure level bystander position Declared per ISO
Acoustical specifications¹
Sound power level Declared per ISO
Acoustical specifications¹
Storage humidity
Storage temperature
Operating and storage environment
Relative humidity
Protecting the environment
Environmental product stewardship program
Recycling
HP LaserJet Printing
Supplies
Supplies Returns
Recycled paper
Rev
Sheet
Material safety data
FCC statement
Declaration of Conformity
Regulatory statements
Supplementary Information
Conforms to the following Product Specifications
Enww
Canadian DOC Regulations
EU Statement for Telecom Operation
Vcci Statement Japan
Luokan 1 laserlaite Klass 1 Laser Apparat
Korean EMI Statement Laser Statement for Finland
Varo
Varoitus
Varning
Taiwan Class a Statement
Taiwan Battery Statement Product Information Sheet
Specifications and regulatory information
Page
C8549-90902