FS-C5100DN/C5200DN/C5300DN
Contents
Specifications Glossary Index
Computer Interface
Legal and Safety Information
Regarding Tradenames
License Agreements
Typeface Trademark Acknowledgement
Monotype Imaging License Agreement
Open SSLeay License
Copyright 1998-2006 The OpenSSL Project. All rights reserved
Original SSLeay License
This Software is Provided by the OpenSSL Project AS is
Page
Interface connectors
Compliance and Conformity
Above warning is valid only in the United States of America
Safety Information
Laser Safety
Laser Notice
Radio Frequency Transmitter
Page
Safety Instructions Regarding the Disconnection of Power
Cdrh Regulations
Ozone concentration
2004/108/EC, 2006/95/EEC, 93/68/EEC and 1999/5/EC
Canadian Department of Communications Compliance Statement
EN ISO
Disclaimer
Energy Saving Control Function
Installation Precautions
Other Precautions
Environment
Other Precautions
Power Supply/Grounding the Printer
Handling of Plastic Bags
Precautions for Use
Other Precautions
About the Operation Guide
Conventions
Convention Description Example
Personal injury
Xix
Page
Machine Parts
Machine Parts
Components at the Front of the Printer
Components at the Left of the Printer
Paper Transfer Unit Paper Ramp Duplex Unit Envelope Switch
Internal Components
Components at the Rear of the Printer
Operation Panel
Handling Paper
Handling Paper
Paper Specifications
Specification
General Guidelines
Paper Availability
Size Product Weight
Minimum and Maximum Paper Sizes
Recommended Paper
Letter, Legal Hammermill Laser Print 90 g/m² 24 lb
Selecting the Right Paper
Condition
Composition
Paper Sizes
Basis Weight
Paper Weight Equivalence Table
Bond Weight lb Europe Metric Weight g/m²
Smoothness
Moisture Content
Paper Grain
Other Paper Properties
Special Paper
Paper Type to be Used Paper Type to be Selected
Transparency
Labels
Slide the envelope switch to envelope mode and print
Postcards
Envelopes
Thick Paper
Colored Paper
Preprinted Paper Recycled Paper
Coated Paper
Paper Type Indicators Optional paper feeder PF-510
Paper Weight Duplex Path Feeder PF-510 Feeder PF-500
Paper Type
Paper Source Paper Type
Optional Paper
Loading Paper
Loading Paper into the Cassette
Paper Guides Release Lever
Loading Paper into the MP Multi-Purpose Tray
Exhausted, the pointer will go down to the level of empty
When printing on transparencies, feed the sheets into
Printer one at a time
If the paper is considerably curled in one direction, for
Paper in the opposite direction to counteract the curl
Paper stopper
Printing Operation
Printing Operation
TCP/IP, TCP/IP IPv6 settings
This is mandatory to make the settings effective
Changing Network Interface Parameters
Network
Press U or V to select On or Off as the setting for Dhcp
TCP/IP
TCP/IP IPv6 On RAStateless Off DHCPv6 Off ?Off Security
TCP/IP IPv6
Password
NetWare
AppleTalk On IPP Off
SSL Server Off IPSec Off
NetWare
AppleTalk On ?On IPP On
AppleTalk
?Off IPSec On ?On
SSL Server
IPSec
Security Level High
Security Level
Adjust/ Maintenance Print Network Status Page ?
Adjust/Maintenance
Printing a Network Interface Status
Installing the Printer Driver
Installing the Software in Windows
Click Install software
Express Mode
Custom Mode
Installation on a Macintosh
Select Custom Mode
Printer driver installation program starts up
Open System Preferences and click Print & Fax
Page
Page
Printing from Application Software
Accessing the Status Monitor
Status Monitor
Exiting the Status Monitor
Screen Overview
Status Monitor icon
Status Monitor Settings
Enable Event Notification
Sound Notification Tab
Sound file
Appearance Tab
Enlarge window
Always on top
Transparency
Uninstalling Software Windows PC
Click Uninstall
Select the software package to remove
Maintenance
Maintenance
Toner Container Replacement
Frequency of Toner Container Replacement
General Information
Toner Color Life of the Toner Container Printable pages
FS-C5300DN
Toner Kits
Replacing the Toner Container
Open the top cover top tray
Plastic Bag Toner Feed Slot
Replacing the Waste Toner Box
Open the cap of the new waste toner box
Cleaning the Printer
Cleaning the Paper Transfer Unit
Push the front cover back in completely Maintenance
Maintenance
Troubleshooting
Troubleshooting
Symptom Check Items Corrective Action
Tips
Print Quality Problems
Printed Results Corrective Action
Black or white vertical streaks
Faint or blurred printing
Grey background
Check the paper chute and the ramp
Error Messages
Message Corrective Action
Displayed when the envelope switch is set to envelope mode
Servicing. Contact your service technician
Being used
Previous screen is displayed again 1 or 2 seconds
Cancel
Install the specified toner container
Selected cassette is being prepared
Printing
Containers
Storage Error Codes
Hard Disk Errors
Code Meaning
Memory Card and USB Memory Errors Code Meaning
RAM Disk Errors Code Meaning
Clearing Paper Jams
Possible Paper Jam Locations
Paper Jam Message Description Reference
General Considerations for Clearing Jams
Paper jam at Cassette
Paper Jam at MP Tray
Utilizing Online Help Messages
Paper Jam in Printer
Paper Jam at Cassette 2 to
Troubleshooting
Using the Operation Panel
Using the Operation Panel
General Information
Understanding the Operation Panel
Message Display
Error Codes
Status Information
Message Meaning
Indicators in Message Display
Ready, Data, and Attention Indicators
Indicator Description
Ready
Cancel Key
Keys
GO Key
Menu Key
OK Key
Using the Menu Selection System
Entering the Mode Selection Menu
Menu Selection System
Paper Settings
Type Adjust
Paper Weight Normal
Setting a Mode Selection Menu
Report Print
Report Print
Print Menu Map ?
Print Menu Map
Menu Map
Menu Map Sample
Using the Operation Panel
Print Status
Print Status Page ?
Understanding the Status
Printer Settings Information
Installed Options
Firmware Version
Network Status
Print Fonts List
Print Hard Disk File List
Print RAM Disk File List
Print Mem. Card File List ?
Print Mem. Card File List
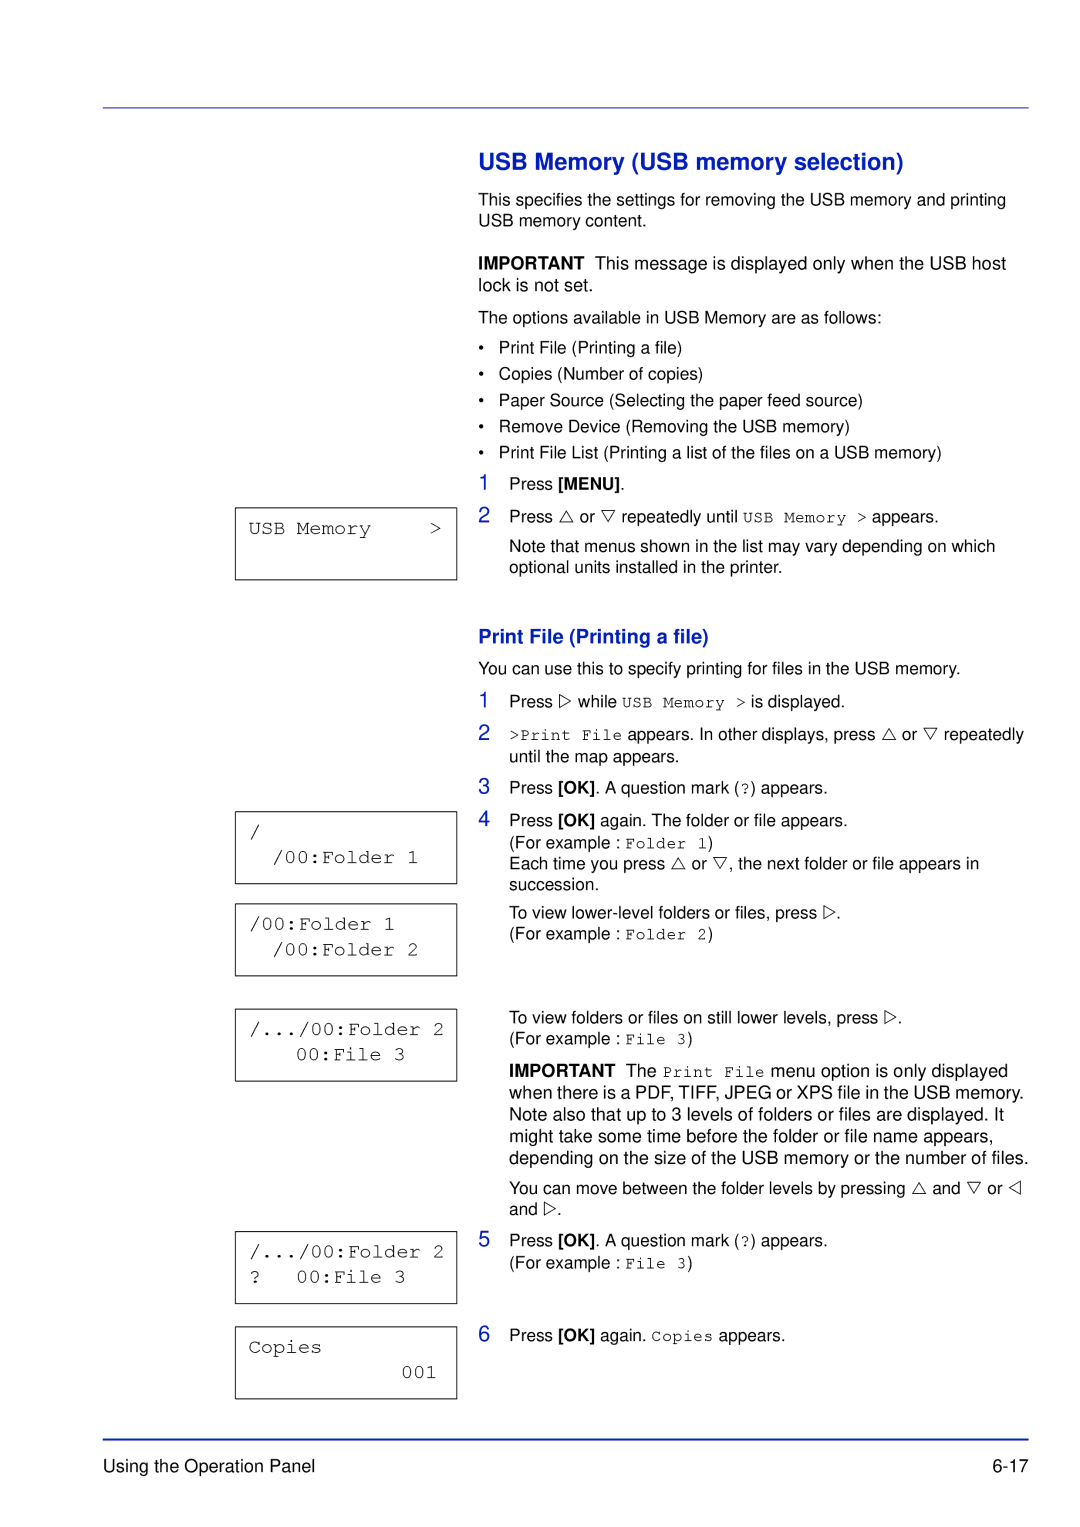
USB Memory USB memory selection
USB Memory
00Folder
00Folder 2 00File ? 00File Copies 001
Copies 010 Paper Source ? Cassette Remove Device ?
Copies Number of copies
Paper Source Selecting the paper feed source
Remove Device Removing the USB memory
Job Box
Job Retention
Quick Copy Proof-and-Hold Private Print Stored Job
Quick Copy Using Quick Copy
Job Box
Printing Additional Copies using Quick Copy
Press Z while Job Box is displayed
Deleting a Quick Copy Job
Using Proof-and-Hold
Printing Remaining Copies of a Proof-and-Hold Job
Deleting a Proof-and-Hold Job
Private/Stored ?Harold Arlen ?Agenda Copies
Private/Stored Printing a private print/stored job
Releasing a Private/Stored Job
Job Box Configuration Quick Copy
Job Box Configuration
Agenda Copies Agenda Delete
Deleting a Private/Stored Job
Counter Viewing the counter value
Counter Printed Pages Color 1000 Monochrome
Printed Pages Displaying the total printed pages
Color Displaying the color printed pages
Paper Settings
Paper Settings MP Tray Size ? A4
MP Tray Size Setting MP tray paper size
MP Tray Type Setting the MP tray paper type
MP Tray Type
Press OK Press MENU. The display returns to Ready
Cassette 1 to 4 Size Setting the cassette paper size
Selecting the Size Dial Setting
Setting the Paper Size from the Operation Panel
Cassette Size ? Custom
Unit ? mm
Unit Selecting the unit of measurement
Dimension 216 mm
Entering the Width and Length
Cassette 1 to 4 Type Setting the cassette paper type
Cassette Type
Type Adjust Creating custom paper type
Reset Type Adjust Resetting the custom paper type
Paper Weight Setting the paper weight
Duplex Path Setting the duplex path
Print Settings
Print Settings
Paper Feed Mode ? Auto
Paper Feed Mode Setting the paper feed source
When the Paper Runs Out During Printing
Duplex Duplex printing
Binding Modes
Duplex ? Off Override A4/LT ? Off
Override A4/LT Overriding difference between A4 and Letter
Emulation Setting the emulation
Error Report ? On
Error Report Printing Kpdl errors
Emulation
Color Mode ? Color Print Quality Gloss Mode ? Low
Color Mode Selecting color or monochrome printing
Print Quality Setting print quality
Gloss Mode Selecting the gloss mode
EcoPrint Mode ? Off
EcoPrint Mode Selecting the EcoPrint mode
Set Setting pagination
Set
Orientation ? Portrait Wide A4 ? Off
Wide A4 Wide A4 pitch
Orientation Print orientation
Network Network settings
TCP/IP IPv4 settings
Dhcp Dhcp setting
IP Address IP address setting
? Off Dhcp ? Off
Subnet Mask Subnet mask setting
Gateway Gateway setting
Subnet Mask Gateway
TCP/IP IPv6 IPv6 settings
Bonjour Bonjour setting
This selects the settings for TCP/IP IPv6
Bonjour ? Off
RAStateless RA Stateless setting
DHCPv6 DHCPv6 setting
RAStateless ? Off DHCPv6 ? Off
Device Common Selecting/Setting the common device
Device Common MSG Language ? English
MSG Language Selecting the message language
Buzzer Alarm Buzzer setting
Key Confirm. Key confirmation tone setting
Job End Job completed tone setting
Buzzer Key Confirm. ? On Job End ? Off
Ready ? Off Error ? On
Ready Preparation completed tone setting
Error Error tone setting
RAM Disk Mode ? Off
RAM Disk Mode Using the RAM disk
RAM Disk Size Setting the RAM disk size
RAM Disk Size 119 MByte
Hard Disk
Memory Card Using the memory card
Format ?
Memory Card
Format Formatting hard disk
Error Handling
Error Handling Error detection setting
Format Formatting memory card
Duplex Duplex printing error detection setting
Duplex ? Off Paper Mismatch ? On
Off
Timer Form Feed Time Out 030sec
Timer Timer setting
Form Feed Time Out Automatic form feed timeout setting
Sleep Timer 030 min
Sleep Timer Sleep timer timeout time
Auto Error Clear ? Off
Auto Error Clear Auto error clear setting
Error Clear Timer Setting the error clear time
Auto Panel Reset Auto panel reset settings
Panel Reset Timer Setting the panel reset timer
Auto Sleep Setting the sleep timer
Auto Sleep ? On
ID Administrator ID input
Security
Password Block USB Host ? Unblock
Password Administrator Password input
Block Interface external device block setting
USB Host USB memory slot setting
USB Device USB interface setting
Optional Interface Network interface card setting
USB Device ? Unblock Option I/F ? Unblock
NetWare NetWare setting
Frame Type Frame type setting
NetWare ? On Frame Type ? Auto
AppleTalk AppleTalk setting
IPP IPP setting
AppleTalk AppleTalk ? On
IPP ? Off
SSL Server SSL Server setting
DES SSL Server DES setting
SSL Server ? Off DES ? Off
3DES SSL Server 3DES setting
AES SSL Server AES setting
IPP over SSL SSL Server IPP over SSL setting
3DES ? Off AES ? Off IPP over SSL ? Off
IPSec IPSec setting
Security Level Security Level setting
Https SSL Server Https setting
Https ? Off IPSec IPSec ? Off
Job Accounting Job Accounting selection/ setting
Job Accounting
Password Job Accounting ? Off Enter Account
Job Accounting Enabled
Select Account Department-specific settings
Select Account ?00000000 Counter 0000100 Color Counter
Color Counter Account-specific counter management color
Restriction ? Off Color Restrict ? Off
Set the account ID and then press U or V repeatedly until
Color Restrict Print restriction selection color
Maximum Output Color Max.out Reset Counter?
Color Max.out Maximum print output setting color
Reset Counter Counter reset
Add Account Delete Account ?001
Add Account Department registration
Delete Account Department removal
Print Job Accounting List Job Accounting list output
Admin Administrator settings
Admin
Password Change ID
Change ID Administrator ID change
You can use this to change the administrator ID
002
Change Password
Change Password Administrator Password change
You can use this to change the administrator password
Adjust/Maintenance Adjust/Maintenance selection/setting
Adjust/ Maintenance
Color Calibration ?
Color Calibration
Print Registra tion Chart ?
Registration Normal Color registration standard
Sample Color Registration Correction Chart
Color Registration Correction Chart
Adjust Magenta L=0 V=0 R=0
Adjust Magenta L=B V=0 R=0
Adjust Magenta
Press U or V until that value is displayed
Registration Details Color registration detailed
Page
12345 3 Adjust magenta
12345 MV=0 MH=00000
12345 MH=B0000 MV=0
Restart Printer ?
Restart Printer
12345 3 Cyan correction and Y 12345 3 Yellow correction
Service Print Status Page ? Print Network Status Page ?
Service for maintenance
Print Status Page Printing the service status
Print Network Status Page Printing the network status
Print Test Page ? Maintenance ?
DEV-CLN Developer/Refresh mode setting
Print Test
LSU/Charger LSU/Main charger cleaning mode setting
When cleaning ends, the display returns to Ready
Drum Drum/Refresh mode setting
LSU/Charger ? Drum ?
Options
Options
General Information
Expansion Memory Modules
Expansion Memory Modules
Installing the Memory Modules
Removing a Memory Module
General Description of Options
Memory Card
PF-500, PF-510 Paper Feeder
Reading the Memory Card
Base CA-500
Hard Disk
USB Memory
Options
Computer Interface
Interface USB Interface Network Interface
Computer Interface
Specifications
Interface Signals
Interface
USB Interface
Features
Network Interface
Operation Environment
10 to 35 C 50 to 95 F, 20-80 % RH condensation-free
EMI Countermeasures
Specifications
Description FS-C5100DN FS-C5200DN FS-C5300DN
Paper Sizes Cassette
ISO B5, A6, Envelope C5, 16K, and Custom
Folio, Youkei 2, Youkei 4, 16K, and Custom
MP Tray
Description FS-C5100DN FS-C5200DN FS-C5300DN
Specifications
Glossary
NetBEUI NetBIOS Extended User Interface
Sleep mode
IP Address Internet Protocol Address
MP Tray
Status
Subnet Mask
TCP/IP Transmission Control Protocol/Internet Protocol
USB Universal Serial Bus
Glossary-4
Index
Index-1
Index-2
Paper
Timer
Index-3
Index-4
Page
Page
Version 1.1