WI818G 10/05 | Page 11 |
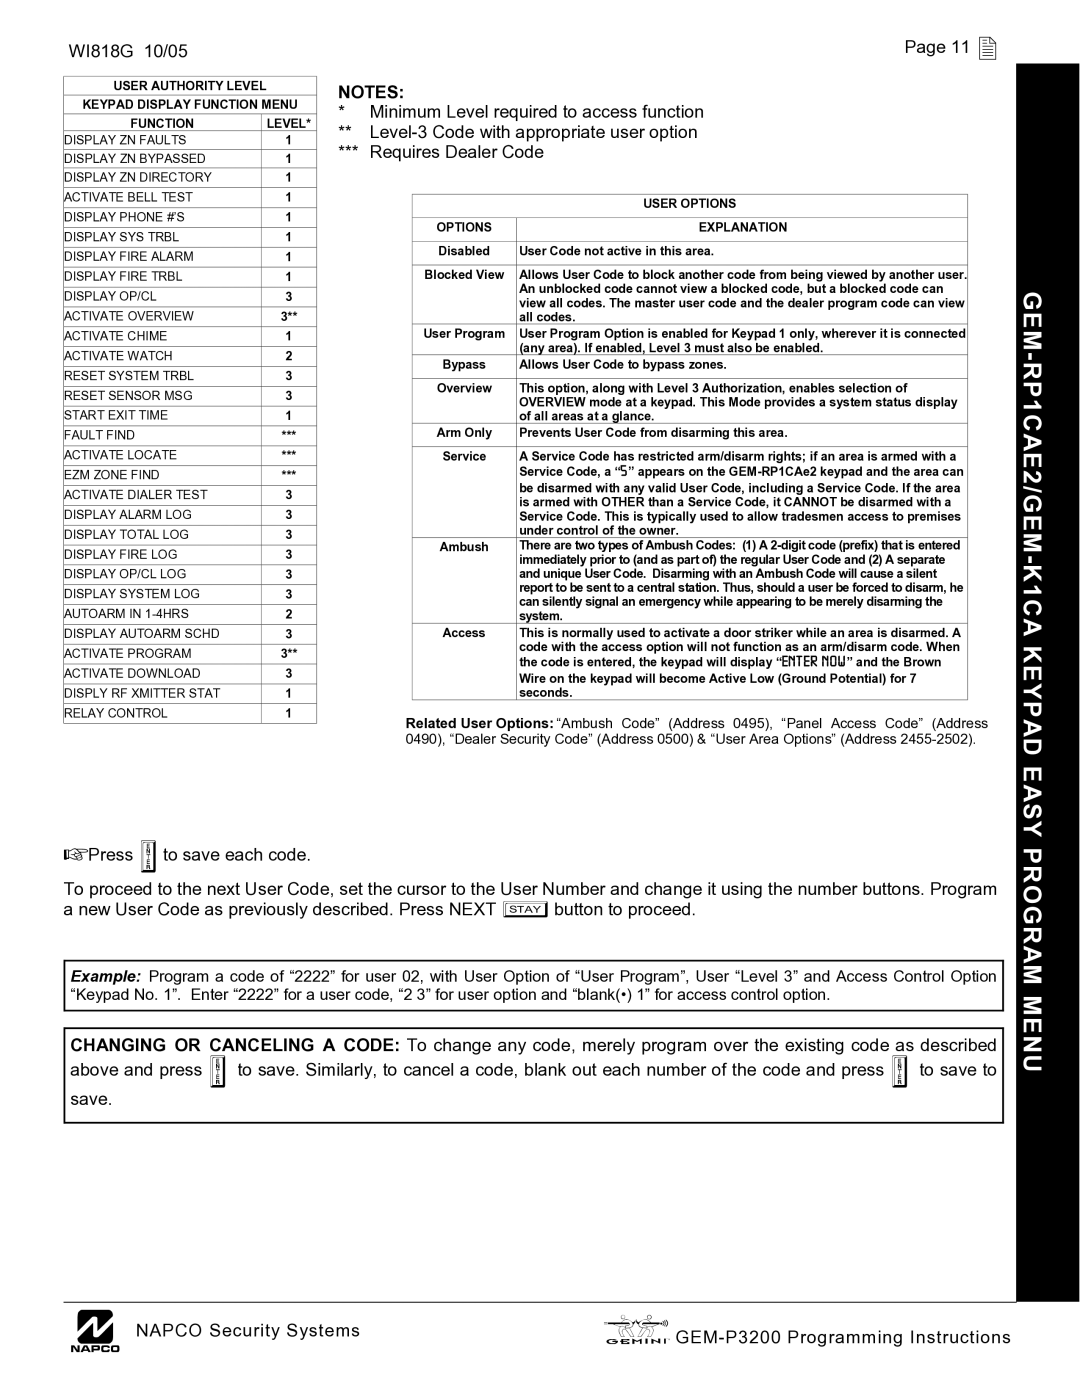
USER AUTHORITY LEVEL
KEYPAD DISPLAY FUNCTION MENU
FUNCTION | LEVEL* |
DISPLAY ZN FAULTS | 1 |
DISPLAY ZN BYPASSED | 1 |
DISPLAY ZN DIRECTORY | 1 |
ACTIVATE BELL TEST | 1 |
DISPLAY PHONE #’S | 1 |
DISPLAY SYS TRBL | 1 |
DISPLAY FIRE ALARM | 1 |
DISPLAY FIRE TRBL | 1 |
DISPLAY OP/CL | 3 |
ACTIVATE OVERVIEW | 3** |
ACTIVATE CHIME | 1 |
ACTIVATE WATCH | 2 |
RESET SYSTEM TRBL | 3 |
RESET SENSOR MSG | 3 |
START EXIT TIME | 1 |
FAULT FIND | *** |
ACTIVATE LOCATE | *** |
EZM ZONE FIND | *** |
ACTIVATE DIALER TEST | 3 |
DISPLAY ALARM LOG | 3 |
DISPLAY TOTAL LOG | 3 |
DISPLAY FIRE LOG | 3 |
DISPLAY OP/CL LOG | 3 |
DISPLAY SYSTEM LOG | 3 |
AUTOARM IN | 2 |
DISPLAY AUTOARM SCHD | 3 |
ACTIVATE PROGRAM | 3** |
ACTIVATE DOWNLOAD | 3 |
DISPLY RF XMITTER STAT | 1 |
RELAY CONTROL | 1 |
NOTES:
*Minimum Level required to access function
**
***Requires Dealer Code
| USER OPTIONS |
|
|
OPTIONS | EXPLANATION |
|
|
Disabled | User Code not active in this area. |
|
|
Blocked View | Allows User Code to block another code from being viewed by another user. |
| An unblocked code cannot view a blocked code, but a blocked code can |
| view all codes. The master user code and the dealer program code can view |
| all codes. |
User Program | User Program Option is enabled for Keypad 1 only, wherever it is connected |
| (any area). If enabled, Level 3 must also be enabled. |
Bypass | Allows User Code to bypass zones. |
|
|
Overview | This option, along with Level 3 Authorization, enables selection of |
| OVERVIEW mode at a keypad. This Mode provides a system status display |
| of all areas at a glance. |
Arm Only | Prevents User Code from disarming this area. |
|
|
Service | A Service Code has restricted arm/disarm rights; if an area is armed with a |
| Service Code, a “5” appears on the |
| be disarmed with any valid User Code, including a Service Code. If the area |
| is armed with OTHER than a Service Code, it CANNOT be disarmed with a |
| Service Code. This is typically used to allow tradesmen access to premises |
| under control of the owner. |
Ambush | There are two types of Ambush Codes: (1) A |
| immediately prior to (and as part of) the regular User Code and (2) A separate |
| and unique User Code. Disarming with an Ambush Code will cause a silent |
| report to be sent to a central station. Thus, should a user be forced to disarm, he |
| can silently signal an emergency while appearing to be merely disarming the |
| system. |
Access | This is normally used to activate a door striker while an area is disarmed. A |
| code with the access option will not function as an arm/disarm code. When |
| the code is entered, the keypad will display “ENTER NOW” and the Brown |
| Wire on the keypad will become Active Low (Ground Potential) for 7 |
| seconds. |
Related User Options: “Ambush Code” (Address 0495), “Panel Access Code” (Address 0490), “Dealer Security Code” (Address 0500) & “User Area Options” (Address
GEM-RP1CAE2/GEM-K1CA KEYPAD EASY
Press Uto save each code.
To proceed to the next User Code, set the cursor to the User Number and change it using the number buttons. Program a new User Code as previously described. Press NEXT Pbutton to proceed.
Example: Program a code of “2222” for user 02, with User Option of “User Program”, User “Level 3” and Access Control Option “Keypad No. 1”. Enter “2222” for a user code, “2 3” for user option and “blank(•) 1” for access control option.
CHANGING OR CANCELING A CODE: To change any code, merely program over the existing code as described above and press Uto save. Similarly, to cancel a code, blank out each number of the code and press Uto save to
save.
PROGRAM MENU
LNAPCO Security Systems |