Digital HD Video Cassette Recorder
Model AJ
Operating Instructions
Thank you for purchasing this product
THE AC OUTLET MAINS SOCKET SHALL BE INSTALLED NEAR THE EQUIPMENT AND
For your safety
Operating precaution
SHALL BE EASILY ACCESSIBLE
For Europe
For U.S.A. and Canada
Notice U.S.A. only
DO NOT REMOVE PANEL COVER BY UN SCREWING
How to replace the fuse
For your safety
FOR YOUR SAFETY PLEASE READ THE FOLLOWING TEXT CAREFULLY
Caution for AC Mains Lead
Time code and user’s bit
Contents
Turning on the power and inserting
Standard accessories
General outline
1080i/720p * 1, 59.94 Hz/60 Hz/50 Hz signal switching
Features
Compact size and light weight
Menu-driven setup
6 Volume control dial
1 POWER switch 2 Audio level meter
5 Headphones jack
These lamps light to indicate the error rate
8 MONITOR SELECT buttons
factory setting
FINE mode
9 METER FULL/FINE selector button
AUDIO UNITY lamp
C ADJUST dial
Time code display
@ Direct menu buttons
Switching between CH1
with the operation using the search dial
Switching between UNITY or VAR
HREV, STILL and FWD lamps
L PREVIEW/REVIEW button
J Audio channel selector button
K Number keys
M AUTO EDIT button
No guarantees are made for the sound played back in the
and sound are restored
mode while the button is held down
search mode
If a
Y STANDBY button
The same tape tension is applied as in the regular
VTR is set to the
VIDEO 50 Hz mode
INPUT CHECK output specifications
VIDEO 59/60 Hz mode
AUDIO
Variable mode
2 Operation mode speed display
Jog mode
Shuttle mode
5 Back page menu indicator
code generator is preset
4 Variable memory mode indicator
6 Function button operation inhibited indicator
6 TIME CODE OUT connector
2 SIGNAL GND terminal
5 TIME CODE IN connector
7 CUE IN connector
A HD REF IN connectors and 75-ohm termination switches
? ANALOG COMPOSITE VIDEO OUT connectors
@ SD REF IN connectors and 75-ohm termination switches
B HD REF OUT connector
Player side
Connections
Example of connections performed for one VTR
Source side
Connections
Example of system connections in 23/24 Hz or 25 Hz HD mode
Example of system connections in 25 Hz SD mode
Note concerning tapes played back by this VTR
Connections
Example of connections with an editing controller
Video monitor signals
Concerning tapes
Noise may occur when performing slow playback
using consumer-use DV or DVCAM cassette tapes
S cassettes
2 The VTR is set to the STANDBY ON/OFF mode
Turning on the power and inserting the cassette
1 Turn on the VTR’s power 2 Check that the AUTO OFF lamp is off
Precautions for STILL TIMER setting
Adjust the audio levels
Recording
Playback phase adjustment function
Playback
Variable mode
Jog mode
Shuttle mode
Jog/Shuttle
Preroll
When the search mode is established on the CUE screen
Manual Editing
ASSEM button
When using this VTR as the recorder
Switch settings and adjustments
When using this VTR as the player
Automatic Editing
to select A5, A6, A7
Selecting the editing mode
Registering the edit points
channels
3 Resetting edit points
How the duration is calculated When two edit points have been set
When no edit points have been set
1 Resetting both an edit IN point and OUT point
Regular preview is now conducted
Previewing
Automatic editing
To stop the preview at any time, press the STOP button
Review is now started by the recorder
Reviewing
1 Upon completion of the editing, press the REVIEW button
To stop the review at any time, press the STOP button
∫ Clearing the edit points
Audio Split Editing
∫ Registering the edit points
∫ Modifying the edit points
Between the video IN and OUT points
∫ Duration display
The duration can be indicated on the display
Press the IN button and OUT button at the same time
Variable memory function
Variable memory playback operation procedure
The variable memory mode can be selected by setting
Variable memory function selection
Phase synchronization is not performed during
when the VTR exits the variable memory mode. It
is also cleared when the POWER switch is set to
the player and its speed setting, no guarantees are
General description
SETUP MENU
Function menus
General menus
Function menus
Allocating the function keys
GENERAL DESCRIPTION
Toggle
How to switch the settings
When only the function button is pressed, message
F i toggle
Function menus
HOME
Status display
Status display 1 continued
Function menus
59.94 Hz/60 Hz, 50 Hz mode
Playback reference signal OutRef specifications for tape playback
59.94 Hz/60 Hz operation specifications for tape playback
23.98/24Hz, 25 Hz HD mode
This indicates the current operation mode including the speed display
Operation mode speed display
Variable memory mode indicator
Remaining tape/total tape display
2. Inputting numbers and letters
Registering TCG values
1. Selecting the values
3. Entering the input values
The variable memory mode is not used
For selecting the variable memory mode
The control signal time data is displayed
Function menus
VIDEO
2. Video signal output level adjustments
pressed. Refer to setup menu items No.670 to
VIDEO
V LEVEL
Function menus
VIDEO
C LEVEL
AUDIO
1.Audio signal input selection CH1jCH4
AUDIO
Function menus
jCH8 channels are controlled
Function menus
AUDIO
Function menus
Cue point registration mode
When “OFF” is set
When “ON” is set
When “MANU” is set
Cue point registration
When registering cue points by number
Search mode
When “MANU” is set
$ Clearing all the registered points together
Clearing registered points
Search operations
$Clearing individual registered points
The error log mode can be selected by pressing the
Error log function
When a warning occurs in this VTR, the warning mark
SHIFT button and switching the screen to DIAG SHIFT
Function menus
Concerning the setup menu item No.015 AUTO STEP setting default OFF
Messages saved when ON is selected as the setting
DIAG
Function menus
MENU
MENU
Automatic editing and manual editing
When the editing mode has been selected the
ASSEMBLE
ASSEM button is lighted, automatic editing or
INSERT
INSERT
Registering the edit points
After the edit
2. Changing the settings
SETUP MENU/SYSTEM MENU
Settings
SETUP menu
function buttons
SETUP MENU function buttons
Flow of setting changes
SETUP MENU/SYSTEM MENU
1. Selecting the memory target
FILE
When
Press the
LOCK
FILE
5. File overwrite inhibit facility
Unlocked status
PF1/PF2
Clearing all the function button settings
6. Saving the settings in a PF registration file
Registration
PF1/PF2
Flow of function button registration
PF1/PF2 function buttons
Function menus
PF1/PF2
PF1/PF2 function button names
Function menus
item No
PF1/PF2
Name of setup menu
Function menus
PF1/PF2
A3 ILV
Function menus
PF1/PF2
A4 ILV
ERROR LOG
MENU/ERROR LOG/MULTI CUE
BATTERY
CARD
SHIFT button
For SYSTEM MENU, SETUP MENU and 50PIN ASSIGN
1. Selecting the targeted memory
between the IC CARD MEMORY and VTR MEMORY
Locking a file
4. Editing the title of a selected file
First select the operation file, and then press the ADJ dial
Select the file to be locked, and press LOCK
50P IN/OUT ASSIGN
Pins in which functions can be registered
Items which can be registered in the input and output pins
Registered item names
The entered 50-pin connector pin display is highlighted
Resetting all the items and values
1. Selecting the 50-pin connector pins
The on-screen setting display now blinks
Function menus
Special IN menu list continued
Special OUT menu list
50P IN/OUT ASSIGN
TC input statuses
The statuses established by a multiple number of pins
Error statuses
Up-conversion statuses
Function menus
50P IN/OUT ASSIGN function buttons
Flow of registration
50P IN/OUT ASSIGN
Function menus
50-pin assignment factory settings
or more
50P IN/OUT ASSIGN
System menus
Video output signal adjustments
System menus
For adjusting the system phase of the HD SDI output
For adjusting the system phase of the VIDEO OUT
submenu
Some of the system menu and setup menu items each have
System menus
Setup menus
BASIC
DISPLAY SEL
Setup menus
BASIC
mode
BASIC
Setup menus
internal sync signal serves as the
continued
to the EE mode when “0 EE” is selected as
OPERATION
Setup menus
The BLACK mode is established for
OPERATION
Setup menus
output in the STANDBY OFF mode and EJECT
For selecting what playback images are to be
Setup menus
OPERATION
OTHER
INTERFACE
Setup menus
DVCPRO
EDIT
Setup menus
Setup menus
EDIT
STEP FWD
TAPE PROTECT
Setup menus
Half-loading
REGEN
TIME CODE
Setup menus
TIME CODE
Setup menus
signals are recorded
in the SBC area is output
VIDEO
Setup menus
VIDEO
Setup menus
During SD tape playback, the VTR cannot be operated in the Hz mode
Setup menus
VIDEO
VIDEO
Setup menus
This selects the composite output signal in SD mode
Setup menus
This selects the composite output signal in HD mode
INDEX signal on the SD SDI output signal
AUDIO
Setup menus
continued
Setup menus
AUDIO
Setup menus
AUDIO
a setting other than “MANU” has been
Setup menus
i2.0 k speed range the CUE signal is
enabled
Setup menus
AUDIO
For adjusting the recording level of the CUE
Setup menus
Audio outputs in the search mode
AUDIO
Setup menus
MENU
Connections with Dolby-E* components
of its markings for those channels through which
has been cleared, the following message appears
How to switch the system frequency
4 To cancel the setting entered in step 2, press the
VTR starts
50P IN/OUT 50-pin connector registration
Menu management accompanying switching the system frequency
System menu and setup menu settings
System menu
DET STOP
Setup menus
Setup menus
j8f to 0f
EDIT RPLCE2
Setup menus
Setup menus
Setup menus
Setup menus
The underlining denotes the factory setting mode
Setup menus
Setup menus
BLANK LINE
CTL Reset
Setting the internal time code
TC/UB Preset in the preset enable status
Time code and user’s bit
Time code and user’s bit playback
Setting the external time code
Concerning the time code and user’s bit
These functions work only on the HOME, PF1 and PF2 screens
Superimpose screen
Operation mode
the MONITOR and VIDEO OUT3 connectors are not displayed
Characters displayed
Monitor output channels
Selecting the audio recording channels and monitor output
Audio recording channels
the function will be executed after the function is released
Display saving function
been run at all for about 5 minutes
Rack mounting
CAUTIONS
its power immediately
Video head cleaning
Maintenance
Before proceeding with maintenance, be absolutely
DIAG menu
Error messages
When a warning occurs in this VTR, the warning lamp lights up
∫ Displaying the DIAG menu
shown as a superimposed display
∫Displaying the hour-meter information
Turn the ADJ dial to move the cursor
Error messages
Error messages
Error messages
Warning messages
Operation continues and a warning beep is sounded
OFF lamp lights, and the message display blinks
Error messages
Error messages
External interface specifications
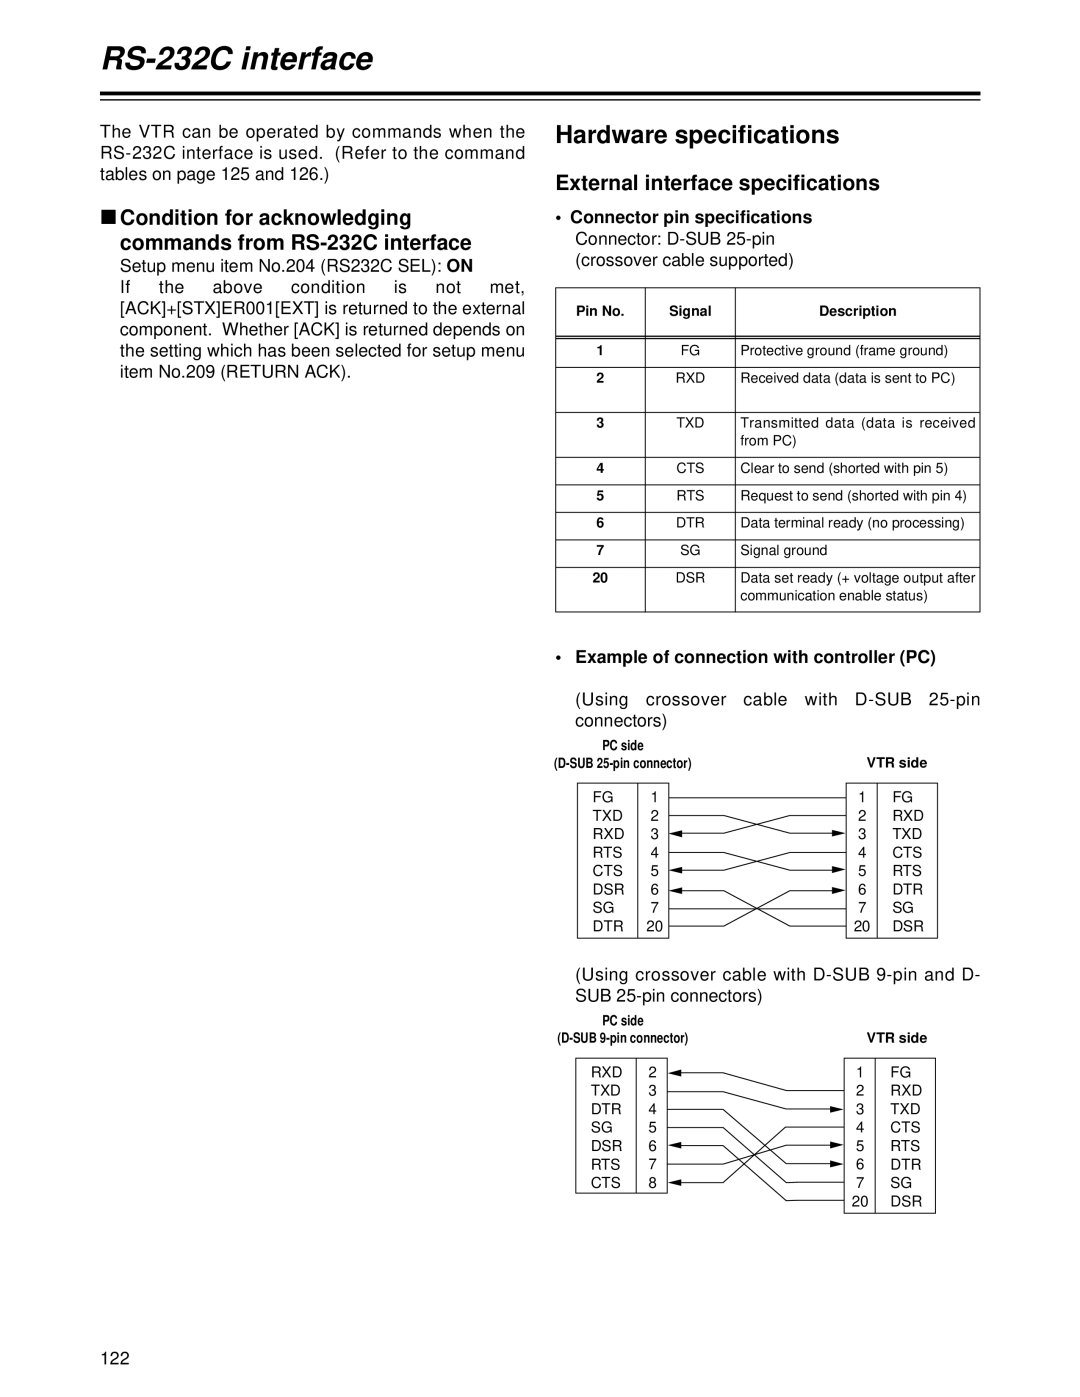
Hardware specifications
∫ Condition for acknowledging commands from RS-232C interface
Connector pin specifications
∫ Outline of procedure for sending data from controller
Software specifications protocol
command
2. Send format
Send command
4. Error code table
∫ When the communication has ended successfully
∫ When the communication has ended unsuccessfully
RS-232C interface
5. Command table
∫ Commands relating to operation control
∫ Commands relating to inquiries
RS-232C interface
RS-232C interface
∫ Microsoft QuickBASIC sample program
Microsoft QuickBASIC is a trademark of Microsoft Corporation
VIDEO OUT
Connector signals
VIDEO IN
AUDIO IN
RS-232C
Printed circuit boards
PARALLEL REMOTE 50P
ENCODER REMOTE15P
Video Output Connectors
Specifications
Video Input Connectors
GENERAL
Cue Track
Video signal adjustment ranges
Audio Input Connectors
Digital Audio
Specifications
OTHER INPUT/OUTPUT SIGNALS
OPTIONAL ACCESSORIES
Time code output
Page
Panasonic Broadcast Europe
Panasonic Broadcast Europe GmbH