1035/1045
Overseas Affiliates
⇒ P.231 Power Connection
Means Power ON. c means Stand by
Safety Information
Safety During Operation
Page
Iii
How to Read this Manual
Symbols
Table of Contents
Preset Reduce/Enlarge
Basic Procedure Setting Originals
Job Preset Other Functions
Basic Functions
118
109
113
120
153
145
147
157
200
192
196
201
232
229
230
233
Page
Machine Types
What You Can Do with This Machine Copy Mode
Series/Book Document Server
100
⇒ P.36
⇒ P.35
⇒ P.75
Guide To Components
Bypass tray Right side cover
Ventilation hole
To copy onto OHP transparencies and translucent paper
Output Tray Guide
To copy onto normal paper and thick paper
Options
Control Panel
Number keys
Function Status indicator
Clear/Stop key
Function keys
Initial copy display
Display Panel
Displays and Key Operations
Function menu
Document Server initial display
Function List Based on Options
Set the paper of the same size KL in the paper trays
Power switches
Turning On the Power
Turning On the Main Power
Operation switch right side of the control panel
Turning Off the Main Power
Turning On the Power
Turning Off the Power
Press the operation switch to
Changing Modes
Inch version
Originals
Metric version
Non-recommended originals for the document feeder
Sizes Detectable by the Auto Paper Select
Sizes difficult to detect
Document feeder
Missing Image Area
Exposure glass
Copy Paper
Recommended Paper Sizes and Types
Ify the size. ⇒ P.58 Copying from the Bypass Tray
Copy Paper
Direction-fixed paper or 2-sided paper
Non-recommended Paper
Paper Storage
Used Toner
Toner
Toner Storage
Make sure that there are no previ- ous settings remaining
Basic Procedure
Make sure that the machine is in Copy mode
Set your originals
System Reset
Auto Off
Lift the platen cover or the docu Ment feeder
Setting Originals
Setting Originals on Exposure Glass
Lower the platen cover or docu- ment feeder
Standard Orientation
Setting Originals Document Feeder
Original Orientation
Turn
Turn
Setting Special Originals
Batch mode
Press the key Press the OK key
Mixed Size mode
Setting Custom Size Originals
Copying
Adjusting Copy Image Density
Basic Functions
Text·Photo
Selecting Original Type Setting
Text
Photo
Press the appropriate key to select the original type
Pale
Generation Copy
Manual Paper Select
Selecting Copy Paper
Auto Paper Select
Make sure that the Auto Paper Select key is selected
Auto Paper Select
Manual Paper Select
Rotated copy
Select the paper tray
Auto Reduce/Enlarge
Press the Auto Reduce/Enlarge key
Sort
Sort/Stack/Staple
Stack
Sort
Shift Sort
Press the Sort or Rotate Sort key
Stack
When the 2 Tray Finisher is installed
When setting a stack of originals in the document feeder
Shift Stack
Set the original, then press the Start key
Staple
Stapling position and original setting
Sheet Finisher
Tray Finisher
Available staple positions except A3, B4, size of paper
Sheet Finisher Tray Finisher
Select one of the stapling positions
To clear scanned images of the originals
When Memory Reaches 0%
To resume scanning
Press the No key to resume scanning
To Remove the Paper from the Staple Unit
Punch
Holes
Punch hole positions
Punchable paper sizes are as follows
Select the Punch position
Copying from the Bypass Tray
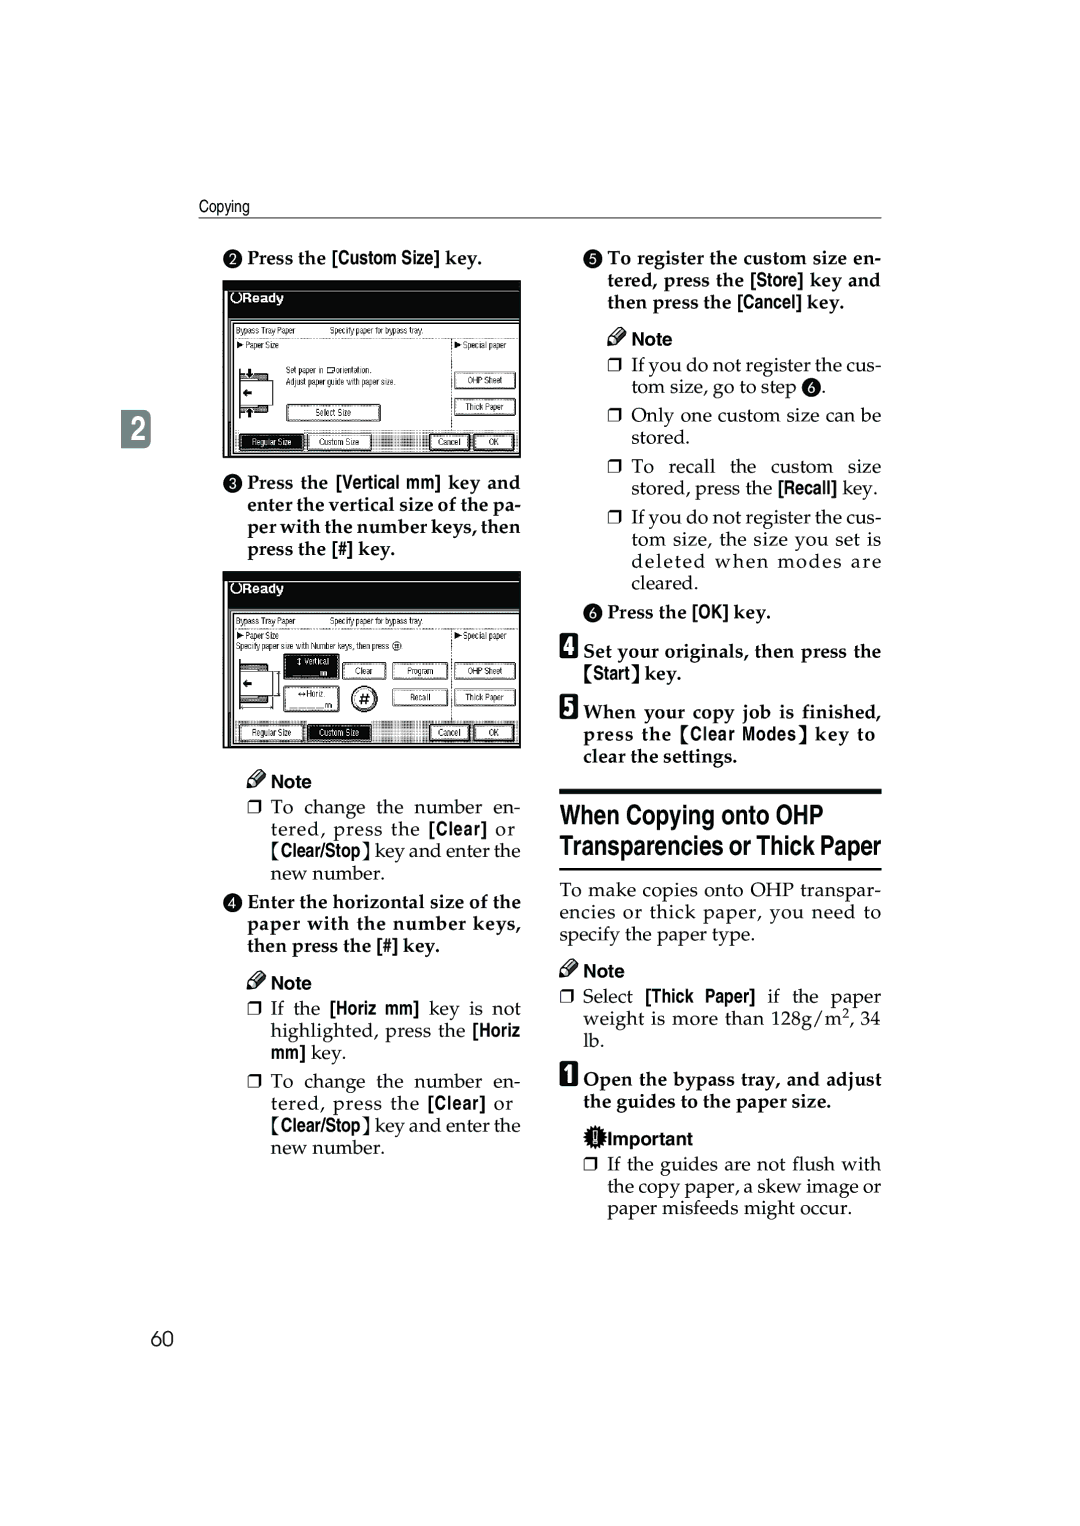
When copying onto custom size paper
Press the # key
When Copying onto OHP Transparencies or Thick Paper
Select OHP Sheet or Thick Paper
Press the OK key Set your originals and press the Start key
Storing a Program
Storing Your Settings
Programs
Deleting a Program
To overwrite the program
Deleting a Program
Changing a Stored Program
Not to overwrite the program
Recalling a Program
Cancel key
Job Preset
Press the Copy key Set up the next copy job
Press the To Printing key
Interrupt Copy
Energy Saver Mode
Other Functions
To interrupt an original being fed
Sample Copy
Press the Clear/Stop key when Copying is displayed
Original Beeper
Changing the Number of Sets
Press the Change Quantity key
Press the Continue key
Preset Reduce/Enlarge
Original → Copy Ratio % Paper size
Create Margin mode
Press the Reduce/Enlarge key
To enter the ratio with the number keys
Zoom
To select the ratio with the n and o keys
Enter the ratio
Enter the desired ratio with the number keys
Size Magnification
Press the Reduce/Enlarge key Press the Specifid Ratio key
Set your original, then press
Directional Magnification %
To specify a ratio with the n
O keys
Directional Size Magnification mm
Press the Dir.Size Mag mm key
Duplex/Combine/Series
Press the Dup./Combine/Series key
Original Direction Completed Copies
Originals and Copy Direction
Duplex/Combine/Series
Sided → 2 Sided
Duplex
Sided → 2 Sided
Copy
Press the 1 Sided key for original
Then press the 2 Sided key for
Press the OK key. Start key
Start key
Sided 16 Pages → Combine 2 Side
Combine
Sided 4 Pages → Combine 2 Side
Combining, the last page is copied
Sided 2 Pages → Combine
Less than the number specified for
Blank as shown in the illustration
Sided 4 Pages → Combine
Side
Press the 4 Originals key, then
Side
Press the 4 Originals key, then press the OK key
Front Back
Sided 16 Pages → Combine
Sided 2 Pages → Combine
Press the 4 Pages key, then press the OK key
Sided 8 Pages → Combine
Side
GCSHVY2E
GCSHVY6E
Series Copies
Series/Book
Series Copies
Booklet
Book → 2 Sided
Press the OK key F Select the paper
Front & Back → 2 Sided
100
Nals are scanned
101
Press the # key after all origi
Press the Front & Back → 2 Sided key, then press the OK key
Open to Left
Copying Book Originals
Sided → Booklet
Open to Right
Open to Left Open to Right
How to fold copies to make a booklet
103
Press the Series/Book key Press the Book key
104
Press the 2 Sided → Booklet key, then press the OK key
Sided → Magazine
105
Press the 1 Sided → Magazine key, then press the OK key
How to fold and unfold copies to make a magazine
106
Open to Left Open to Right
107
108
Original A5K/Copy paper A4K Or Original A5L/Copy paper A4L
Edit Image
Image Repeat
Original A5K/Copy paper A4L Or Original A5L/Copy paper A4K
Press the Edit/Stamp key Press the Edit Image key
Double Copies
110
Press the Double Copies key
Centering
111
Press the Centering key
Positive/Negative
112
Press the Positive/Negative key
Center
Erase
Border
Center/Border
Selecting Diff. Width
Border Erase
Selecting Same Width
114
Center Erase
115
Press the Edit/Stamp key Press the Erase key
Center/Border Erase
116
Press the Center/Border key
117
118
Margin Adjustment
Press the Margin Adjustment key
119
Stamp
Background Numbering
Press the Background Numbering
Preset Stamp
121
Key
Press the Edit/Stamp key Press the Stamp key
Press the Preset Stamp key
122
Select the desired message
123
User Stamp
To change the stamp position, size or density
Change the stamp position, size or density
Press the Change key
To change the stamp position
124
Program/Delete User Stamp
125
Press the Program/Delete Stamp
To program the User Stamp
126
Enter the user stamp name
127
Date Stamp
To delete the User Stamp
Start Scanning key
128
Press the All Pages or 1st Page on- ly to select the print
To change the style of date
129
Press the Change Format key
Numbering
130
131
Numbering per original
Numbering per copy
Press the Page Numbering key
If you selected P1,P2…, -1-,-2- …, P.1, P.2…, 1, 2…
132
If you selected 1/5,2/5…
133
Press the # key Press the OK key
If you selected 1-1, 1-2,…
134
Press the First Printing Page key, then enter the original
Cover/Slip Sheet
Front Cover
136
Front/Back Covers
Copy
Press the Cover/Slip Sheet key
137
Designate
138
Chapter
139
140
Press the Desig./Chapter key
141
When using OHP transparencies set on the bypass tray
Slip Sheets
Press the Slip sheet key
142
Combination Chart
143
144
Overview
145
Process
146
Your current situation might be…
Features and Benefits
On Demand Printing
147
With the Document Server
148
File Merge Printing
149
150
151
Facsimile Resend
You current situation might be
Operation from a Computer
152
To set the file name
Scanning in Document Server mode
Scanning Originals
153
To set the user name
154 To set the password
Make any desired settings
Press the Scanning Finished key
To change the file name, user name, or password
155
156
Scanning in Copy mode
Make the scanning settings for the original
Press the Copy key Set your originals
Printing Saved Documents
157
Enter the required number of prints using the number keys
158
159
Sample Printing
Print First
1st Page key
To Search by User Name
Searching Saved Documents
To Search by File Name
Search by File Name
To Check the Details of Stored Documents
161
Repeat step B if you want to select more than one document
Deleting Saved Documents
162
Press the Delete key to delete it
163
Press the Delete File key
164
165
If Your Machine Does Not Operate as You Want
General
Document Server
166
Document Server
167
Display
168
If You Cannot Make Clear Copies
169
If You Cannot Make Copies As You Want
170
171
Adjust Image
Stamp
Combine
172
Duplex
173
When Memory Is Full
174
175
Loading Paper
Loading Paper in Tray 1or
Push the paper tray in until it stops
Loading Paper in Tray 3 or
176
Pull out the paper tray until it stops
Press the key if it is not lit
Loading Paper in the Large Capacity Tray
177
Place the paper in the tray along the edge on the left
Adding Toner
178
179
Adding Toner
180
Clearing Misfeeds
181
182
183
184
185
186
187
188
Changing the Paper Size
Changing the Paper Size Tray 1 or
Remove the back fence Remove any remaining copy pa- per
189
Press the User Tools/Counter
Changing the Paper Size in Tray 3 or
190
191
192
Adding Staples
Sheet Finisher
193
Adding Staples
Tray Finisher
194
195
Removing Jammed Staples
196
197
Removing Jammed Staples
198
199
Close the front cover of the 2 Tray finisher
Removing Punch Waste
200
201
Accessing the User Tools Copy/ Document Server Features
Press the Copier/Document Server Features key
Press the User Tools/Counter key
Exiting From the User Tools
202
203
User Tools Menu Copier/Document Server Features
204
205
Original Mode Priority
General Features 1/4
Auto Tray Switching
Auto Paper Select Priority
Copy Quality
Original Mode Display
Auto Image Density Priority
207
Image Density
208
General Features 2/4
Job End Call
210
211
General Features 3/4
Copy Function Key F1-F5
212
General Features 4/4
Document Server Storage Key F1-F5
Shortcut R/E
Priority Setting Enlarge
Reproduction Ratio 1/2
Enlarge
Reduce
Priority Setting Reduce
Reproduction Ratio 2/2
Ratio for Create Margin
Priority
215
Back Margin Left/Right
Edit 1/2
Front Margin Left/Right
Front Margin Top/Bottom
Erase Border Width
Sided→2 sided Auto MarginT to T
Sided→2 sided Auto MarginT to B
Erase Original Shadow in Combine
Double Copies Separation Line
Edit 2/2
Image Repeat Separation Line
218
Separation Line in Combine
219
Copy on Designated Paper
Front Cover Copy in Combine
Designated Slip Sheet Copy in Combine
Orientation Booklet, Magazine
Preset Stamp 1/4-4/4
Program/Delete Stamp
User Stamp 1/2-2/2
Stamp Format
222
223
Format
Font
Superimpose
Stamp Setting
Numbering 1/2-2/2
224
Stamp on Designated Slip Sheet
Duplex Back Page Stamping Position
Numbering in Combine
225
Input/Output
Select Stapling Position
Letterhead Setting
Select Stack Function
227
228
Dos And Donts
229
Moving
Where to Put Your Machine
Machine Environment
Optimum environmental conditions
231
Power Connection
Access to the Machine
Cleaning the machine
Cleaning the Exposure Glass
Cleaning the Platen Cover Cleaning the Document Feeder
Maintaining Your Machine
Mainframe
Non-reproduction area
Copy paper weight
Copy paper size
First copy time
Maximum continuous copy run
Power consumption
Reproduction ratio
Copy paper capacity
Space for mainframe W ⋅ D
Dimensions W ⋅ D ⋅ H up to exposure glass
Weight
Noise Emission *1
Document Feeder Option
Sheet Finisher Option
Tray Finisher Option
239
Staple position
240
Punch Kit Option
241
Paper capacity
Internal tray 2 1 bin tray Option
Number of bins Available paper size
242
Extarnal Tray Option
243
244
Dimensions W ⋅ D ⋅ H, option unit
Large Capacity Tray LCT Option
Paper tray unit Option
245
Index
246
247
Background Numbering, 120 Page Numbering
248
249
250