AccXES Firmware Version
XEROX WIDE FORMAT COPY SYSTEM User Guide
Page
Getting to know the WIDE FORMAT COPY SYSTEM
Contents
Document quality
Image Quality
Making copies
Main Menu
Appendix
iv ∙ Contents
Getting to know the WIDE FORMAT COPY SYSTEM
Getting to know the WIDE FORMAT COPY SYSTEM
Table 1. WIDE FORMAT COPY SYSTEM configurations
Scanner standard components
B A C F D
E. Standard Organizer
A. Standard Stacker
Front View A: Compact Organizer
Scanner compact components
8 ∙Getting to know the WIDE FORMAT COPY SYSTEM
Rear View A: Compact Stacker
OPTIONS KEYS
Scanner Control Panel
Control Panel Options Area
Media Selection
10 ∙Getting to know the WIDE FORMAT COPY SYSTEM
Type
Source
ENTER CUSTOM MEDIA SIZE
CUSTOM OUTPUT FORMAT
11.0 IN
WIDTH
SELECT
PRESET OUTPUT FORMAT
8.5 X 11 ANSI A
Image Quality Area
100.0 %
INVALID MODE UPGRADE SCANNER FIRMWARE
400 DPI
TIFF/CCITTG4 1 BIT
FILE FORMAT
SCAN OPTIONS LINE üPREVIEW
TIFF
SCAN OPTIONS PHOTO üPREVIEW
ü PREVIEW
SCAN OPTIONS COLOR
NORMAL
PREVIEW
Background Suppression
NORMAL MODE: BEST IQ üDYNAMIC BACKGROUND REMOVAL
IMAGE ENHANCEMENT COLOR IQ: SRGB COLOR IQ
NOTE: Copy is not selectgable in Color mode
Auto
Reduce/Enlarge
SELECT
PRESET REDUCTION/ENLARGEMENT
100.0%
MANUAL REDUCTION/ENLARGEMENT
INSERT DOCUMENT
READY TO COPY
100.0
Menu
100.0%1 READY TO SCAN INSERT DOCUMENT
READY TO COPY INSERT DOCUMENT
400 DPI
NOTE: The COPY mode is disabled foe X2 TECH
Transform
Batch
Sets Build
Finisher
Start key
Special Features Keys Scan Control Keys
Stop key
The Printer and the Controller
Powering On the WIDE FORMAT COPY SYSTEM
Initial power-on
Switching on the Controller and the Printer
Switching on the Scan System
XEROX WIDE FORMAT COPY SYSTEM 8825/8830/8850
26 ∙Getting to know the WIDE FORMAT COPY SYSTEM
C: Printer Power Switch
A: Controller B: Circuit Breaker switch
Switch721P Power Switch
Controller Power Switch 510 Series Power
28 ∙Getting to know the WIDE FORMAT COPY SYSTEM
Scanner Warm-up
100.0 %
Powering off the System
Document quality
Document quality
Dynamic Background Removal
32 ∙Document quality
Automatic edge detection and document centering
What is a good quality document?
Determining document quality
What is a bad quality document?
34 ∙Document quality
Preparing documents
Type of original
Scanning strategies
First step to try
Second step to try
Normal. Select Photo for
Set Background
Suppression to light
Type to Line
Image Quality
COPY MODE
Original, Type
READY TO COPY INSERT DOCUMENT
100.0%1
AUTO-ROTATE
IMAGING
4REDUCTION LINE PRESERVATION
IMAGE ENHANCEMENT
Type, Normal
SCAN MODE
FILE FORMAT
SCAN OPTIONS LINE
FILE FORMAT: TIFF
SCAN OPTIONS PHOTO 4PREVIEW COMPRESSION: RAW
Type Photo
Type, Color
PREVIEW
Copy
Background Suppression
46 ∙Image Quality
Making copies
Making copies
SCANNER CONTROL
4AUTOSCAN
∙Thick documents
The Image Quality area of the Scanner Control Panel allows you to make adjustments for both the type of original document and the output copy to produce the best possible image quality. It contains selections for Original Document: Type and Background Suppression, and Copy options lighter or darker
100.0%1
Making a copy with the default settings
Page
Fitting the image to a fixed copy size
Scanning when using a Folder
Scanning when using a Folder
READY TO COPY INSERT DOCUMENT
100.0 %
AUTO
Scanning oversized documents
Scanning oversized documents
LONG DOCUMENTS
WIDE DOCUMENTS
Special features keys
Special features keys
Printer Interrupt key
Store/Recall key
JOB TEMPLATES SAVE DEFAULT TEMPLATE
STORE/RECALL
LAST JOB
RECALL LAST JOB
LAST JOB
DELETE LAST JOB
COPIER PARAMETERS AND IMAGES
JOB PARAMETERS AND IMAGES FOR LAST JOB DELETED
DELETE LAST JOB ARE YOU SURE ?:NO
PRESS ENTER TO CONTINUE
Job Templates
TEMPLATES IN USE:
RECALL TEMPLATE
ENTER TEMPLATE NUMBER
JOB PARAMETERS RECALLED PRESS ENTER TO CONTINUE
UNUSED TEMPLATES: 6 7 8 ENTER TEMPLATE NUMBER
SAVE TEMPLATE
JOB PARAMETERS SAVED PRESS ENTER TO CONTINUE
Saving Job Templates
EXIT TO ABORT
TEMPLATE IS IN USE PRESS ENTER TO CONTINUE
DELETE TEMPLATE
TEMPLATES IN USE: 1 2 3 4
Save Default Template Recall Factory Defaults
FINISHER FOLD PROGRAM TITLE BLOCK LOCATION
Finisher key
OUTPUT BIN OVERLENGTH OPTION TAB OPTIONS
FINISHER FINISHER OPTION IS NOT AVAILABLE
FOLD PROGRAM PROGRAM: USER PROGRAM
READY TO COPY INSERT DOCUMENT
FOLD PROGRAMS OVERLENGTH OPTIONS
AUTO
TAB OPTIONS TAB:USE PROGRAM
OVERLENGTH OPTIONS OVERLENGTH:NO FOLD
PUNCH OPTIONS PUNCH: USE PROGRAM
MARGIN OPTIONS MARGIN: USE PROGRAM
TITLE BLOCK LOCATION TB LOCATION: BOTTOM RIGHT
CROSSFOLD OPTIONS CROSSFOLD: USE PROGRAM
TITLE BLOCK LOCATION
SETS BUILD COLLATION:FORWARD
Sets Build key
OUTPUT BIN
BYPASS
100.0 MEMORY
READY TO BUILD SET INSERT DOCUMENT
READY TO PRINT SET PRESS START TO PRINT 100.0
WIDTH FOUND FOR SET IS INPUT ANOTHER WIDTH OR
Batch key
PRESS ENTER TO ACCEPT
TRANSFORM MENU
Transform key
MARGINS
JUSTIFICATION TRANSFORM
+ 1.0 IN
LEAD
LEFT
+ 0.0 IN
+1.0 IN - 1.0 IN
LEAD LEFT RIGHT TRAIL
+0.0 IN +0.0 IN
JUSTIFICATION LEFT CENTER
NOTE: To cancel your choice, press the Exit key
TRANSFORM MIRROR: OFF INVERT: OFF
Transform
Creating a Mirror Image
TRANSFORM
MIRROR: INVERT
To cancel your choice, press the Exit key
Inverting an Image
MIRROR INVERT
Sample key
TRANSFORM OFF
PRESS C/CA TO REJECT
SAMPLE MODE PRESS START TO ACCEPT PAGE
SAMPLE MODE
4SCAN IMAGE TO FILE SCAN IMAGE TO PRINTER
5.Press the Enter key to enable SCAN IMAGE TO PRINTER. Press the Exit key to exit the menu
Page
Scanning to the Network SCAN mode
Scanning to the Network SCAN mode
PLEASE ENTER DIRECTORY
Switching between COPY mode and SCAN mode
Images
Understanding the READY TO SCAN screen
Selections disabled in SCAN mode
READY TO SCAN INSERT DOCUMENT
84 ∙Scanning to the Network SCAN mode
Operating in SCAN mode
5.To view a sample of the file before it is scan to a file, Press the Sample key on the Control Panel. Use the Next or Previous key to highlight SCAN TO PRINTER and press the Enter key. Press the Exit key to return to the READY screen, then press Start. A copy will be sent to the printer
Managing the file system
Clearing the scanned images
CLEAR SCANNED IMAGE
DO NOT CLEAR IMAGE
∙Deleting all of the images currently stored on the hard disk
Main Menu
Main Menu
READY TO COPY INSERT DOCUMENT AUTO 100.0%1
Previous Next
CONFIGURATION
Configuration menu
SYSTEM INFORMATION SYSTEM ADMINISTRATION
MAIN MENU
LOCALIZATION
CONFIGURATION
CONTROL PANEL COPY OPTIONS
LOCALIZATION LANGUAGE: ENGLISH DISPLAY UNITS
DEFAULT MODE: COPY
CONTROL PANEL BEEPER: ENABLED TEXT: NORMAL
CONTROL PANEL
COPY OPTIONS
CUSTOM MEDIA FORMATS CUSTOM R/E PRESETS
MEDIA SERIES
Table 5. Media sizes
MEDIA SERIES
ISO A
MEDIA SERES
ANSI
ARCH
0.0.X
CUSTOM MEDIA FORMATS IN
0.0 X
0.0 X
100.0%100.0%
CUSTOM R/E PRESETS
100.0%100.0% 100.0%100.0%
IMAGING
5.Press the Next key until IMAGING is highlighted
4DYNAMIC BACKGROUND REMOVAL
COLOR IQ
FEATURE 0 — 99 MIN
TIMERS
PRINTER INTERRUPT 1 — 99 MIN:
FILE DELETION 1-24HR:
SCANNER CONTROL
POWER SAVER POWER SAVER DELAY 0 − 4 HR:
PRODUCTIVITY — ANSI
MODE
102 ∙Main Menu
System Information menu
RECENT FAULT LIST CONFIGURATION
SYSTEM INFORMATION
SYSTEM DESCRIPTION
SCANNER
SYSTEM DESCRIPTION
CONTROLLER CONTROL PANEL
CONTROL PANEL MODEL: FIRMWARE: PRINTER
FINISHER MODEL
RECENT FAULT LIST
37449914
37449868
PRINTER CONFIGURATION PRINTER SETTINGS
COPIER CONFIGURATION
ALL CONFIGURATION PRINTS
COPIER CONFIGURATION
PRINTER SETTINGS QUEUE TO PRINTER: YES
PRINTER CONFIGURATION QUEUE TO PRINTER: YES
ALL CONFIGURATION PRINTS QUEUE TO PRINTER: YES
SYSTEM ADMINISTRATION ENTER PASSWORD
System Administration menu
INVALID PASSWORD, RE-ENTER
SYSTEM ADMINISTRATION PASSWORD
SYSTEM
JOB ACCOUNTING FILE SYSTEM
LIST BY DIRECTORY
FILE SYSTEM
DELETE IMAGES DIRECTORY Images ARE YOU SURE ? NO
DELETE IMAGES DIRECTORY Images o
DELETING STORED IMAGES BY DIRECTORY
DELETE IMAGES DIRECTORY Images o IMAGES DELETED
DELETE ALL IMAGES ARE YOU SURE?:NO
DELETE IMAGES ARE YOU SURE?: YES IMAGES DELETED
DELETING ALL STORED IMAGES
CHANGE PASSWORD ENTER NEW PASSWORD
CHANGE PASSWORD ENTER OLD PASSWORD
CHANGE PASSWORD
SECURITY SETTINGS IMAGE RECALL: ENABLED
CHANGE PASSWORD RE-ENTERNEW PASSWORD
SECURITY SETTINGS
DIAGNOSTICS
Diagnostics menu
CLEAR SCANNER USAGE SCANNER DIAGNOSTICS
USAGE METERS
USAGE METERS
SCANNER DIAGNOSTICS
IMAGE PATH
SCANNER DIAGNOSTICS
SCAN BAR FULL SYSTEM
IMAGE PATH
CALIBRATION TEST
SCAN BAR
PRESS START TO BEGIN
SCAN BAR
FULL SYSTEM TEST A B C D E F G H
DESTROYS NVR CONTENTS
RESET NVR DEFAULTS WARNING: THIS FUNCTION
SCANNER RELIABILITY METER
LAST CLEARED
SCANNER FAULTS ORDERED
2001
01-02
SCANNER FAULTS COUNT
SCANNER FAULTS COUNTS
CLEAN CAL ZONE
CLEAR SCANNER FAULT LOG WARNING: THIS FUNCTION
CLEANING POSITION
DESTROYS ALL LOG MESSAGES EXECUTE: NO
MOTOR SPEED
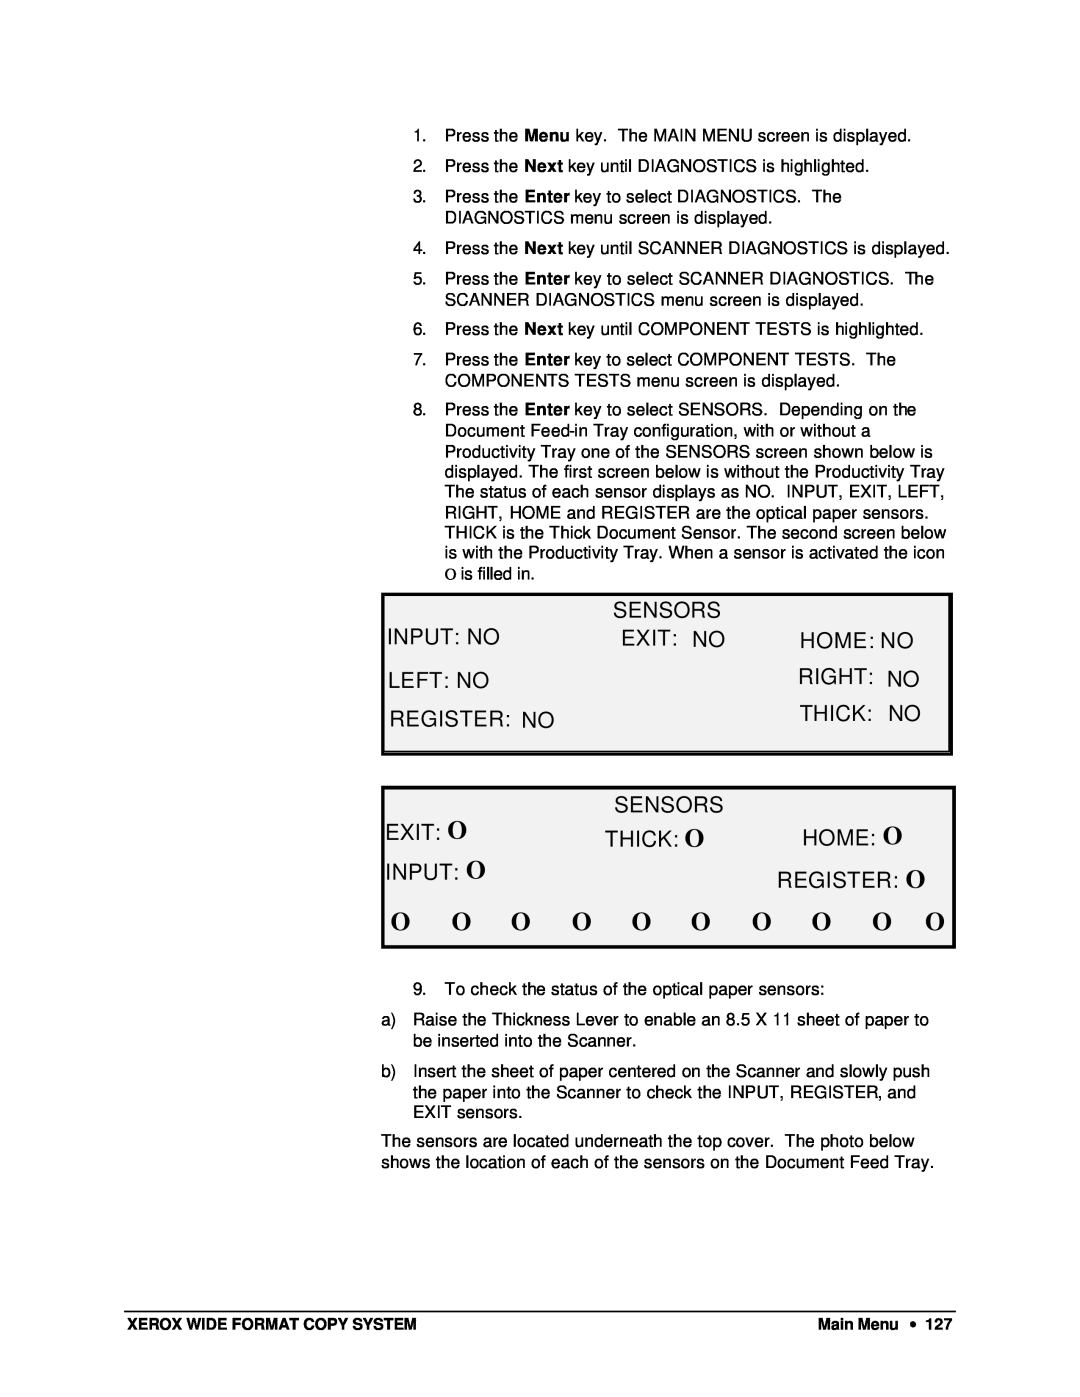
COMPONENT TESTS
LEAD EDGE/TRAIL EDGE SENSORS
LEAD EDGE/TRAIL EDGE ADJUSTMENT
PRESS START TO ADJUST SPEED
MOTOR SPEED
EXPECTED LENGTH
INPUT: NO
SENSORS
EXIT: NO
HOME: NO
D: Register
A: Left
B: Exit
E: Input
MOTOR COMMUNICATIONS DOCUMENT MOTOR
DOCUMENT MOTOR COMMUNICATIONS
MOTOR: OFF
DOCUMENT MOTOR
SPEED
DIRECTION: FORWARD
CALIBRATION MOTOR
CALIBRATION MOTOR: OFF FUNCTION: GO TO HOME
READ NVR 00 -07:xx xx xx xx xx xx xx
PASSWORD ENTER PASSWORD
08 - 0F: xx xx xx xx xx xx xx
10-17:xx xx xx xx xx xx xx
Job Accounting
Job Accounting
Overview
Submitting jobs
Job Accounting Mode menu
PLEASE ENTER ACCOUNT
PLEASE ENTER USER
From the Scanner Control Panel
Over the network Terminating use under an account
ERROR INVALID USER OR ACCOUNT
Cleaning and maintenance - Scanner
Cleaning and maintenance - Scanner
Document Drive Rolls
Cleaning the Platen Glass and
A: Platen Glass
D: Document Drive Rolls front
Cleaning the Calibration Strip
Problem solving
Problem solving
Scanner control
Problem solving ∙
Document feed
Not Ready Media Jam
142 ∙ Problem solving
Image quality
Set Original, Type to
Error messages
Background Suppression to Off
Line and Background
144 ∙ Problem solving
Specifications
Specifications
Specifications ∙
146 ∙ Specifications
Power Consumption
Maximum Elevation
Heat Emission
Appendix
Appendices
IPS/10.16cm/s in all Modes
Table 10. Printer paper sizes
Dimension
Paper size
8825/8830/8850
Roll size
Table 11. Printer roll sizes
Width
∙Test Print Stick Font ∙HP2 Stick Font Latin
LED Number
Table 12. UP8 Controller LED status indicators
Color
Indicated Condition
Timers
Configuration
Power
Localization
System Description
Page
Page
Prepared by Xerox Corporation
Global Knowledge & Language Services
800 Phillips Road Building 845-17S
Webster, New York USA