Chapter 2: Installation
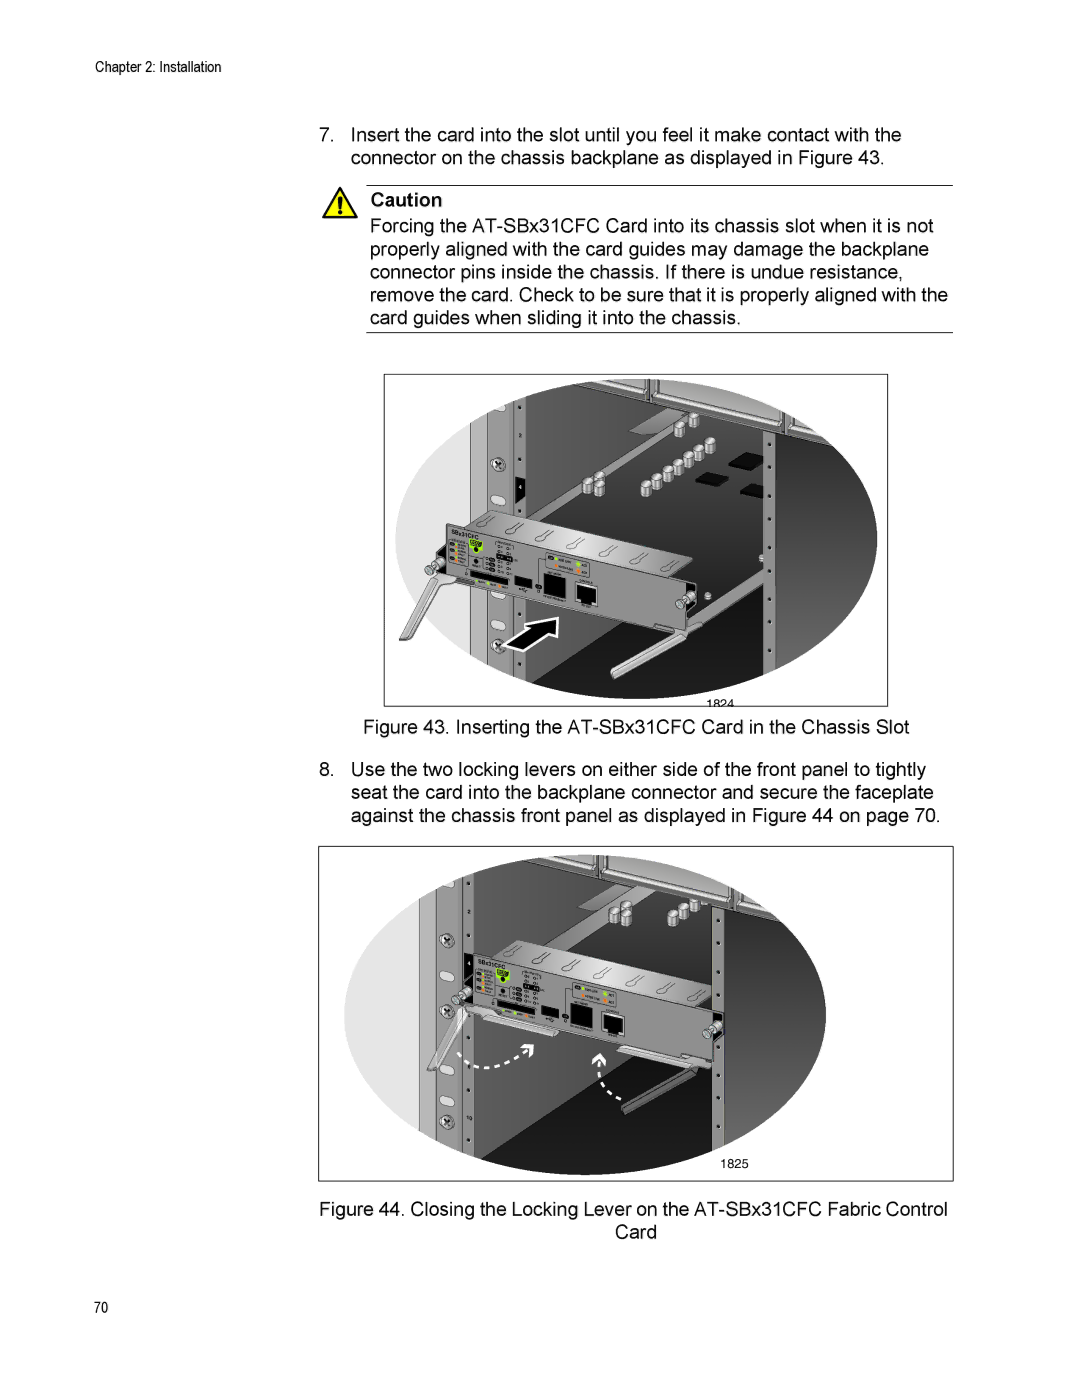
7.Insert the card into the slot until you feel it make contact with the connector on the chassis backplane as displayed in Figure 43.
Caution
Forcing the
|
|
|
|
|
|
| 0 |
|
|
|
|
|
|
|
|
|
|
|
| 2 |
|
|
|
|
|
|
|
|
|
|
|
| 4 |
|
|
|
|
|
SBx31CFC |
|
|
|
|
| 6 |
|
|
|
|
| |
SYS | STATUS |
| SBx | STATUS |
|
|
|
|
|
| ||
M/S |
|
|
|
|
|
|
|
| ||||
| MASTER |
| 0 |
|
|
|
|
|
|
| ||
PSU | SLAVE |
|
| 1 |
|
|
|
|
|
|
| |
| NORMAL |
| 2 |
| 3 |
|
|
|
|
|
|
|
| FAULT |
| 4 |
|
|
|
|
|
|
|
| |
FAN | NORMAL | M/S |
| 5 | CFC |
|
| 1000 | LINK |
| ||
| 6 |
|
|
|
| |||||||
| FAULT | PSU |
| 7 |
|
|
|
| ACT | |||
| RESET | 8 |
| 9 |
|
|
| 10/100 | LINK | |||
|
| FAN | 10 |
| NET |
|
| ACT | ||||
|
| SD | 11 |
| MGMT |
|
| |||||
| READY | BUSY |
|
|
|
|
|
|
|
|
| CONSOLE |
|
| FAULT |
|
| L/A |
|
|
|
|
| ||
|
|
|
|
|
|
| 8 |
|
|
|
|
|
|
|
|
|
|
|
| 10/100/ |
|
| |||
|
|
|
|
|
|
|
|
|
| |||
|
|
|
|
|
|
|
|
|
|
|
| |
|
|
|
|
|
|
|
|
|
|
|
| 1824 |
Figure 43. Inserting the AT-SBx31CFC Card in the Chassis Slot
8.Use the two locking levers on either side of the front panel to tightly seat the card into the backplane connector and secure the faceplate against the chassis front panel as displayed in Figure 44 on page 70.
0 |
|
|
|
|
|
|
|
|
|
|
|
|
|
|
|
2 |
|
|
|
|
|
|
|
|
|
|
|
|
|
|
|
4 | SBx31CFC |
|
|
|
|
|
|
|
|
|
|
| |||
|
|
|
|
|
|
|
|
|
|
|
| ||||
| SYS |
|
|
| SBx |
|
|
|
|
|
|
|
|
| |
| M/S | STATUS |
| STATUS |
|
|
|
|
|
|
| ||||
| MAST | ER |
| 0 |
|
|
|
|
|
|
| ||||
|
| SL |
|
|
| 1 |
|
|
|
|
|
|
| ||
| PSU |
| AVE |
| 2 |
|
|
|
|
|
|
|
| ||
|
| NORMAL |
|
| 3 |
|
|
|
|
|
|
| |||
|
| FAULT |
| 4 |
|
|
|
|
|
|
|
| |||
| FAN | NORMAL | M/S |
| 5 | CFC |
|
| 1000 | LINK |
| ||||
|
| 6 |
|
|
|
| |||||||||
|
| FAULT | PSU |
| 7 |
|
|
|
| ACT | |||||
|
|
|
| RESET | 8 |
| 9 |
|
|
| 10/100 | LINK | |||
|
|
|
|
| FAN | 10 |
| NET |
|
| ACT | ||||
|
|
|
|
| SD | 11 |
| MGMT |
|
| |||||
|
|
|
|
|
|
|
|
|
|
|
|
| |||
6 |
|
|
| READY | BUSY |
|
|
|
|
|
|
|
|
| CONSOLE |
|
|
|
|
| FAULT |
|
| L/A |
|
|
|
|
| ||
|
|
|
|
|
|
|
|
|
| 10/100/ |
|
| |||
|
|
|
|
|
|
|
|
|
|
|
|
| |||
|
|
|
|
|
|
|
|
|
|
|
|
|
|
| |
8 |
|
|
|
|
|
|
|
|
|
|
|
|
|
|
|
10 |
|
|
|
|
|
|
|
|
|
|
|
|
|
|
|
|
|
|
|
|
|
|
|
|
|
|
|
|
|
| 1825 |
Figure 44. Closing the Locking Lever on the AT-SBx31CFC Fabric Control
Card
70