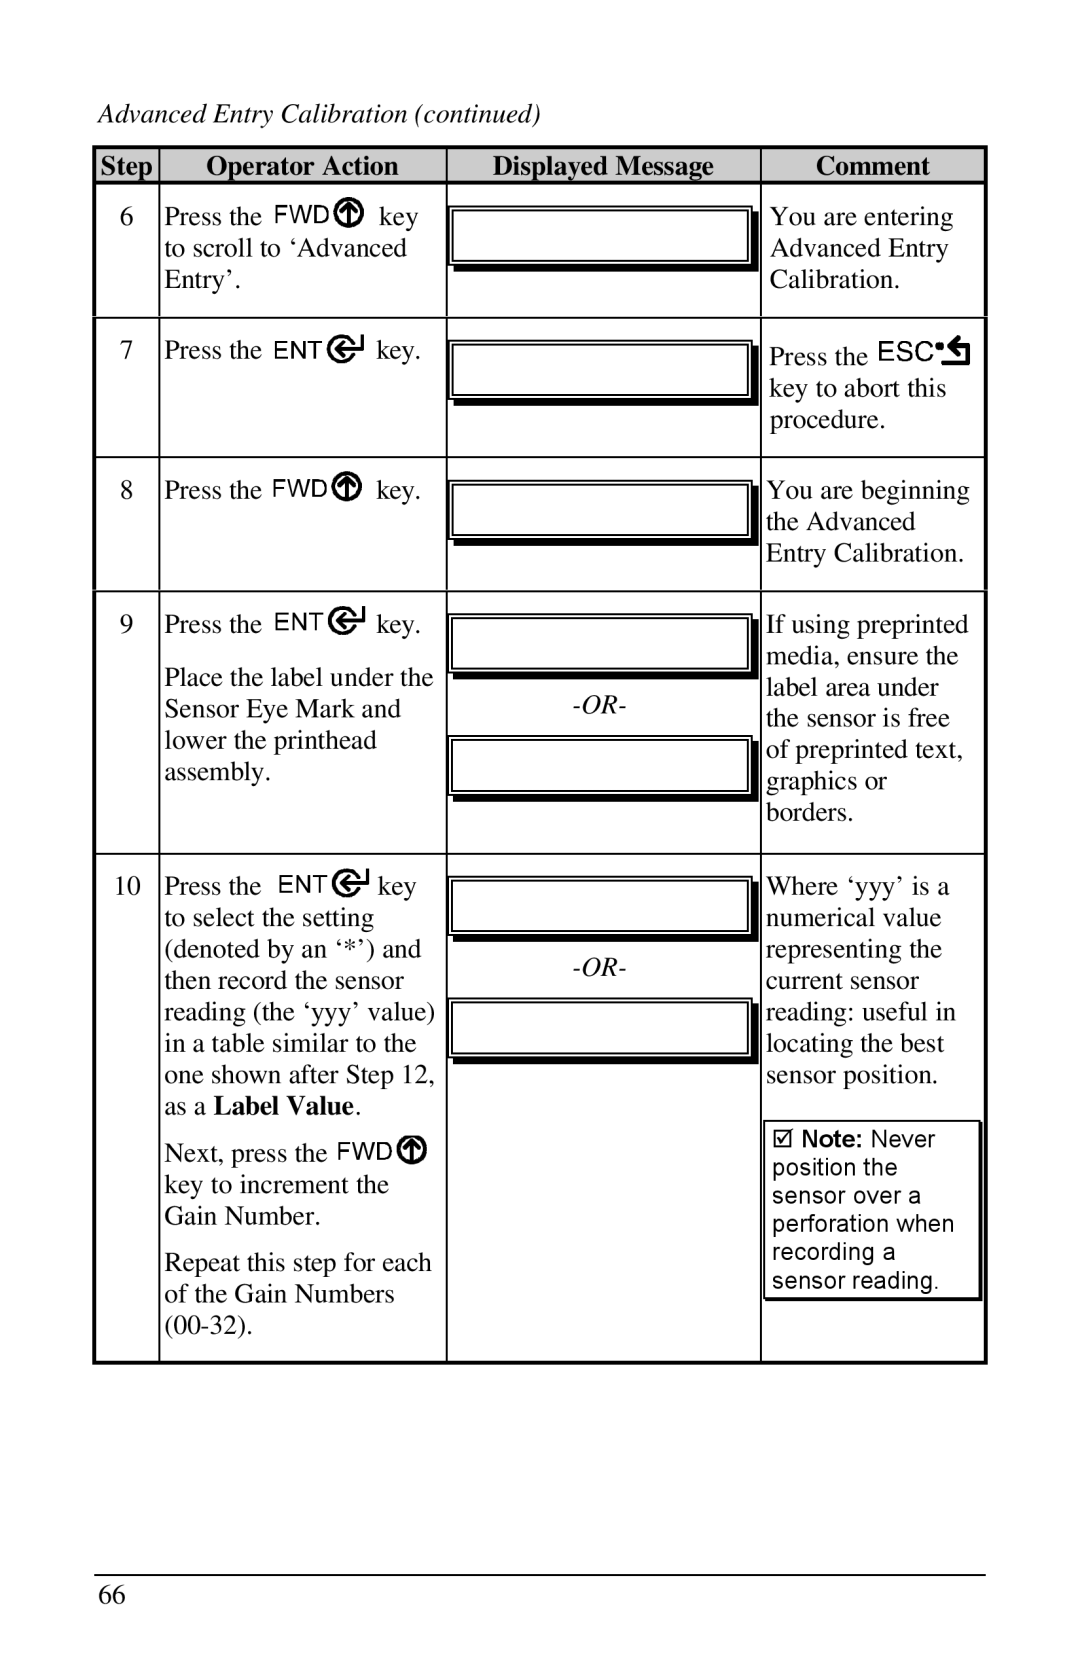
Advanced Entry Calibration (continued)
Step | Operator Action | Displayed Message | Comment | |||||||||||||||
6 | Press the |
|
|
|
|
| key |
| You are entering | |||||||||
| to scroll to ‘Advanced |
| Advanced Entry | |||||||||||||||
| Entry’. |
|
|
| Calibration. | |||||||||||||
|
|
|
| |||||||||||||||
|
|
|
|
|
|
|
|
|
|
|
|
|
|
|
|
|
|
|
7 | Press the |
|
|
|
| key. |
| Press the |
|
|
| |||||||
|
|
|
|
|
|
|
| |||||||||||
|
|
|
|
|
|
|
| |||||||||||
|
|
|
|
|
|
|
|
|
|
|
|
|
|
| key to abort this | |||
|
|
|
|
|
|
|
|
|
|
|
|
|
|
| ||||
|
|
|
|
|
|
|
|
|
|
|
|
|
|
| ||||
|
|
|
|
|
|
|
|
|
|
|
|
|
|
| procedure. | |||
|
|
|
|
|
|
|
|
|
|
|
|
|
|
|
|
|
|
|
8 | Press the |
|
|
|
|
| key. |
| You are beginning | |||||||||
|
|
|
|
|
|
|
|
|
|
|
|
|
|
| the Advanced | |||
|
|
|
|
|
|
|
|
|
|
|
|
|
|
| Entry Calibration. | |||
|
|
|
|
|
|
|
|
|
|
|
|
|
|
| ||||
|
|
|
|
|
|
|
|
|
|
|
|
|
|
|
|
|
|
|
9 | Press the |
|
|
| key. |
| If using preprinted | |||||||||||
|
|
|
| |||||||||||||||
|
|
| ||||||||||||||||
| Place the label under the |
| media, ensure the | |||||||||||||||
|
| |||||||||||||||||
|
| label area under | ||||||||||||||||
| ||||||||||||||||||
| Sensor Eye Mark and | |||||||||||||||||
| the sensor is free | |||||||||||||||||
| lower the printhead |
| ||||||||||||||||
|
| of preprinted text, | ||||||||||||||||
| assembly. |
|
|
| ||||||||||||||
|
|
|
| graphics or | ||||||||||||||
|
|
|
|
|
|
|
|
|
|
|
|
|
|
| borders. | |||
|
|
|
|
|
|
|
|
|
|
|
|
|
|
| ||||
|
|
|
|
|
|
|
|
|
|
|
|
|
|
|
|
|
|
|
10 | Press the |
| key |
| Where ‘yyy’ is a | |||||||||||||
|
| |||||||||||||||||
|
| |||||||||||||||||
| to select the setting |
|
|
| numerical value | |||||||||||||
|
|
|
| |||||||||||||||
| (denoted by an ‘*’) and |
| representing the | |||||||||||||||
| ||||||||||||||||||
| then record the sensor | current sensor | ||||||||||||||||
|
| |||||||||||||||||
| reading (the ‘yyy’ value) |
| reading: useful in | |||||||||||||||
|
| |||||||||||||||||
| in a table similar to the |
| locating the best | |||||||||||||||
| one shown after Step 12, |
| sensor position. | |||||||||||||||
|
| |||||||||||||||||
| as a Label Value. |
|
|
|
|
|
|
| ||||||||||
| Next, press the |
|
|
| þ Note: Never | |||||||||||||
|
|
|
| |||||||||||||||
|
|
|
| position the | ||||||||||||||
|
|
|
| |||||||||||||||
| key to increment the |
| ||||||||||||||||
|
| sensor over a | ||||||||||||||||
| Gain Number. |
|
|
| ||||||||||||||
|
|
|
| perforation when | ||||||||||||||
| Repeat this step for each |
| recording a | |||||||||||||||
|
| sensor reading. | ||||||||||||||||
| of the Gain Numbers |
| ||||||||||||||||
|
|
|
|
|
| |||||||||||||
|
|
|
|
|
|
|
|
|
|
|
|
|
|
|
|
|
| |
|
|
|
|
|
|
|
|
|
|
|
|
|
|
|
|
|
|
|
66
