Page
Table of Contents
Basic Switch Configuration
Iii
Catalyst Crescendo Architecture
Axis Bus
Phoenix Asic
LCP Sage Asic QTP Asic Qmac
103
100
101
102
114
Vii
Depth 160 ATM Overview
161
Viii
Depth 199 Layer 2 Switching Overview
235
Vlan ID
Multilayer Switching
Xii
Xiii
Depth 309 Hardware Troubleshooting No Power
Xiv
341
345
347
359
President and CEO
Cisco Switching Black Book
Limits of Liability and Disclaimer of Warranty
Trademarks
Technical Reviewer
Acquisitions Editor
Product Marketing Manager
Project Editor
Sean Odom
Jeff Duntemann VP and Editorial Director
About the Authors
Acknowledgments
Overview
How to Use This Book
Thanks for buying the Cisco Switching Black Book
Introduction
Black Book Philosophy
Network Switching Fundamentals
Physical Media and Switching Types
Depth
Networking Architectures
Bit of History
Peer−to−Peer Networking Model
Client/Server Network Model
Pieces of Technology
Hubs
Repeaters
Bridges
Page
Routers
Switches
Network Design
Collision Domains
Broadcast Domains
Why Upgrade to Switches?
Unshielded Twisted−Pair Cable
Network Utilization
Properly Switched Networks
FragmentFree Switching
Switched Forwarding
Store−and−Forward Switching
Cut−Through Switching
Combining Switching Methods
Switched Network Bottlenecks
Non−Blocking Switch vs. Blocking Switch
Internal Route Processor vs. External Route Processor
Rule of the Network Road
Switched Ethernet Innovations
Full−Duplex Ethernet
Fast Ethernet
Avoiding Fork−Lift Upgrades
Cisco IOS
Gigabit Ethernet
Connecting to the Switch
Powering Up the Switch
Subinterfaces
Following commands are available in Privileged Exec mode
Today’s Trend
Challenges
Entering and Exiting Subinterface Configuration Mode
Entering and Exiting Privileged Exec Mode
Entering and Exiting Global Configuration Mode
Entering and Exiting Interface Configuration Mode
Saving Configuration Changes
Command−Line Interfaces
Basic Switch Configuration
Queuing
Campus Hierarchical Switching Model
Distribution Layer
Access Layer
Core Layer
Remote Network Monitoring
Connecting to the Console Port
Console Cable Pinouts
Console Connectors
RJ−45−to−AUX Port Console Connector Pinouts
Rollover cable RJ−45−to−RJ−45 pinouts
Pin Signal Input/Output
DTE connectors for an RJ−45 to a DB−25 female
Out
Switch IOSs
IOS Configuration Modes
DB−25−to−DB−9 connector pinouts Signal
Implementing Privilege Levels
Limiting Telnet Access
Configuring an IOS−Based CLI Switch
Configuring Passwords
Setting the Console Port Time−out Value
Setting the Login Passwords
Setting Privilege Levels
Assigning Allowable Commands
Configuring an IP Address and Netmask
Configuring the Telnet Time−out Value
Configuring the Hostname
Configuring the Date and Time
Enabling Snmp Contact
Configuring a Set/Clear−Based CLI Switch
Configuring Port Speed and Duplex
Logging On to a Switch
Help
Setting the Login and Enable Passwords
∙ You are now in Privileged Exec mode
Changing the Console Prompt
Configuring System and Time Information
To configure a Slip interface, enter the following
Entering a Contact Name and Location Information
Viewing the Default Routes
Enabling Snmp
Configuring Trap Message Targets
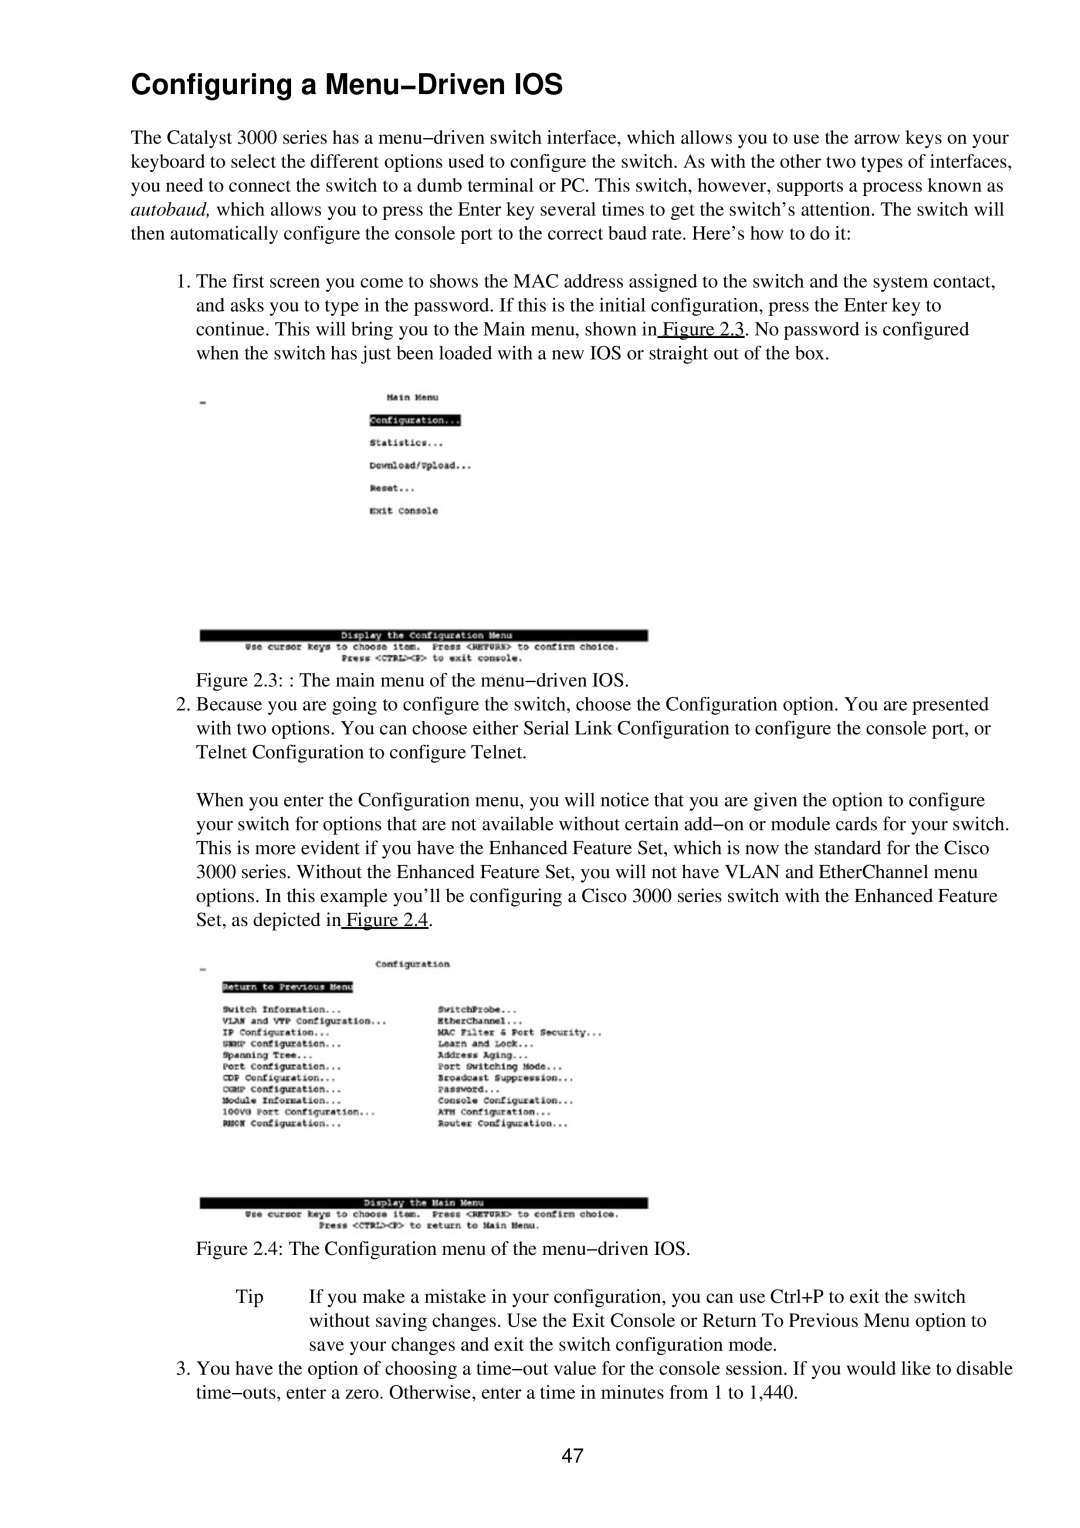
Configuring a Menu−Driven IOS
Configuring an IP Address and Default Gateway
Configuring the Console Port
Configuring Telnet
Configuring the Password
Configuring Snmp
Device
Configuring ROM
Entering ROM Configuration Mode
Booting ROM Mode from a Flash Device
Configuring Rmon on a Set/Clear−Based Interface
Configuring Rmon
Using IOS−Based Command Editing Keys and Functions
Using Set/Clear Command Set Recall Key Sequences
Page
WAN Switching
WAN Transmission Media
Synchronous Transport Signal STS
MGX 8200 Series
Cisco WAN Switches
IGX 8400 Series
BPX 8600 Series Wide−Area Switches
MGX 8800 Series Wide−Area Edge Switches
WAN Switch Hardware Overview
Cisco WAN Switch Network Topologies
Network Management
CLI
WAN Manager
Adding New Users
Accessing and Setting Up IGX and BPX Switches
Displaying a User’s Password
Changing a User’s Password
Resetting the Switch
Using the History Command
Displaying the Power and Temperature of a Switch
Configuring the ASM Setting for BPX
Configuring the Time and Date
Displaying Other Switches
Setting the Switch Name
Setting the Time Zone
Use the command cnfname to assign a hostname for the switch
Accessing the MGX 8850
Changing Passwords
Assigning a Switch Hostname
Displaying the IP Address
Displaying a Summary of All Modules
Displaying Detailed Information for the Current Card
Changing the Time and Date
Displaying the Alarm Level of the Switch
Configuring the IP Interface
Catalyst Crescendo Architecture
LAN Switch Architectures
Output Queuing
ASICs
Single BUS vs. Crossbar Matrix
Input Queuing
∙ Synergy Advanced Multipurpose Bus Arbiter Samba Asic
Earl Asic placement on the Crescendo architecture
Crescendo Logic Units
Crescendo Processors
Axis Bus
Other Cisco Switch Processors, Buses, ASICs, and Logic Units
DCEF
CEF Asic
CEF Search Engine
Adjacency Table
Cisco Express Forwarding Asic components
Phoenix Asic
Bridging Types
Source Route Bridging
Connected to the Qmac Asic
Transparent Bridging
Source Route Switching
Source Route Transparent Bridging
Source Route Translational Bridging
Switching Paths
Process Switching
Fast Switching
Distributed Switching
Autonomous Switching
Silicon Switching
Optimum Switching
To load copies to Flash memory, use the following
System Message Logging
Loading an Image on the Supervisor Engine
Up to 90 seconds
Enabling CEF
Booting the Supervisor Engine III from Flash
Setting the Boot Configuration Register
Configuring Cisco Express Forwarding
Disabling CEF on an Individual Interface
Configuring CEF Load Balancing
Enabling dCEF
Disabling dCEF
Viewing CEF Packet−Dropped Statistics
Disabling Per−Destination Load Sharing
Viewing the Adjacency Table on the 8500 GSR
Clearing the Adjacency Table on the 8500 GSR
Here’s an example of the command’s use
Disabling Server Logging
Clearing the Server Logging Table
Displaying System Logging Messages
Displaying the Logging Configuration
Page
Flat Network of Yesterday
Virtual Local Area Networks
Why Use VLANs?
Vlan Basics
Properly Switched Network
Switched Internetwork Security
Vlan Boundaries
Scaling with VLANs
Vlan Membership Types
Traffic Patterns Flowing through the Network
Cisco’s Vlan Recommendations
Trunk Types
Vlan Trunking
Ieee
Cisco Standards
Ieee 802.1Q
Inter−Switch Link ISL Protocol
Vlan Trunking Protocol VTP
LAN Emulation Lane
Domain must share the same VTP domain name
VTP Advertisements
VTP Versions
Page
100
VTP Switch Modes
Client Mode
VTP Pruning
Methods for Vlan Identification
Server Mode
Transparent Mode
InterVLAN Routing
Internal Route Processors
How InterVLAN Routing Works
102
103
Configuring a Static Vlan on a Catalyst 5000 Series Switch
Configuring Multiple VLANs on a Catalyst 5000 Series Switch
Creating VLANs on a Catalyst 1900EN Series
104
Assigning a Static Vlan to an Interface on a 1900EN Series
Results are shown here
Viewing the Vlan Configuration on a 1900 Series
Viewing an Individual Vlan Configuration on a 1900 Series
Configuring a Trunk Port on a Cisco 5000 Series
Off
On or desirable mode
Auto
Desirable
Clearing VLANs from Trunk Links on a Cisco 1900EN Series
Configuring a Trunk Port on a Cisco 1900EN Series
Mapping VLANs to a Trunk Port
Clearing VLANs from Trunk Links on a Cisco 5000 Series
Following shows the results
Verifying a Trunk Link Configuration on a 5000 Series
Verifying a Trunk Link Configuration on a 1900EN Series
Configuring the VTP Version on a Catalyst 5000 Switch
Configuring a Catalyst 1900 Switch as a VTP Client
Configuring a VTP Domain on a Catalyst 1900 Switch
Setting a VTP Domain Password on a Catalyst Switch
Configuring a Catalyst 1900 Switch as a VTP Server
110
Configuring VTP Pruning on a Catalyst 1900 Switch
Configuring VTP on a Set/Clear CLI Switch
Configuring VTP on a 1900 Cisco IOS CLI Switch
111
Verifying the VTP Configuration on a Set/Clear CLI
Statistics command instead
Displaying VTP Statistics
Configuring VTP Pruning on a Set/Clear CLI Switch
Disabling Pruning for Unwanted VLANs
112
Configuring IPX InterVLAN Routing on an External Router
Assign an IP address and subnet mask to the subinterface
113
InterVLAN and Basic Module Configuration
Internal Route Processors
114
115
Cisco Express Forwarding Asic
Multimodule vs. Fixed Configuration Switches
Available Route Processors
116
117
NetFlow Feature Card and NetFlow Feature Card
118
Route Switch Module
119
Route Switch Feature Card
Multilayer Switch Module
∙ Xerox Network Systems XNS
120
Supervisor Engine Modules
Routing Protocol Assignment
Supervisor Engines I
121
Supervisor Engine
Using the Supervisor Engine
Etherport Modules
122
123
Manually Configured MAC Addresses
Determining the Slot Number in Which a Module Resides
Port Security
Accessing the Internal Route Processor from the Switch
Configuring a Hostname on the RSM
124
Enter Global Configuration mode with the following commands
Here is an example of setting the port speed and port name
125
Assign a Vlan to an IP address
Configuring a Default Gateway on a Catalyst
Verifying the IP Configuration on a Catalyst
Enabling RIP on an RSM
127
Viewing the RSM’s Running Configuration
Configuring InterVLAN Routing on an RSM
Configuration to the Nvram
Configuring IPX InterVLAN Routing on the RSM
Configuring AppleTalk InterVLAN Routing on an RSM
128
129
Viewing the RSM Configuration
Assigning a MAC Address to a Vlan
Viewing the MAC Addresses
Configuring Filtering on an Ethernet Interface
Configuring Port Security on an Ethernet Module
130
131
Configuring the Catalyst 5000 Supervisor Engine Module
Configure the hostname
Clearing MAC Addresses
132
Viewing the Supervisor Engine Configuration
Changing the Management Vlan on a Supervisor Engine
133
134
Configuring the Cisco 2621 External Router for ISL Trunking
135
Configuring Redundancy Using Hsrp
136
IP Multicast
IP Multicasting Overview
137
138
Broadcast
Unicast
∙ Unicast ∙ Multicast
Multicast
Want to Join the Military?
139
IP Multicasting Addresses
Multicast IP Structure
140
141
X bits are not used. The remaining bits
After removing the X portion, the section
Special Multicast Addresses
Delivery of Multicast Datagrams
Multicast Distribution Tree
142
Multicast Forwarding
Igmp Protocols
143
Distance Vector Multicast Routing Protocol
Protocol Independent Multicast
144
145
Internet Group Management Protocol Igmp
IGMPv1
Multicast Open Shortest Path First
146
IGMPv2
147
Multicast at Layer
Time to Live
Igmp Snooping
Cisco Group Management Protocol
Router Group Management Protocol
148
Enabling PIM on an Interface
Configuring IP Multicast Routing
Garp Multicast Registration Protocol
Disabling IP Multicast Routing
Adding a Router to a Multicast Group
Configuring the Rendezvous Point
Configuring a Router to Be a Static Multicast Group Member
Restricting Access to a Multicast Group
Removing Multicast Groups
Configuring Multicast Groups
Configuring Multicast Router Ports
Changing the Igmp Host−Query Message Interval
Disabling Igmp Snooping
Configuring Igmp Snooping
Configuring Igmp Fast−Leave Processing
Removing the Multicast Router
153
Displaying Igmp Statistics
Displaying Multicast Routers Learned from Igmp
Displaying Igmp Multicast Groups
Disabling Cgmp Fast−Leave Processing
Configuring Cgmp
Disabling Cgmp
Enabling Cgmp Fast−Leave Processing
Displaying Rgmp Groups
Configuring Rgmp on the Switch
Configuring Rgmp on the Router
Disabling Rgmp on the Switch
156
Configuring Gmrp
Displaying RGMP−Capable Router Ports
Displaying Rgmp Vlan Statistics
Disabling Gmrp on Individual Ports
Configuring Gmrp Registration
Disabling Gmrp
Enabling Gmrp on Individual Ports
158
Displaying the Gmrp Configuration
Setting Gmrp Timers
Displaying Gmrp Timers
159
Configuring Bandwidth−Based Suppression
Configuring Packet−Based Suppression
Disabling Multicast Suppression
WAN Cell Switching
ATM Overview
160
161
ATM-Easy to Learn?
162
ATM Circuit Switching
ATM Protocols
ATM Cells
163
Time Division Multiplexing
164
ATM Switch and ATM Endpoints
ATM Reference Model
ATM Cell Header
Physical Layer
ATM Layer
165
Specifying ATM Connections
ATM Adaptation Layer
166
Local Area Network Emulation Lane
ATM Addressing
167
Lane Components
What Are ELANs?
168
LAN Emulation Client LEC
LAN Emulation Server LES
169
170
LAN Emulation Configuration Server Lecs
171
Broadcast and Unknown Server BUS
ATM Module Subinterfaces
LEC Queries
172
Integrated Local Management Interface Ilmi
Lane Communication
ATM Addresses
173
LE Messages
Joining and Registering with the LES
Lane Configuration Guidelines
Devices by using the config net command
How Lane Works
Configuring ATM on the 5000 Switch
Implementing Lane
175
Lane Modules
Network Management on the Lane Module
176
Connecting in an ATM Network
Segmentation and Reassembly
177
178
Accessing the ATM Lane Module
Monitoring and Maintaining Lane
Displaying the Selector Field
179
Configuring the LES/BUS
Configuring a LEC for an Elan
Verifying the LES/BUS Configuration
180
Verifying a LEC Configuration on an Elan
Map the LEC bus to the Ethernet Elan named default
Map the LEC bus to the Ethernet Elan named ELAN2
181
Configuring the Lecs
Viewing the Lane Database
Binding the Lecs Address to an Interface
Verifying the Lecs Configuration
Verify the proper setup with the following command
182
LightStream Switches
LightStream
183
100Mbps
STS−3c/STM−1 155Mbps
184
185
Virtual Path Connections
Neighborhood Discovery Function
186
LightStream Troubleshooting Tools
LightStream Boot Process
187
MPS
Supported Troubleshooting Protocols
Snooping Mechanisms
Multiprotocol Over ATM
MPC
Configuring the Hostname
Configuring an Enable Password
Configuring the Processor Card Ethernet Interface
Identify the private virtual path PVP number
Configuring Virtual Private Tunnels
Verifying an ATM Interface Connection Status
Enter the interface on the module
191
Viewing the Configured Virtual Connections
Configuring the Advertised Lecs Address
Viewing the Lane Configuration
192
Viewing the Installed Modules
193
Configuring the MPC
Configuring the MPS
Changing the MPS Variables
194
Enabling Ilmi Autoconfiguration
Configuring Lane on a LightStream
Monitoring the MPS
Powering on the LightStream 100 ATM Switch
Configuring the LS100 Switch
195
196
Recovering a Lost Password
197
198
199
Layer 2 Switching Overview
Layer 2 Redundant Links
Frames
∙ Broadcast frames ∙ Multicast frames ∙ Unknown unicasts
Layer 2 Network Loops
Broadcast and Multicast Frames
Unknown Unicasts
201
Edsger Dijkstra’s Graph Theory
202
STP Root Bridges
203
Bridge Protocol Data Units
204
Bpdu Timers
205
Parent and Child Switches
Root Bridge Selection
Selection Process
206
Port Costs, Path Costs, and Port Priorities
Spanning Tree Convergence Time
Equal Cost Paths
207
208
STP Port States
209
EtherChannel
Per−VLAN Spanning Tree
Pvst and PVST+
210
EtherChannel Administrative Groups
Link Failure
Port Aggregation Protocol
211
Fast Convergence Components of STP
PortFast
UplinkFast
Enabling STP on a Set/Clear Command−Based Switch
BackboneFast
212
213
Disabling STP on a Set/Clear Command−Based Switch
Disabling STP on a Set/Clear Command−Based Switch by Vlan
Following example, the Vlan number is
Configuring STP on an IOS Command−Based Switch
Disabling STP on an IOS Command−Based Switch
214
Root
Viewing the STP Configuration on a Command Line Switch
Configuring the STP Root Switch
Configuring the STP Secondary Root Switch
Assigning a Port Cost to a Port Using a CLI−Based Switch
Secondary optional
216
Configuring the Port Priority on a Set/Clear Command−Based
Configuring the Port Priority on a CLI−Based IOS
217
218
Verifying the Vlan Priority Settings
Adjusting the FwdDelay Timer on a Set/Clear Command−Based
Adjusting the Hello Timer on a Set/Clear Command−Based IOS
Adjusting the MaxAge Timer on a Set/Clear Command−Based
Preparing to Enable EtherChannel
219
Disables the port from channeling or creating a bundle
Negotiation. This is the default setting
220
221
Verifying the EtherChannel Configuration
Defining an EtherChannel Administrative Group
Viewing an EtherChannel Administrative Group
222
Configuring EtherChannel on an IOS−Based Switch
Here, the mode is auto
Identifying the Template Port
223
Enabling PortFast on a Set/Clear Command−Based Switch
Disabling PortFast on a Set/Clear Command−Based Switch
Enabling PortFast on a CLI−Based IOS Switch
Disabling UplinkFast on a Set/Clear Command−Based Switch
Disabling PortFast on a CLI−Based IOS Switch
Verifying the PortFast Configuration
Enabling UplinkFast on a Set/Clear Command−Based Switch
225
Verifying the UplinkFast Configuration
Enabling UplinkFast on a Cisco IOS Command−Based Switch
Disabling UplinkFast on a Cisco IOS Command−Based Switch
Disabling BackboneFast on a Set/Clear Command−Based Switch
Viewing the UplinkFast Configuration on an IOS−Based Switch
Viewing UplinkFast Statistics on an IOS−Based Switch
Enabling BackboneFast on a Set/Clear Command−Based Switch
227
Multilayer Switching
Why Not Call Them Routers?
How MLS Works
228
∙ MLS Switching Engine MLS−SE-The switch supporting MLS
MLS Components
Prioritizing Traffic Flows
229
230
MLS Flows
231
Access List Flow Masks
Destination−IP Flow Mask
Source−Destination−IP Flow Mask
232
MLS Troubleshooting Notes
IP Access Lists and MLS Interaction
IP−Flow Flow Mask
233
Configuring MLS
Aging Timers
MLS Cache
234
MLS Cache Fast Aging Time
Configuring an External MLS Route Processor
VTP Domain
Management Interfaces
Disabling Mlsp on an MLS−RP for IPX
Enabling Mlsp on an MLS−RP for IP
Disabling Mlsp on an MLS−RP for IP
Enabling Mlsp on an MLS−RP for IPX
Re−enabling MLS on a Catalyst
Configuring the MLS Switch Engine
Enabling MLS on an Individual Interface
Disabling MLS on an External Router Interface
Disabling Fast Aging on a Catalyst
Configuring the MLS Cache on the Catalyst
Configuring Fast Aging on a Catalyst
Disabling MLS on a Catalyst
Disabling Normal Aging on the Catalyst
Configuring Long Aging on the Catalyst
Configuring Normal Aging on the Catalyst
Disabling Long Aging on the Catalyst
Viewing MLS−RPs
Monitoring and Viewing the MLS Configuration
Viewing the MLS Aging Configuration on a Catalyst
Displaying the IP MLS Configuration
241
Displaying MLS VTP Domain Information
Viewing the MLS Vlan Interface Information
Viewing MLS Statistics on the Catalyst
242
Viewing MLS Entries
Routing Problems
Hot Standby Routing Protocol
243
244
Routing Information Protocol
Proxy ARP
Icmp Router Discovery Protocol
Solution
Token Ring Standby Groups 255
245
246
Groups primarily to facilitate load sharing
Hsrp Message Format
Hsrp States
247
248
Hsrp Configuration
Hsrp Interface Tracking
Disabling Icmp Redirects
Entering Configuration Mode on an RSM
Opening a Session on an Internal Route Processor
249
Assigning an Hsrp Interface Priority
Assigning a Preempt Delay to a Standby Group
Removing a Preempt Delay from a Standby Group
Setting the Hsrp Hello and Hold Timers
Here’s what happened
Removing the Hsrp Hello and Hold Timers
Configuring a Clear−Text Password for Hsrp Authentication
Configuring Two Rsfc Interfaces as One Hsrp Group
Using the show standby Command
Enabling Interface Tracking
252
253
Using the debug Command
Access Security Policies
Policy Networking
254
Core Layer Policies
Distribution Layer Policies
255
256
∙ Managing Hypertext Transfer Protocol Http access
Access Lists
Access List Types
257
Access list string as an example
258
List
To remove a remark, use a command like the following
Applying Access Lists
259
260
Applying Access Lists to Route Filtering
Implementing Privilege Levels
Security at the Access Layer
Configuring Passwords
Limiting Telnet Access
Configuring Banner Messages
Physical Device Security
262
263
Creating a Standard Access List
Vlan Management
Static MAC Assignment vs. Dynamic MAC Assignment
264
Creating an Extended Access List
265
Applying Access Lists Using access−class
Applying Access Lists Using distribute−list
266
267
Configuring a Telnet Session Time−Out Value
Configuring Line Console Time−Out Values
Implementing Privilege Levels on a 1900EN
268
Configuring Banner Messages
Enabling Http Access
Exec−timeout 5
Local
Enable
Enabling Port Security
Aaa
Displaying the MAC Address Table
271
272
Web Management
Standard and Enterprise Edition Cvsm
Cvsm Client Requirements
Cvsm Access Levels
Cvsm Default Home
273
274
Switch Image
275
276
Connecting to the Web Management Console
277
278
279
280
281
Configuring the Switch Port Analyzer
282
283
1900 and 2820 Series Switches
Standard Edition IOS
Main Menu Choices
284
Console Settings
285
System Menu
286
IP Configuration
Network Management
Let’s look at each option from this menu in more detail
287
Snmp Management
288
Snmp Default Trap Messages
Bridge − Spanning Tree
Cisco Discovery Protocol
Port Configuration
Cisco Group Management Protocol
289
290
Syntax Port
AUI port
Port Statuses
291
292
Port Addressing
293
Port Statistics Detail
Monitor
Virtual LAN
Multicast Registration
Firmware
294
295
RS−232 Interface
296
Usage Summaries
297
Configuring Network Settings on the 1900 and 2820 Series
∙ X Exit-This option returns you to the Main Menu
298
299
Configuring Broadcast Storm Control on Switch Ports
300
Configuring Snmp on the 1900 Series
301
302
Configuring Port Monitoring on the Standard Edition IOS
Related solution Found on Enabling Snmp Contact
303
304
Configuring VLANs on the Standard Edition IOS
305
306
307
Configuring Spanning Tree Protocol
Select E to enable Uplink Fast
Assigning a Static Vlan to an Interface on a 1900EN Series
308
309
Switch Troubleshooting
Hardware Troubleshooting
No Power
310
Indicator Lights
Switch Cabling
Switched Port Analyzers
311
Cross−Over Cables
Switch Troubleshooting Tools
Cable Problems
CiscoWorks for Switched Internetworks
313
IOS Software Troubleshooting Commands
Show cdp neighbors
Show config
Show cam
Duplicate MAC Addresses
Show mac
Show flash
Show interface
Show log
Show version
Viewing the Set/Clear IOS Configuration
Show system
Show test
317
318
319
320
Viewing the CLI−Based IOS Configuration
321
Viewing the IOS Version Information on a CLI−Based IOS
Show test module number
322
323
Viewing the VTP Domain Configuration on a Set/Clear IOS
Viewing the VTP Domain Configuration on a CLI−Based IOS
324
325
Viewing the Vlan Configuration on a CLI−Based IOS
326
Viewing the Spanning Tree Configuration on a CLI−Based IOS
327
328
Viewing the CAM MAC Address Table on a CLI−Based IOS
Viewing the CDP Neighbors on a Set/Clear Command−Based
Viewing the CDP Neighbors on a CLI−Based IOS
329
Viewing Individual Port CAM Tables on a CLI−Based IOS
Viewing Port Statistics on a Set/Clear IOS
330
MAC
331
Here is the output using the exception syntax
Viewing Port Statistics on a CLI−Based IOS
332
Using the Port Configuration on a Set/Clear Command−Based
Using the show port Command on a CLI−Based IOS
333
Using the show vlan Command on a Set/Clear Command−Based
Using the show vlan Command on a CLI−Based IOS
334
335
Using the show interface Command on a CLI−Based IOS
336
Using the show log Command on a Set/Clear Command−Based
337
338
339
340
Live Cisco Training/Internet−Based Labs/Study Resources
Appendix a Study Resources
Books
Cisco Group Study and Users Groups
Online Resources
VLANs
Quality of Service
Standards Organizations
Spanning Tree Protocol
Cisco Job Search Sites
∙ it.careershop.com
344
Appendix B Basic IOS CLI−to−Set/Clear Commands
Configures STP Set spantree enable mod/number hello
Vlan name Vlan−membership static vlan Assigns a port to
346
Appendix C The Cisco Consultant
Establishing Credibility
347
Designing a Solution
Come Off As an Expert
348
349
Estimating the Cost
Presenting the Final Proposal and Creating Expectations
Total up front
350
Contracting
Document, Document, Document
Way to Fail
Failing to Manage Your Time
Assuming You Know What the Customer Needs
351
Conclusion
Failing to Take Responsibility
352
353
Required Equipment
354
Lab Objectives
355
Possible Solution
1912 Basic Configuration
Configure a password for the switch
Enable trunking on this port to always be on
Assign Vlan names
356
357
Catalyst 5000 Basic Configuration
Configuring the Cisco 2621 Interface for ISL Trunking
Verify the configurations
358
Forwarding rate 370 pps Max MAC addresses 024 048
Appendix E Switch Features
Access Layer Switches
Cisco Catalyst
360
Forwarding rate 370 pps
361
4MB Dram 8MB
Cisco Catalyst 3500 Series XL
12MB
362
363
Cisco Catalyst 3900 Series
16MB
Stackable Yes Forwarding Rate Million pps
364
Distribution Layer Switches
Key Features and Benefits
Up to 8MB Stackable Yes
365
Key Features
Cisco Catalyst 4000 Series
Catalyst 5000 Series
366
Catalyst 6000 Series
367
Core Layer/WAN Switches
368
Catalyst 8400 Services
Cisco Catalyst 8400 Series
Catalyst 8400 Modules
Cisco Catalyst 8500 Series
Network Management
369
BPX 8680 Universal Service Node
BPX 8600 Series
370
Services
MGX 8800 Series
371
372
Series Gigabit Switch Routers
373
374
375
376
377
378
379
380
381
382
Ieee 802.1Q
Hub
Hypertext Transfer Protocol Http
See Institute of Electrical and Electronics Engineers Ieee
384
385
386
387
388
389
390
391
392
393
394
395