Color Image Scanner
POWER
S510M for Macintosh Operator’s Guide
P3PC-1942-01ENZ0
Page
Converting paper documents into PDFs by pressing a single button
Introduction
ScanSnap S510M Operators Guide
Effortless scanning
Chapter 3 Basic Scanner Operations
Chapter 1 Before You Start Using Your Scanner
Chapter
CONTENTS
Daily Care
Uninstalling ScanSnap
Installation Specifications
Replacing Consumables
FCC declaration
Regulatory Information
Canadian DOC Regulations
International ENERGY STAR Program
Use in High-safety Applications
Bescheinigung des Herstellers / Importeurs
About the use of mercury
How Product Names Are Indicated In This Manual
Trademarks
Manufacturer
Safety Precautions
Note, Liability
Preface
Symbols Used In This Manual
Operation
viii
About the Warning Label
Operation
About Maintenance
Screen Examples In This Manual
Wipe any dust from the power plug
Safety Precautions
Use only specified AC cables and connector cables
Do not touch the AC cable with wet hands
Do not put liquids inside the scanner
Do not use the scanner if you smell strange odor
Turn the scanner OFF if it is damaged
Do not touch the inside of the scanner unless necessary
Do not block the ventilation ports
Do not install the scanner on unstable surfaces
Firmly insert the power plug
Do not place heavy objects or climb on top of the scanner
Do not install the scanner in the direct sunlight
xiii
Avoid any contact when scanner is in use
Protect the scanner from static electricity
Page
Chapter
Before You Start Using Your Scanner
1.1 Names and Functions of Parts
Front Side
Operation Button
Before You Start Using Your Scanner
Rear Side
Page
2.2 Connecting ScanSnap to your Computer
Connecting ScanSnap
2.1 Installing ScanSnap
Chapter
Operating system
2.1 Installing ScanSnap
Before Installing ScanSnap Manager
3 Supported
2. Make sure that ScanSnap is not connected to your computer yet
Connecting ScanSnap
Free disk space
3. Start up your computer
1. Insert the Adobe Acrobat 8 DVD-ROM into the DVD-ROM drive
Installing Adobe Acrobat
Prepare the Adobe Acrobat 8 DVD-ROM
⇒ The Adobe Acrobat 8 Professional window appears
Connecting ScanSnap
⇒ The Finder window appears
1. Insert the ScanSnap Setup CD-ROM into the CD-ROM drive
Installing ScanSnap Manager
follow the procedure below to install ScanSnap Manager
⇒ The Welcome to ScanSnap Manager Installer window appears
2 With Mac OS X v10.3 or
Connecting ScanSnap
⇒ Click the Continue button
⇒ The Important Information window appears
When you have finished reading, click the Continue button
⇒ The Software License Agreement window appears
Connecting ScanSnap
⇒ The agreement confirmation window appears
⇒ The Installing ScanSnap Manager window appears
Connecting ScanSnap
1. Log in as the user that you want to configure
2.2 Connecting ScanSnap to your Computer
Connecting the AC Adapter
Connecting the USB Cable
ScanSnap
1. Remove the seal on the rear side of the ScanSnap scanner
3. Open the paper chute of ScanSnap
USB cable
⇒ ScanSnap is automatically turned on and detected by your computer
Connecting ScanSnap
The scanner can be turned on/off by performing the following actions
Page
3.8 Using the ScanSnap as a Copy Machine
Basic Scanner Operations
Changing Scan Settings
Chapter
3.1 Flow of Operations
Preparation
Basic Scanner Operations
HINT
Scanning documents
2. Confirm if the Use Quick Menu is checked or not
Basic Scanner Operations
⇒ This starts the scanning
Page
Default settings for scanning are as follows
Basic Scanner Operations
Turning off your computer or closing the paper chute
Turning the Scanner ON/OFF
Turning on your computer or opening the paper chute
End of Operation
⇒ The ScanSnap Manager icon changes to . The Power lamp goes out
3. Unplug the AC cable from the power outlet
Basic Scanner Operations
Weight
3.2 Scanning Different Document Types
Without Using the Carrier Sheet
Weight
Clean the Pad ASSY and rollers as frequently as possible
Basic Scanner Operations
Use the Carrier Sheet only for the ScanSnap
How to load documents
3.3 Loading Documents
Basic Scanner Operations
4 Repeat steps 1 to 3 a few times
1. Pull the stacker towards you
3. Adjust the side guides to the document width
Basic Scanner Operations
2. Use the indent and extend the stacker extension Indent
3.4 Changing Scan Settings
2. Change the scan settings in the Scan and Save Settings window
The following describes how to change the settings
⇒ The Scan and Save Settings window appears
Basic Scanner Operations
The following describes the setting items of each tab
Basic Scanner Operations
Application tab
Application
Add or Remove button
Basic Scanner Operations
To change settings
To remove an application
Save tab
Folder path to save images
Basic Scanner Operations
Filename format button
Scanning tab
Image quality
Scanning side
Basic Scanner Operations
Color mode
Continue scanning after current scan is finished
Option button
Basic Scanner Operations
Correct skewed character strings automatically
Allow automatic image rotation
Selecting the file option
File option tab
Basic Scanner Operations
Option button
Create a merged PDF file of all the scanned images
Basic Scanner Operations
Paper size tab
Paper size
Custom button
Carrier Sheet Settings button
When deleting a custom document size
When changing the settings
Basic Scanner Operations
Mode
Mode Create facing pages in
Basic Scanner Operations
Output image size
Mode Create front and back images
You can create up to 5 custom sizes
Add custom size button
To add custom size documents
Clicking the Add custom size button displays the following window
Basic Scanner Operations
To change settings
To delete custom sizes
Compression tab
Compression rate
Image data size
Basic Scanner Operations
File type PDF Paper size A4 Brochure
3.5 Various settings according to your needs
Scanning only one side of a document
Basic Scanner Operations
⇒ The document is scanned in Simplex scan mode
4. Load the document onto the scanner 5. Press the SCAN button
HINT
Scanning color document in black-and-white
Basic Scanner Operations
Skipping blank pages
2. On the Scanning tab, click the Option button
3. Mark the Allow automatic blank page removal checkbox
⇒ The setting takes effect the next time you scan documents
Basic Scanner Operations
4. Click the OK button and close all the windows
⇒ The Read Mode Option window appears
Correcting skewed documents
2. On the Scanning tab, click the Option button
Operation
ScanSnap S510M Operators Guide
3.5 Various settings according to your needs
Basic Scanner Operations
3. Mark the Correct skewed character strings automatically checkbox
Correcting the orientation of scanned image
ScanSnap S510M Operators Guide
3.5 Various settings according to your needs
Basic Scanner Operations
3. Mark the Allow automatic image rotation checkbox
2. Select the Paper size tab
Scanning documents of different widths or sizes at a time
To scan documents of various sizes, do the following
3. Mark the Scan mixed paper size checkbox
4. Click the OK button and close all the windows
This function is available only when Automatic detection is selected
Basic Scanner Operations
5. Align the leading edge and centerline of all documents
6. Load the documents onto the paper chute
7. Press the SCAN button
Basic Scanner Operations
⇒ The size of all images output conforms to the respective documents
Rotating the page view of a PDF file
For details on this function, refer to Adobe Acrobat Help
Basic Scanner Operations
3. You see the view direction is changed
HINT
Saving scanned images in multiple files
Basic Scanner Operations
4. Click the OK button to close the window
You can continue or stop scanning using the following procedure
Continuing/stopping scanning after an error
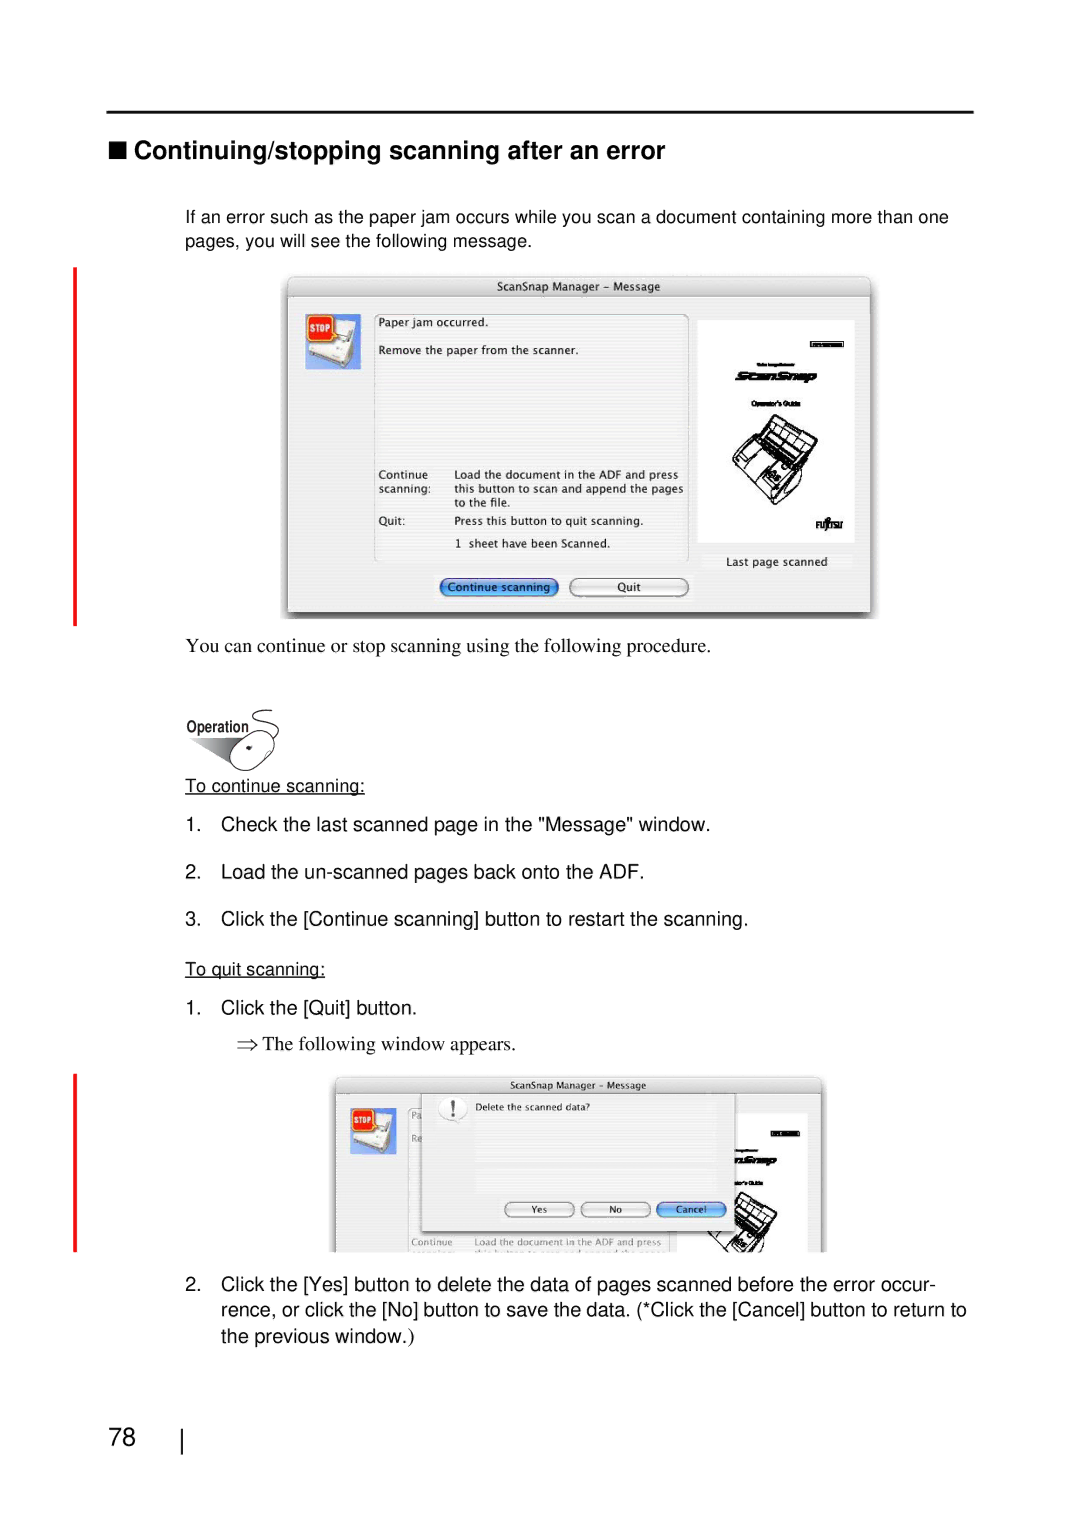
⇒ The following window appears
Basic Scanner Operations
If this is the case, it is not possible to continue scanning
Converting scanned images to searchable text with OCR
Basic Scanner Operations
For details about this function, refer to Adobe Acrobat 8 Help
To Create facing pages in one image
Scanning Documents Using the Carrier Sheet
Create facing pages in one image page
Basic Scanner Operations
3.5 Various settings according to your needs
2. On the Paper size tab, click the Carrier Sheet Settings button
ScanSnap S510M Operators Guide
Page
7. Open the Carrier Sheet and insert the document
Basic Scanner Operations
6. Fold the sheet to be scanned in half
Operation
8. Load the Carrier Sheet onto the ScanSnap
9. Press the SCAN button
Troubleshoot the problem as follows, and the situation may be improved
Basic Scanner Operations
To Create front and back images separately
Basic Scanner Operations
3.5 Various settings according to your needs
ScanSnap S510M Operators Guide
6. Load the Carrier Sheet onto the ScanSnap
5. Open the Carrier Sheet and insert the material to scan
deis kacB
7. Press the SCAN button
Basic Scanner Operations
white paper
3.6 Saving Data in the Specified Folder
Operations in Quick Menu
Basic Scanner Operations
⇒ A preview window appears
4. Click the Scan2Folder action
5. Verify a scanned image in the preview window
Specify file name
Basic Scanner Operations
Preview Window
File List
Save in
History button
Local Folder
Browse button
Network Folder
Basic Scanner Operations
History button
Server address
Browse button
Password
Login button
History button
Cancel button
Basic Scanner
Operations
Browse button
3.7 Sending Files by E-mail
Operations in Quick Menu
Icon List Descriptions of the selected action
Basic Scanner Operations
3. Place the mouse cursor on Scan2E-mail
Operation
Save scanned images to file checkbox
Show preview checkbox
Attached file Size
5. Click the OK button to close the Scan2E-mail -Options window
Basic Scanner Operations
CLICK
⇒ A preview window appears
You can change settings not to display a preview window
6. Click Scan2E-mail in the Action List
7. Verify a scanned image in the preview window
Specify file name
Basic Scanner Operations
Preview Window
File List
History button
Cancel button
Serialize button
Save scanned images to file checkbox
Basic Scanner Operations
8. Click the Attach to E-mail button
3.8 Using the ScanSnap as a Copy Machine
Operations in Quick Menu
3. Place the mouse cursor on Scan2Print
Basic Scanner Operations
Keep data used for printing as files checkbox
6. Click Scan2Print in the Action List
5. Click the OK button to close the Scan2Print - Options window
CLICK
Printer
Presets
Basic Scanner Operations
Copies
Center the image and print checkbox
Cancel button
Allow automatic rotation checkbox
Keep data used for printing as files checkbox
4.1 Uninstalling Supplied Programs
Uninstalling ScanSnap
Chapter
4.1 Uninstalling Supplied Programs
To uninstall ScanSnap Manager in Mac OS X
Uninstalling ScanSnap
To uninstall ScanSnap Manager in Mac OS X v10.3/v10.4
Page
Chapter
Troubleshooting
5.2 Troubleshooting Checklist
5.1 Clearing Document Jams
1. Remove the document on the paper chute
5.1 Clearing Document Jams
Cautions in clearing a paper jam are as follows
2. Pull the cover open lever to open the ADF
Troubleshooting
3. Remove the jammed paper 4. Close the ADF
Resolution
5.2 Troubleshooting Checklist
Symptom
Check The Item Out
Symptom
Troubleshooting
5.2 Troubleshooting Checklist
Resolution
Resolution
Symptom
Check The Item Out
Symptom
Troubleshooting
5.2 Troubleshooting Checklist
Resolution
http//scansnap.fujitsu.com
Symptom
Resolution
Check The Item Out
Cleaning Materials
Daily Care
Fire/Electric Shock
Cleaning the Carrier Sheet
Parts No
6.1 Cleaning Materials
Cleaning Materials
Remarks
Daily Care
6.2 Cleaning the Scanner Exterior & Stacker
Cloth Cleaner F1 or neutral detergent Paint thinner
6.3 Cleaning the Inside of the Scanner
1. Pull the cover open lever to open the ADF
Turn off the scanner before cleaning the following locations
Daily Care
Feed rollers x
3. Close the ADF
Daily Care
Paper chute ADF
6.4 Cleaning the Carrier Sheet
Fire/Electric Shock
Replacing Consumables
Chapter
7.1 Replacing Consumables
Part Nos. and Replacement Cycles of Consumables
Replacing Consumables
Website http//scansnap.fujitsu.com
1. Remove the documents on the paper chute
7.2 Replacing the Pad ASSY
Replace the Pad ASSY following the procedure below
2. Pull the cover open lever to open the ADF
5. Close the ADF
Replacing Consumables
4. Attach the new Pad ASSY
6. Turn on the scanner
⇒ The Check consumable status window will appear
⇒ When you click the Yes button, the counter is reset to
⇒ A confirmation pop-up screen appears
Replacing Consumables
7.3 Replacing the Pick Roller
3. Adjust the Side guide to the A5 size
1. Remove the documents on the paper chute
Handle
4. Remove the sheet guide
5. Rotate the Pick roller bushing on the left side
Sheet guide
Replacing Consumables
Pull out the shaft from the Pick roller while lifting up its tab
9. Install the Pick roller with its shaft to the scanner
8. Attach a new Pick roller to the Pick roller shaft
Replacing Consumables
other feeding errors may occur
11. Attach the sheet guide to the scanner
13. Turn on the scanner
12. Close the ADF
⇒ The Check consumable status window appears
7.3 Replacing the Pick Roller
Replacing Consumables
ScanSnap S510M Operators Guide
7.4 Purchasing the Carrier Sheet
Appendix A
Installation Specifications
Specifications
Page
Index
Page
USB connector
Weight
Page
Repairs
The user must not perform any repairs on the scanner
Page
ScanSnap S510M Operator’s Guide
P3PC-1942-01ENZ0