User guide
Page
User Guide
Warranty
Contents
Getting to know the print server
Media
Copying tasks
Troubleshooting the copier/scanner
Service and support
Appendix E Memory Dimm
Appendix H Scanner resolution and color
Getting to know the printer
Print with excellent quality
Understanding the printer’s features and benefits
Save Time
Save money
Expand your printer
Identifying the printer’s components
Ready light green Go button and light green
Printer control panel
Priority input tray
Printer input trays
Main input tray
Printer media guides
Straight-through output path
Printer output paths
Output bin
Toner door
Choosing paper and other media
Main input tray
Loading media into the input trays
Priority input tray
Specific types of media
Understanding voltage conversions
Turning the power off
Windows 9x, 2000, Millennium, and NT
Accessing the printer properties driver and help
Printer properties driver
Software For Macintosh Computers
Accessing the print driver
PostScript Printer Description Files PPDs
HP LaserJet Utility
Printer properties online help
Printer online help
PrintCopyScan Online help
LaserJet Document Manager Click Help from the main menu
Printing a configuration
Getting to know the copier/scanner
Powerful copier software Copy Plus
Understanding the copier/scanner’s features and benefits
Scan
Copy
Identifying the copier/scanner’s components
Copy Scan
Copier/scanner control panel
Copier/scanner door
Media input tray, guides, and output bin
Supported media sizes and types
Precautions for copying and scanning
Loading originals in the copier/scanner
Getting to know the software
Accessing HP LaserJet Director Windows
Accessing HP LaserJet Director Mac OS
Windows
To turn off the HP LaserJet Director
Mac OS
Open the HP LaserJet Director
Accessing HP Workplace Mac OS
Accessing HP LaserJet Document Manager Windows
HP LaserJet Copier Copy Plus
Quick Copy settings
Accessing HP LaserJet Director Toolbox
Click HP LaserJet Device Configure
HP LaserJet Device Configuration
Click Device Configuration
Click Programs Click HP LaserJet 1220 Series
Accessing HP LaserJet Photo Center
HP LaserJet Director
Accessing the online help
HP LaserJet Document Manager
Any HP LaserJet 1220 software
Getting to know the copier/scanner
Getting to know the print server
Using network protocols
Understanding the print server’s features and benefits
Identifying the print server’s components
Installing the print server
To install the HP JetDirect 175X hardware
Install the printer and server
Installing and configuring the network software
Install the software on a network
Prerequisites
Using the embedded web server
Compatible Web Browsers
Using HP Web JetAdmin
Starting the embedded web server
Benefits of using Bootp
Additional configuration and management tools
Using Bootp
Configuring the Bootp server
Tag Description
Bootptab file entries
Address
Unix systems
Using Dhcp
Windows NT 4.0 server
Windows systems
Page
Windows 2000 server
Page
Enabling or disabling Dhcp
Moving to another network
Media
Optimizing print quality for media types
To print transparencies or labels
Printing transparencies and labels
Printing one envelope
Printing envelopes
Printing multiple envelopes
To print letterhead or preprinted forms
Printing letterhead or preprinted forms
To print on custom-sized media or cardstock
Printing custom-sized media or cardstock
Media
Printing tasks
Printing with manual feed
Printing on both sides of the paper manual duplexing
Manual duplex using the output bin
Manual duplex on heavy media or card stock
Printing watermarks
Accessing the watermark feature
Accessing the multiple pages per sheet feature Mac OS
Accessing the multiple pages per sheet feature Windows
On next
Printing booklets
Page
Canceling a print job
Understanding print quality settings
Using EconoMode Save Toner
Scanning tasks
Starting a scan
Working with scanned items
Scanning to e-mail
Using the e-mail feature Mac OS
Using the e-mail feature Windows 98, 2000, Millennium, NT
Editing scanned text Optical Character Recognition
Online help
Storing scanned text or images
Acquiring an image
Adjusting the contrast
Accessing the contrast feature
Image Enhancement
Accessing the image enhancement features
Enhancing the scanned image in HP Document Manager
Accessing the annotation features
Canceling scan jobs
Adding annotations to scanned images
Properties
Copying tasks
Using the Quick Copy feature
Understanding copying features
WIndows 9x, 2000, Millennium, and NT 4.0
Accessing the Quick Copy settings
Accessing HP LaserJet Copier
Using HP LaserJet Copier
Accessing HP LaserJet Copy Plus
Windows 9x, 2000, Millennium, NT 4.0, Mac OS
Access HP LaserJet Copy Plus from the following locations
Canceling copy jobs
Managing the toner cartridge
Storing toner cartridges
Using HP toner cartridges
HP policy on non-HP toner cartridges
Toner cartridge life expectancy
Saving toner
Recycling toner cartridges
Redistributing toner
Changing the toner cartridge
Page
103
Troubleshooting the printer
Pages did not print
Finding the solution
Pages printed, but there was a problem
Light status legend
Printer light patterns
Printer initialization/Cancel
Error messages on the screen Solution
Error messages on the screen
Avoid memory-intensive tasks such as sending a fax or
Symptom Possible Cause Solution Problems in the Chooser
Common Macintosh Problems
Symptom Possible Cause Solution
USB Problems
Symptom Possible Cause Solution Printing Errors
LaserWriter
LaserWriter 8.4 and higher
Hardware troubleshooting
Software troubleshooting
Click Select PPD
Selecting an Alternate PostScript Printer Description PPD
Renaming the Printer
PS Errors Symptom Possible Cause Solution
Troubleshooting PostScript PS Errors
PS Errors Symptom Possible Cause Solution Specific Errors
Paper handling problems Problem Solution
Paper handling problems
Paper handling problems ProblemSolution
Printed page is different than what appeared on screen
Printed page problems Problem Solution
Settings. See Printer properties driver for more
Printed page problems ProblemSolution
Light print or fade
Improving print quality
Toner specks
Dropouts
Toner smear
Vertical lines
Gray background
Misformed characters
Loose toner
Vertical repetitive defects
Wrinkles or creases
Skew
Curl or wave
Toner scatter outline
Cleaning the printer
Cleaning the toner cartridge area
Cleaning the printer media path
Typical media jam locations
Clearing printer media jams
Removing a jammed
Page
Changing the pickup roller
Gently pull the pickup roller up
Cleaning the pickup roller
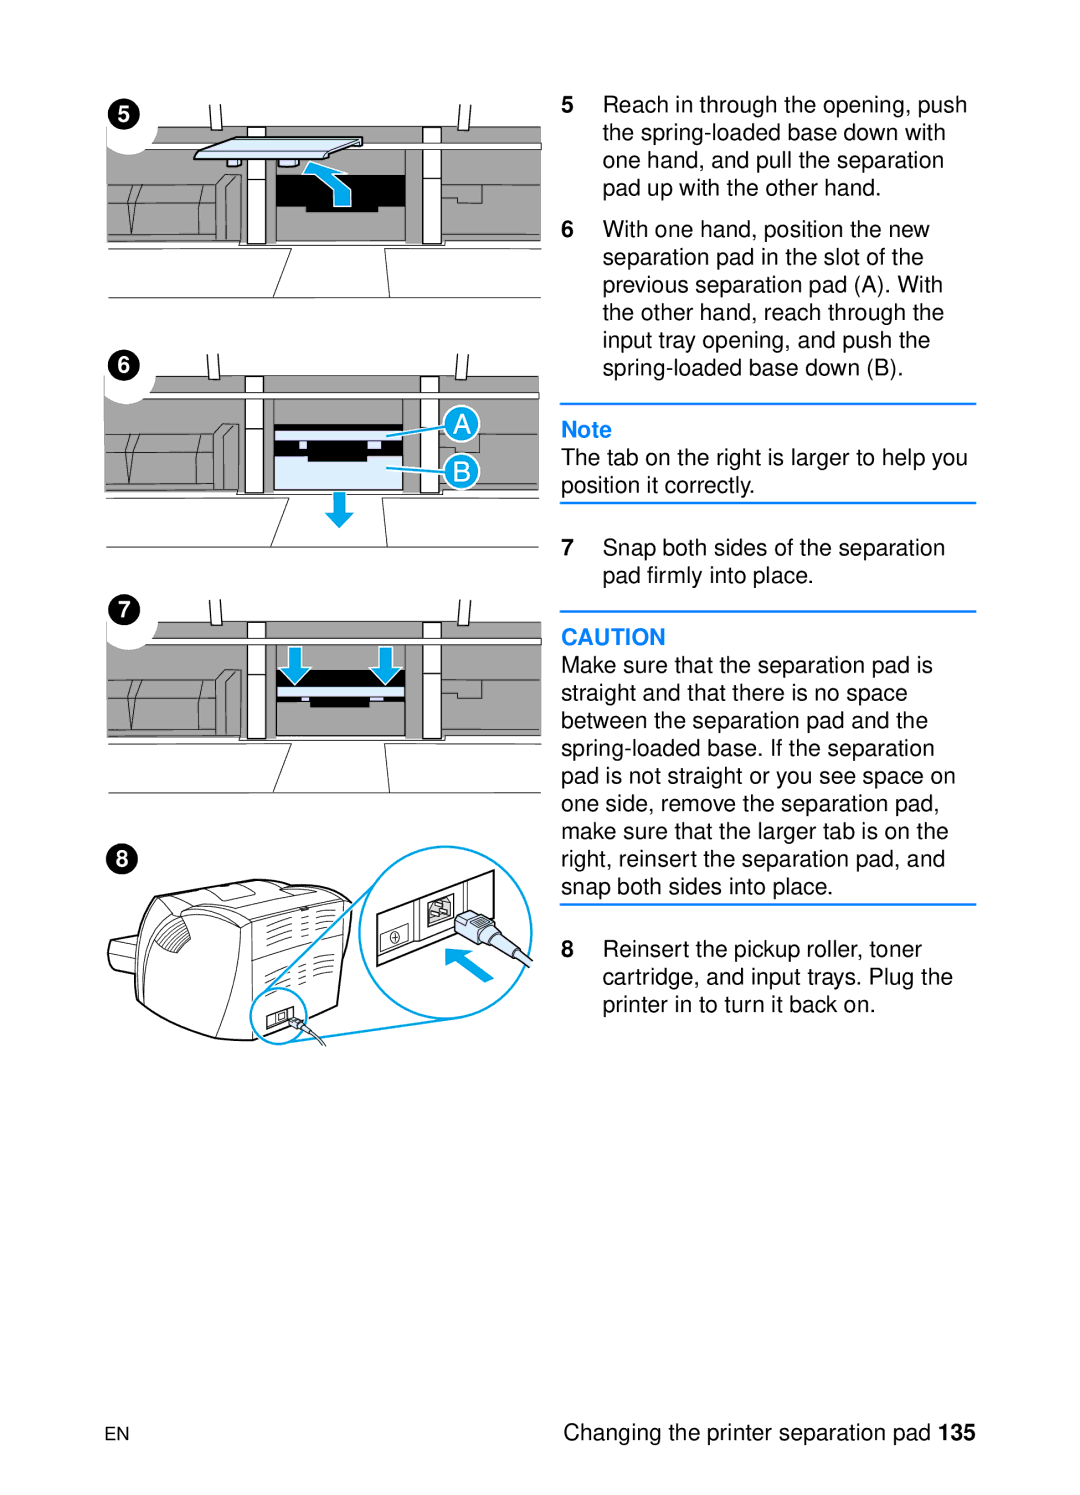
Changing the printer separation pad
Page
Troubleshooting the printer
137
Troubleshooting the copier/scanner
Copying problems
Scanning problems
Did you send a print or copy job before you tried to scan?
SolutionDescription
Scanner did nothing
SolutionDescription
Correctly?
No preview appeared on the screen
Is the original loaded
Scanned image is of poor quality
SolutionDescription
Part of the image did not scan or text is missing
Solution Description
Is the original of poor quality?
Text cannot be edited
Is your software set to scan in color?
Do you have your resolution and grayscale set too high?
Scan takes too long
Source
Error messages appear on the screen
Unable to activate Twain
Is the wrong printer
No copy came out of the printer or the scanner did nothing
Is media loaded in the input tray?
Is the toner cartridge low on toner?
Copies are blank, missing images, or faded
Improving copy/scan quality
Preventing problems
Vertical white stripes
Identifying and correcting copy/scan defects
Blank pages
Too light or dark
Black dots or streaks
Unwanted lines
Unclear text
Reduced size
Toner scatter outline
See The scan takes too long
Cleaning the copier/scanner
Clearing copier/scanner jams
Clearing jams
Replacing the copier/scanner separation pad
Removing the copier/scanner
Page
Closing the left side panel
Troubleshooting the copier/scanner
163
Troubleshooting the print server
Finding the solution
USB Port
HP JetDirect 175X configuration
LED light patterns
Understanding the print server’s light patterns
Behavior Meaning
Status
Understanding the print server configuration
Using a print server configuration
Printing a print server configuration
Status field error messages
Section Description
Sections and messages
Message Description
General HP JetDirect information
Manufacturing ID
Auto Negotiation
Date Manufactured
Snmp Set Cmty Name
Device Name
USB port information
Manufacturer
Serial Number
Network statistics
TCP/IP protocol information
Default Gateway
Host Name
IP Address
Bootp Server
Config By
BOOTP/DHCP Server
Config File
Access List
Idle Timeout
Domain Name
DNS Server
Web JetAdmin URL
Primary Frame Type
IPX/SPX protocol information
Node Name
ENSNAP, and EN802.3
Network
Frame Type
AppleTalk protocol information
Error Code and Message Description
Error messages
0D LAN Error
Invalid Gateway
4D CF ERR Access List Exceeded
Unable to Connect
Print server
Verifying your hardware
Printer
Verify scanning over the network
Verify printing when attached to a computer
187
Service and support
Availability
Hardware service
Extended warranty
Guidelines for repacking the printer
Service information form
Service information form
Hewlett-Packard Support
European Customer Support Center
In-country/region support numbers
Page
World Wide Web URL
Online services
America Online
CompuServetm
Obtaining software utilities and electronic information
Hewlett-Packard direct ordering for accessories or supplies
Hewlett-Packard SupportPack
Hewlett-Packard service information
Hewlett-Packard Support Assistant compact disc
Page
Argentina
Worldwide country/region sales and service offices
Australia
Austria
Chile
Brazil Croatia
China
Colombia
Greece Israel
Germany India
Hong Kong SAR
Hungary
Latin American Headquarters
Korea
México
Middle East
Russia
Romania
Singapore
Slovakia
Ukraine
Turkey Venezuela
United Arab Emirates
United Kingdom
205
Printer specifications
Printer specifications Environmental specifications
Specifications
Electrical specifications
Acoustics
Printer capacities and ratings
Printer specifications Physical specifications
Port availability
Printer specifications
Memory specifications
FCC compliance
Protecting the Environment
Environmental Product Stewardship Program
This HP LaserJet product eliminates
This HP LaserJet product design reduces
Plastics
HP Printing Supplies Environmental Program Information
HP LaserJet Printing Supplies
Returns Non-U.S. Recycling Returns
Paper
Material safety data sheet
Declaration of Conformity
Regulatory statements
Korean EMI statement
Laser safety statement
Canadian DOC regulations
Laserturvallisuus Luokan 1 Laserlaite Klass 1 Laser Apparat
Laser statement for Finland
Appendix a Printer specifications
217
Printer and copier/scanner specifications
Appendix B Printer and copier/scanner specifications
Dimm
Copier/scanner capacities and ratings
HP LaserJet 1220 PrintCopyScan specifications
FCC compliance
Environmental Product Stewardship Program
ALL
Laser safety statement
Laser statement for Finland
Appendix B Printer and copier/scanner specifications
227
Print server specifications
Appendix C Print server specifications
Electromagnetic emissions
Electromagnetic immunity
Safety
European community
Regulatory statements
Foothills Blvd
Canada DOC regulations
Chinese safety statement
Appendix C Print server specifications
237
Media specifications
Printer media specifications
Paper usage Symptom Problem with paper Solution
Guidelines for using media
Supported media sizes printer
Paper
As those used in some types of thermography
Label construction
Labels
Transparencies
Envelope construction
Envelopes
Envelopes with double-side seams
Envelopes with adhesive strips or flaps
Envelope storage
Card stock and heavy media
Card stock construction
Card stock guidelines
Appendix D Media specifications
245
Memory Dimm
Installing a Dimm memory
Page
Testing the Dimm installation
Removing a Dimm
Appendix E Memory Dimm
251
Warrantylicensing
HP Software License Terms
Hewlett-Packard software license agreement
Page
Hewlett-Packard limited warranty statement
Hewlett-Packard limited warranty statement
Limited warranty for toner cartridge life
How does State, Province, or Country Law apply?
Appendix F Warranty and licensing
Ordering information Description or use
Accessories and ordering information
259
Order number
Appendix G Accessories and ordering information
261
Ordering information
Country/region Part Numbers Input Rating Output Rating
Power module chart
263
Scanner resolution and color
Overview
Resolution and color guidelines
Resolution
Color
Setting Recommended use Where you set the color value
Appendix H Scanner resolution and color
ARP Duplicate IP Address 181 Autonegotiation
Index
Index
Disconnecting from Server
IPX/SPX
OUT of Buffers
TCP/IP
Xmit Collisions Xmit Late Collisions
Page
Copyright 2002 Hewlett-Packard Company