Connecting your equipment | 02 |
Connecting digital audio sources
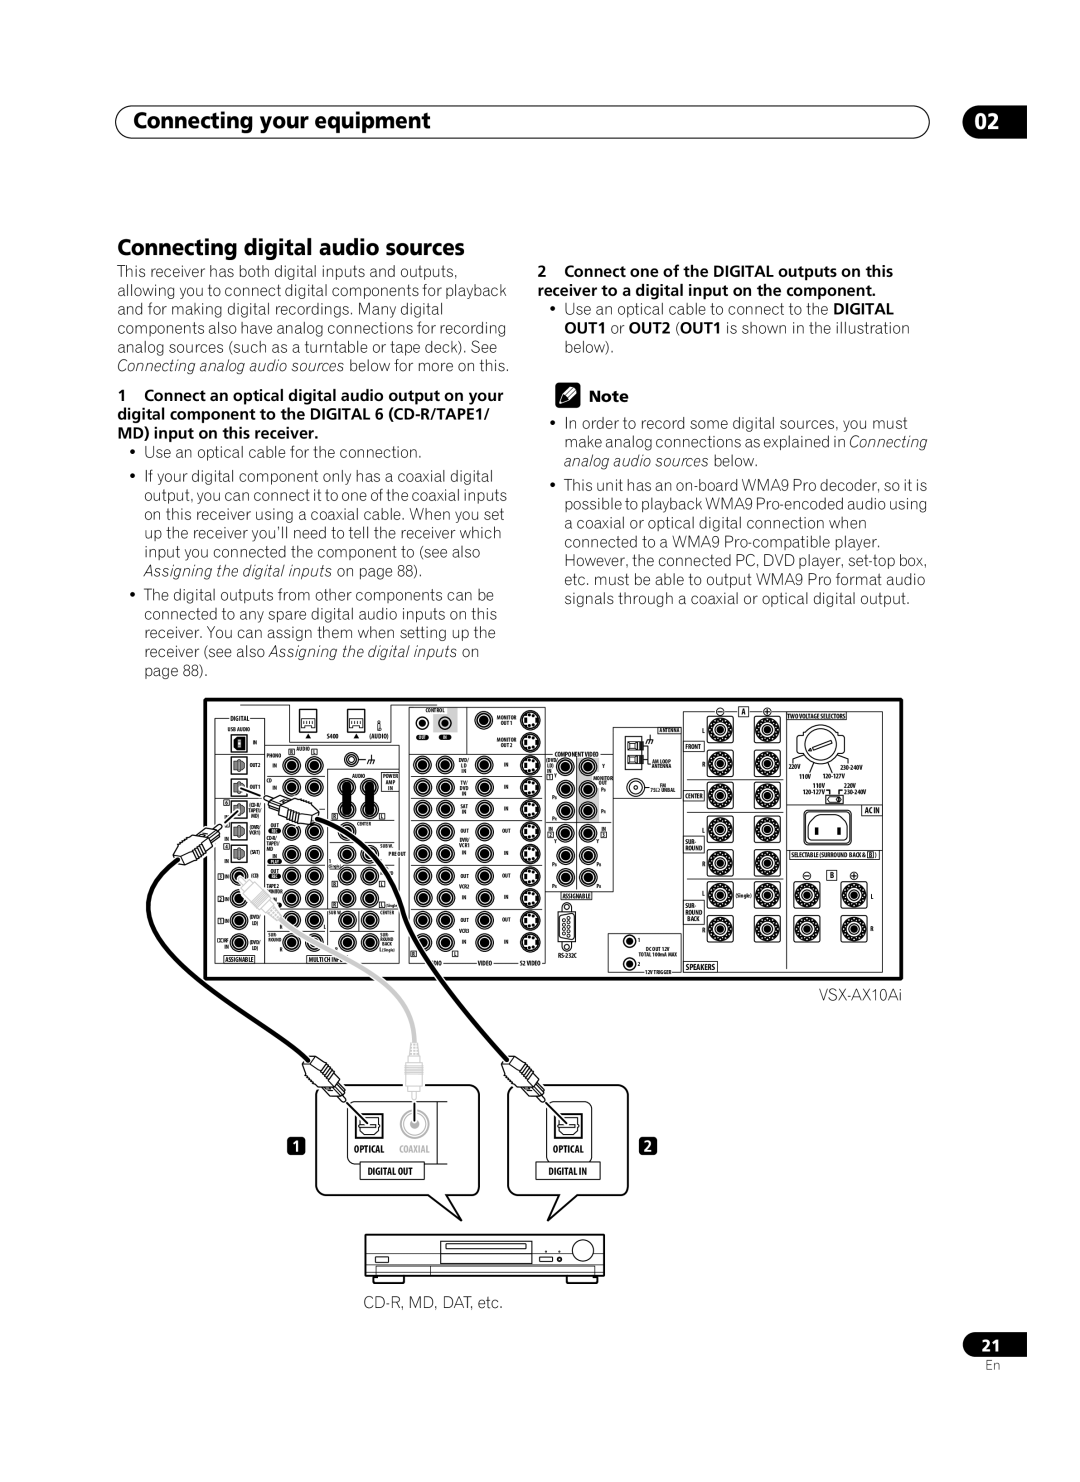
This receiver has both digital inputs and outputs, allowing you to connect digital components for playback and for making digital recordings. Many digital components also have analog connections for recording analog sources (such as a turntable or tape deck). See Connecting analog audio sources below for more on this.
1Connect an optical digital audio output on your digital component to the DIGITAL 6
•Use an optical cable for the connection.
•If your digital component only has a coaxial digital output, you can connect it to one of the coaxial inputs on this receiver using a coaxial cable. When you set up the receiver you’ll need to tell the receiver which input you connected the component to (see also Assigning the digital inputs on page 88).
•The digital outputs from other components can be connected to any spare digital audio inputs on this receiver. You can assign them when setting up the receiver (see also Assigning the digital inputs on page 88).
2Connect one of the DIGITAL outputs on this receiver to a digital input on the component.
•Use an optical cable to connect to the DIGITAL OUT1 or OUT2 (OUT1 is shown in the illustration below).
![]() Note
Note
•In order to record some digital sources, you must make analog connections as explained in Connecting analog audio sources below.
•This unit has an
|
|
|
|
|
|
| CONTROL |
|
|
|
DIGITAL |
|
|
|
|
|
|
| MONITOR |
|
|
|
|
|
|
|
|
|
| OUT 1 |
|
|
USB AUDIO |
|
|
| S400 | (AUDIO) |
|
|
|
|
|
IN |
|
|
| OUT | IN | MONITOR |
|
| ||
|
| AUDIO |
|
|
|
| OUT 2 |
|
| |
|
| R | L |
|
|
|
|
| ||
| PHONO |
|
|
|
| COMPONENT VIDEO |
| |||
OUT2 |
|
|
|
|
|
| DVD/ | IN | (DVD/ |
|
IN |
|
|
|
|
| LD | LD) | Y | ||
|
|
|
|
|
|
| IN |
| IN |
|
|
| CD |
| AUDIO | POWER | TV/ |
| 1 Y | MONITOR |
| OUT1 |
|
| AMP | IN |
| OUT | ||
| IN |
|
| IN | DVD |
| PB | ||
|
|
|
|
|
| IN |
| PB |
|
6 |
|
|
|
|
|
|
|
| |
|
|
|
| SAT | IN |
|
| ||
|
|
|
|
|
|
| |||
| TAPE1/ |
|
|
|
| IN |
| PR | |
IN | MD) | L | R | CENTER | L |
|
| PR |
|
5 | (DVR/ | OUT |
|
| OUT | OUT | IN | IN | |
| VCR1) | REC |
|
|
| ||||
|
|
|
| 2 | 3 | ||||
IN |
|
|
|
| DVR/ |
| |||
|
|
|
|
| Y | Y | |||
4 |
| TAPE1/ |
|
| SUB W. | VCR1 |
|
|
|
| (SAT) | MD |
|
| PRE OUT | IN | IN |
|
|
| IN |
|
|
|
| ||||
IN |
| PLAY | 1 |
| 2 |
|
| PB | PB |
|
| OUT | (Single) |
| SUR- |
|
| ||
3 IN |
|
|
| ROUND | OUT | OUT |
|
| |
| REC |
|
|
|
|
| |||
|
| TAPE2 | R |
| L | VCR2 |
| PR | PR |
|
|
|
|
|
|
2 IN |
|
|
|
|
| IN | IN | ASSIGNABLE |
|
|
|
| R | L (Single) |
|
|
|
| (DVD/ |
|
| SUB W | CENTER |
|
|
|
1 IN |
|
|
|
| OUT | OUT |
| |
LD) | R | L |
|
|
| |||
|
|
|
|
|
| |||
|
|
|
| VCR3 |
|
| ||
|
| SUR- |
|
| SUR- |
|
| |
2RF |
|
|
|
|
|
| ||
(DVD/ | ROUND |
|
| ROUND | IN | IN |
| |
IN |
|
|
| BACK |
| |||
LD) | R | L | R | L(Single) |
|
|
| |
ASSIGNABLE |
| MULTI CH INPUT | R | L |
| |||
| AUDIO | VIDEO |
| S2 VIDEO | ||||
|
|
|
|
|
| |||
ANTENNA
AM LOOP
ANTENNA
FM
75Ω UNBAL
1
DC OUT 12V
TOTAL 100mA MAX
2
12V TRIGGER
A
L
FRONT
R
CENTER
L
SUR-
ROUND
R
L![]()
![]()
![]() (Single)
(Single)
SUR-
ROUND
BACK
R
SPEAKERS
TWO VOLTAGE SELECTORS
220V |
| ||
110V | |||
| 110V |
| 220V |
| |||
|
|
|
|
AC IN
SELECTABLE (SURROUND BACK & B )
B
L
R
1 OPTICAL COAXIAL
DIGITAL OUT
OPTICAL2
DIGITAL IN
21
En