Other connections
![]() Note
Note
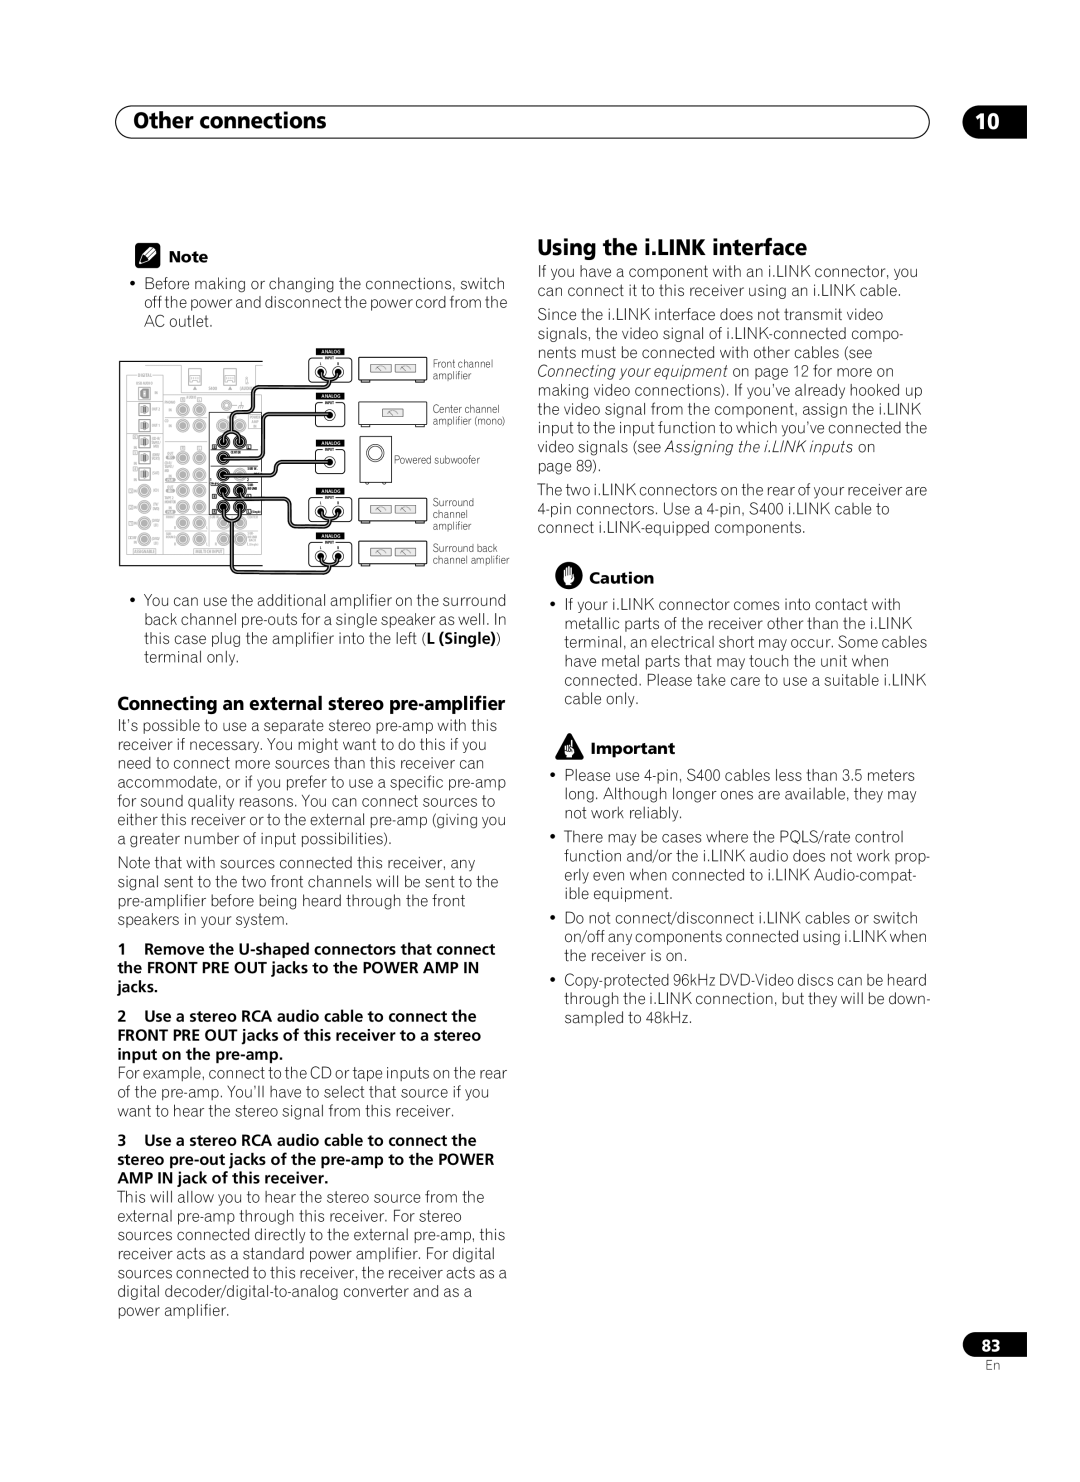
•Before making or changing the connections, switch off the power and disconnect the power cord from the AC outlet.
10
Using the i.LINK interface
If you have a component with an i.LINK connector, you can connect it to this receiver using an i.LINK cable.
Since the i.LINK interface does not transmit video signals, the video signal of
|
|
|
|
|
|
|
|
| ANALOG |
|
|
|
|
|
|
|
|
| INPUT |
|
|
|
|
|
|
|
| L | R |
|
| DIGITAL |
|
|
|
|
|
|
|
| USB AUDIO |
|
|
|
| S400 | (AUDIO) |
| |
|
| IN |
|
|
|
|
| ||
|
|
|
| AUDIO |
|
|
| ANALOG | |
|
|
| PHONO | R | L |
|
| ||
|
|
|
|
|
|
|
| INPUT | |
|
| OUT2 | IN |
|
|
|
|
|
|
|
|
| CD |
|
|
| AUDIO | POWER |
|
|
| OUT1 |
|
|
|
| AMP |
| |
|
| IN |
|
|
|
| IN |
| |
| 6 |
|
|
|
|
|
|
| |
|
| TAPE1/ |
|
|
|
|
|
| ANALOG |
| IN | MD) |
| R |
| L | R | L | INPUT |
| 5 | (DVR/ | OUT |
|
|
| CENTER |
| |
|
| VCR1) | REC |
|
|
|
|
|
|
| IN |
|
|
|
|
|
|
| |
| 4 |
| TAPE1/ |
|
|
|
| SUB W. |
|
| (SAT) | MD |
|
|
|
| PRE |
| |
|
| IN |
|
|
|
|
| ||
| IN |
| PLAY |
|
|
| 1 | 2 |
|
|
|
| OUT |
|
|
| (Single) | SUR- |
|
3 | IN | (CD) |
|
|
|
| ROUND | ANALOG | |
REC |
|
|
|
|
| ||||
|
|
| TAPE2 |
|
|
| R | L | INPUT |
|
| (TV/ | MONITOR |
|
|
|
| L | R |
2 IN | IN |
|
|
|
| ||||
DVD) |
|
|
| R | L (Single) |
| |||
|
|
| PLAY |
|
|
|
| ||
|
| (DVD/ | FRONT |
|
|
| SUB W | CENTER |
|
1 IN |
|
|
|
|
|
|
| ||
LD) | R |
|
| L |
|
|
| ||
2RF |
| SUR- |
|
|
|
| SUR- | ANALOG | |
(DVD/ | ROUND |
|
|
|
| ROUND | |||
| IN |
|
|
|
|
| BACK | INPUT | |
| LD) | R |
|
| L | R | L(Single) | ||
| ASSIGNABLE |
|
| MULTI CH INPUT | L | R | |||
|
|
|
|
| |||||
Front channel amplifier
Center channel amplifier (mono)
Powered subwoofer
Surround channel amplifier
Surround back channel amplifier
nents must be connected with other cables (see Connecting your equipment on page 12 for more on making video connections). If you’ve already hooked up the video signal from the component, assign the i.LINK input to the input function to which you’ve connected the video signals (see Assigning the i.LINK inputs on page 89).
The two i.LINK connectors on the rear of your receiver are
![]() Caution
Caution
•You can use the additional amplifier on the surround back channel
Connecting an external stereo pre-amplifier
It’s possible to use a separate stereo
Note that with sources connected this receiver, any signal sent to the two front channels will be sent to the
1Remove the
2Use a stereo RCA audio cable to connect the FRONT PRE OUT jacks of this receiver to a stereo input on the
For example, connect to the CD or tape inputs on the rear of the
3Use a stereo RCA audio cable to connect the stereo
This will allow you to hear the stereo source from the external
•If your i.LINK connector comes into contact with metallic parts of the receiver other than the i.LINK terminal, an electrical short may occur. Some cables have metal parts that may touch the unit when connected. Please take care to use a suitable i.LINK cable only.
![]() Important
Important
•Please use
•There may be cases where the PQLS/rate control function and/or the i.LINK audio does not work prop- erly even when connected to i.LINK
•Do not connect/disconnect i.LINK cables or switch on/off any components connected using i.LINK when the receiver is on.
•
83
En