General Settings Guide
Operating Instructions
Introduction
Manuals for This Machine
Manuals for ScanRouter V2 Lite
Manuals for DeskTopBinder V2 Lite
Other manuals
What You Can Do with This Machine
Scanner Functions
Copier, Facsimile, Printer,
Iii
Fax Transmission
Reception Reception Through Internet
Reception
Transmission
Using the Scanner in a Administrating Network Environment
Security Functions
Machine/Protecting Documents
Security Functions
Monitoring the Machine Via Computer
Table of Contents
Viii
Where to Put Your Machine
Registering Destinations to a Group
Registering the Transfer Request
Programming/Changing Ldap Server
168
Copyrights and Trademarks
Trademarks
Expat
Information about Installed Software
NetBSD
Sablotron
Authors Name List
Jpeg Library
MD4
How to Read This Manual
Symbols
Preparation
Limitation
Safety Information
Safety During Operation
Page
Positions of Labels and Hallmarks forRWARNING and Rcaution
Low-Power mode and Off mode or Sleep mode
Energy Star Program
Duplex Priority
Specifications
Recycled Paper
Machine Types
Page
Guide to Components
Remove Paper Indicator
Control panel Front cover
Duplex unit Unit for two-sided copies optional
Paper tray
External Options
Internal Options
HDD
Control Panel
User Tools/Counter key
Check Modes key
Clear Modes key
Energy Saver key
Sample Copy key
Start key
Clear/Stop key
Common key operations
Display Panel
Key list
Turning On the Power
Turning On the Main Power
Turning On the Power
Main power switch left side of the ma- chine
Turning Off the Main Power
Turning Off the Power
When the fax unit optional is installed
Saving Energy
Energy Saver Mode
Auto Off
Combined Function Operations
Changing Modes
System Reset
Multi-Access
Function Compatibility
Mode after you select Copy
Limitation
Combined Function Operations
Document Server
Relationship between Document Server and Other Functions
Document Server Display
Document Server Main Display
Using the Document Server
Password
Storing Data
File name
When using a registered user name in the Address Book
To register or change a user name
Stop key
Press User Name
When using an unregistered user name in the Address Book
When no user name has been registered in the Address Book
To set or change a password
To change a file name
Press File Management
Selecting a Document
Select a document you want to print
Searching for Stored Documents
To search by file name
Select a document to display its detailed information
Press Detail
Printing Stored Documents
To search by user name
To display all files stored
Document Server, press File
Binding format
Cover handling
Finish
To stop printing
Changing the number of copies during printing
Sample copy
Printing first
Press Continue
Deleting Stored Documents
Press Print 1st
Press Delete File
Press Delete to delete the docu- ment
Viewing Stored Documents Using a Web Browser
Check the documents content
Downloading Stored Documents
Click Document Server Document Server File List ap- pears
Settings for the Document Server
Items Default
Document Server
User Tools Menu System Settings
General Features See p.49 General Features
Tray Paper Settings See p.53 Tray Paper Settings
Timer Settings See p.56 Timer Settings
Interface Settings
File Transfer
Key Operator Tools See p.57 Key Operator Tools
Accessing User Tools System Settings
Changing Default Settings
Exiting User Tools
Press the User Tools/Counter key
Settings You Can Change with User Tools
General Features
Function Reset Timer
Print Priority
Output Copier copier
Output Document Server Document Server
Output Facsimile facsimile
Output Printer printer
F4 Size Setting
Output tray settings
When 500-sheet finisher is the finisher shift tray
When 1000-sheet finisher is the finisher shift tray
Tray Paper Settings
Paper Type Bypass tray
Paper types you can set for the bypass tray are as follows
Paper Type Tray
Paper types you can set for trays 1, 3 and 4 are as follows
Cover Sheet Tray
Slip Sheet Tray
Timer Settings
Auto Off Timer
Panel Off Timer
System Auto Reset Timer
Key Operator Tools
If you selected All Initial Settings
Key Counter Management
External Charge Unit Management
Key Operator Code
Display/Print Counter
Display/Clear/Print Counter per User Code
Print Address Book Destination List
Address Book Management
Program/Change
Delete
Address Book Program/Change/Delete Transfer Request
Address Book Program/Change/Delete Group
Protect Dest
Address Book Change Order
Address Book Select Title
Address Book Edit Title
Auto Delete File
Password Management for Stored Files
Delete All Files
AOF Always on
Program/Change Ldap Server
Items to register
Address Book
To manage registered items
When using the fax function
Registering the destination name and key display
When using the scanner function
Registering Sender Information
Registering a New User Code
User Codes
Set the user information
To register the user name and key display
To select the title
Press User Code
Clear or the Clear/Stop key
Changing a User Code
Changing the user code
To change the user destination name or key display
To change the title
Deleting a User Code
Displaying the Counter for Each User Code
To delete the user code
To delete a user destination
Printing the Counter for Each User Code
To print the number of prints made under each user code
To print the number of prints for all user codes
Select a user code from the left side of the display
Clearing the Number of Prints
To clear the number of prints made under a user code
To clear the number of prints for all user codes
Press Select all on the page to select all user codes on
Fax Destination
Registering a Fax Destination
To register the user destination name and key display
Set the users information
Press Change under User Des- tination Name or Key Display
To set the International TX mode
To select the line
To program the SUB Code
To program the SEP Code
Changing a Registered Fax Destination
To set label insertion
To change the fax number
Tion user you want to change
To change the line
To change the SUB Code
To change the SEP Code
To change the fax header
To delete only the fax number
Deleting a Registered Fax Destination
To delete all user information
Mail Destination
Registering an E-mail Destination
Using the e-mail address as the sender
Entering the e-mail address
Press E-mail
Enter the e-mail address Press OK
Deleting a Registered E-mail Destination
To change the e-mail address
To delete only the e-mail address
Dress user you want to change
Registering Folders
Using SMB to Connect
To register an SMB folder
Press Folder
Press Change under User Destination Name or Key Display
Press SMB
Using Browse Network to locate the folder
You can press Up One Level to switch between levels
To locate the folder manually
Press Browse Network
Changing a registered SMB folder
To change the protocol
Changing items under SMB
Press Connection Test to check the path is set correctly
To delete only the registered folder
Deleting a registered SMB folder
To register an FTP folder
Press Change under Path. L Enter the path
Changing a registered FTP folder
Press SMB Confirmation message ap- pears. Press Yes
Changing items under FTP
Deleting a registered FTP folder
Registering a Protection Code
Registering a Protection Code To a Single User
To protect the sender name
To protect the folder
Registering a Protection Code To a Group User
Registering a New Group
Registering Destinations to a Group
Press the title key under Select Ti- tle, if necessary
Registering Destinations to a Group
Removing a Destination from a Group
Select the user destination to register in a group
Select the user destination to re- move from a group
Changing a Group Name
To change the group name and key display
To change the registration number
Gram/Change/Delete Group
Deleting a Group
Press a group key you want to de- lete Press Yes
Registering the Transfer Request
Registering a Transfer Station/Receiving Station
Transfer Station
Receiving Station
Quick Dial
To register the Transfer Request name and key display
Speed Dial
Group Dial
Changing a Registered Transfer Station/Receiving Station
To change the Transfer Request name and key display
To change the Transfer Station
Deleting a Registered Transfer Station/Receiving Station
100
Select a Transfer Request you
Want to delete
Programming/Changing Ldap Server
To enter an identification name
To enter a server name
To enter the search base
To set authentication
To enter the user name and password
To enter a port number
To test the connection
Changing an Ldap Server
To set search options
To change an identification name
To change the server name
To change authentication
To change the user name and password
To change a port number
To change search options
General
If Your Machine Does Not Operate As You Want
105
106
Sided Copy is se
Document Server
107
Setting special paper in the paper tray
Loading Paper
Loading Paper into Paper Trays
108
109
Pull out the LCT
Orientation-Fixed Paper or Two-Sided Paper
110
Adding Toner
111
Removing Toner
112
Inserting Toner
113
Clearing Misfeeds
114
115
116
117
118
119
Changing the Paper Size of the Paper Tray
Changing the Paper Size
120
121
Set the paper size selector to the p mark
Press the User Tools/Counter
Key
Press Exit or the User Tools
122
Counter key to exit User Tools
Sheet Finisher
Adding Staples
123
124
125
Removing Jammed Staples
126
127
128
Dos and Donts
129
Toner
Handling Toner
Toner Storage
Used Toner
Where to Put Your Machine
Machine Environment
Optimum environmental conditions
Environments to avoid
Moving Power Connection
132
Access to the Machine
133
Cleaning the Exposure Glass
Cleaning the Exposure Glass Cover
Cleaning the Auto Document Feeder
Cleaning the machine
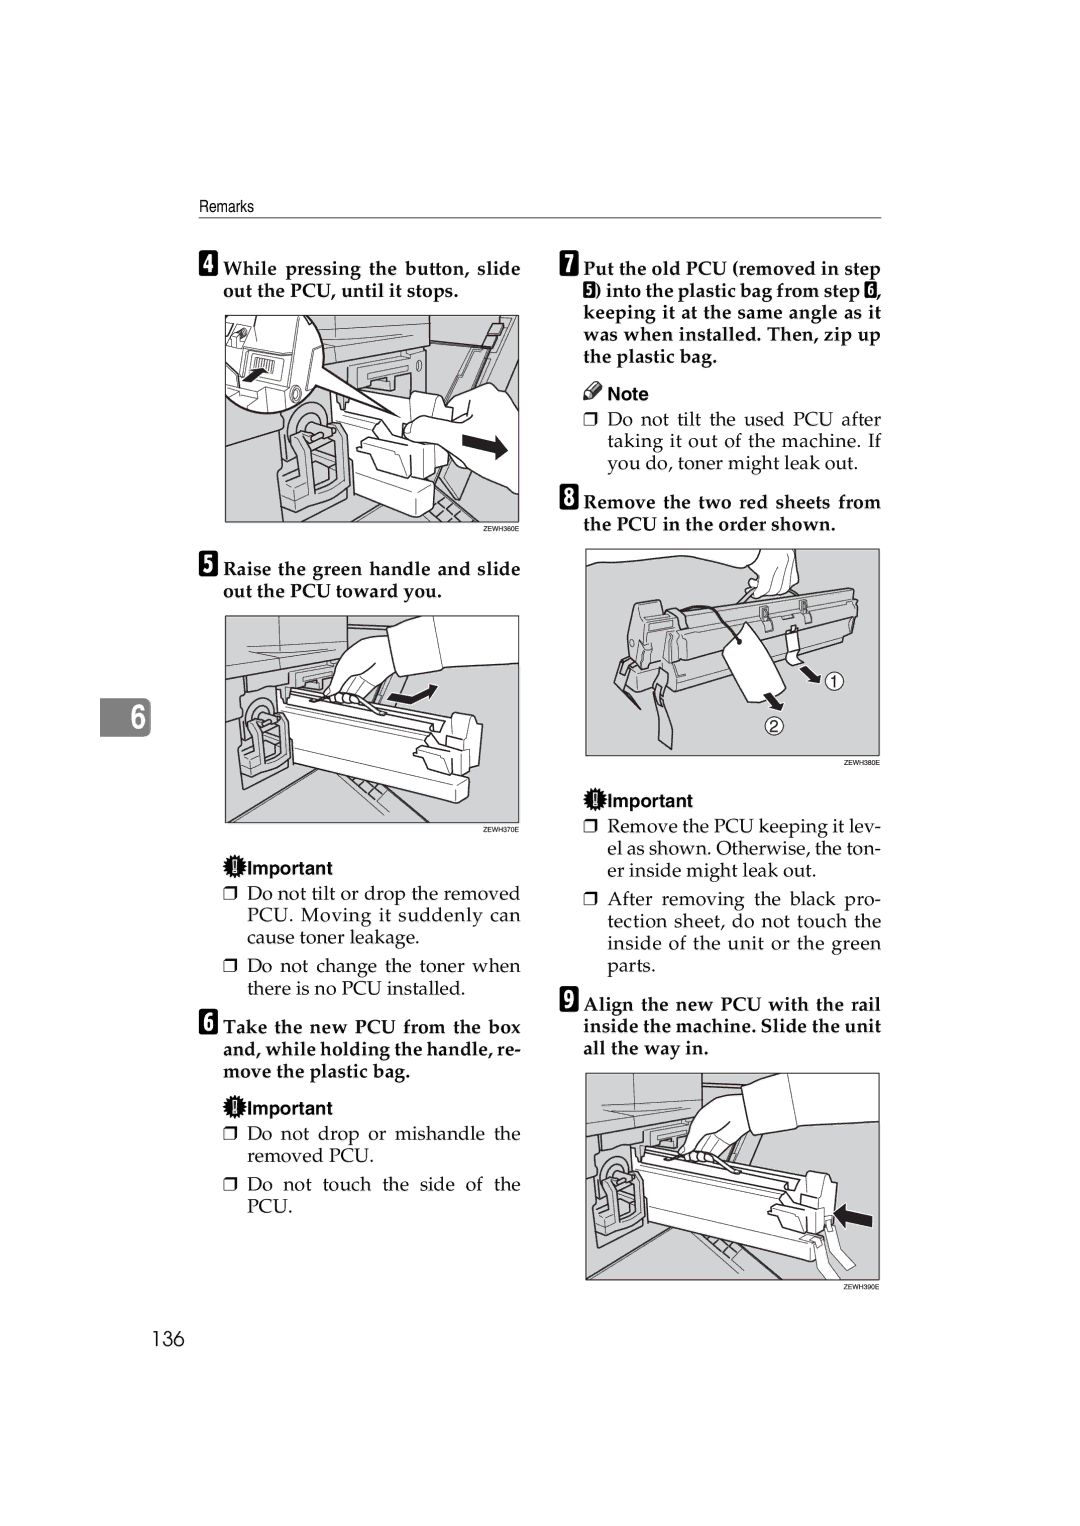
Replacing the Photo Conductor Unit PCU
135
136
Remove the two red sheets from the PCU in the order shown
137
Inquiry
Other Functions
Changing the Display Language
Counter
Displaying the Total Counter
139
Press the User Tools/Counter key Press Counter
140
Entering Text
Available Characters
Keys
141
How to Enter Text
Entering letters
Deleting characters
142
Primary Security Functions
Security
Extended Security Function
Press Extended Security. Press On, and then OK
Setting Extended Security
Press the User Tools/Counter key to finish
Temporarily Disabling Document Security
Unlocking a locked document
145
Press OK under Unlock Files
For Administrator
Operating Environment and Notes
Operating Environment
146
For User
147
148
Main Unit
Copy paper weight
Copy paper size
Non-reproduction area
First copy time
Reproduction ratio
Maximum continuous copy run
Paper capacity
151
Power consumption
Dimensions W ⋅ D ⋅ H up to exposure glass
Space for main unit W ⋅ D
Noise Emission *1
HDD
Weight
153
Exposure Glass Cover
Options
Auto Document Feeder
Paper weight
Staple paper weight
Dimensions W ⋅ D ⋅ H
Paper size
156
Power consumption Max
Shift Sort Tray
Duplex Unit
157
Dimensions
Bypass Tray
Bridge Unit
Internal Tray 2 1 bin tray
Dimensions W ⋅ D ⋅ H, option unit
Large Capacity Tray
Paper Tray Unit
159
160
Recommended Paper Sizes and Types
Copy Paper
161
162
A4KL, B5 JISKL, A5KL, B6 Jisl
163
Envelopes
When copying onto envelopes
164
165
Close the right cover
166
Paper Storage
Unusable Paper
167
Index
168
169
Sheet Finisher
170
Storage
Means Power ON. c means Stand by
AE AE B097-6508