| Likely Cause | Corrective Action | |||
Display | Display | ||||
|
|
| |||
|
|
|
|
| |
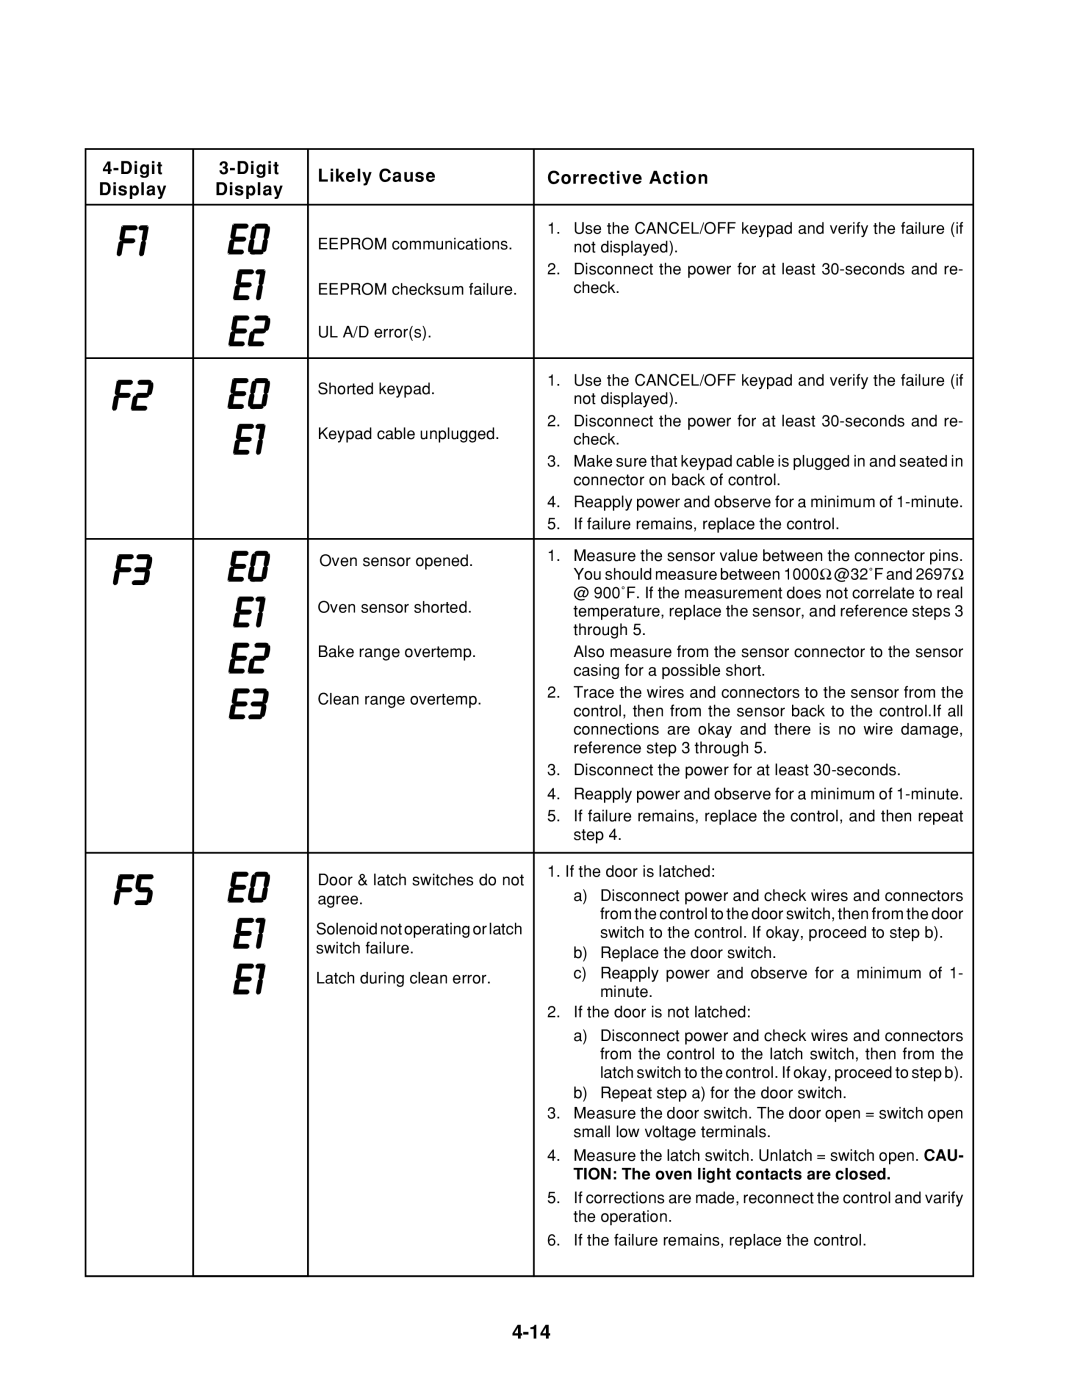
F1 | E0 | EEPROM communications. | 1. | Use the CANCEL/OFF keypad and verify the failure (if | |
| not displayed). | ||||
|
| ||||
| E1 |
| 2. | Disconnect the power for at least | |
| EEPROM checksum failure. |
| check. | ||
|
|
|
| ||
| E2 | UL A/D error(s). |
|
| |
|
|
|
| ||
|
|
|
|
| |
F2 | E0 | Shorted keypad. | 1. | Use the CANCEL/OFF keypad and verify the failure (if | |
| not displayed). | ||||
|
| ||||
| 2. | Disconnect the power for at least | |||
| E1 | Keypad cable unplugged. | |||
|
| check. | |||
|
|
| |||
|
| 3. | Make sure that keypad cable is plugged in and seated in | ||
|
|
| |||
|
|
|
| connector on back of control. | |
|
|
| 4. | Reapply power and observe for a minimum of | |
|
|
| 5. | If failure remains, replace the control. | |
|
|
|
|
| |
F3 | E0 | Oven sensor opened. | 1. | Measure the sensor value between the connector pins. | |
| You should measure between 1000Ω @32˚F and 2697Ω | ||||
|
| ||||
|
| @ 900˚F. If the measurement does not correlate to real | |||
| E1 | Oven sensor shorted. |
| ||
|
| temperature, replace the sensor, and reference steps 3 | |||
|
|
| through 5. | ||
| E2 | Bake range overtemp. |
| Also measure from the sensor connector to the sensor | |
|
|
| casing for a possible short. | ||
| E3 | Clean range overtemp. | 2. | Trace the wires and connectors to the sensor from the | |
|
| control, then from the sensor back to the control.If all | |||
|
|
| |||
|
|
|
| connections are okay and there is no wire damage, | |
|
|
|
| reference step 3 through 5. | |
|
|
| 3. | Disconnect the power for at least | |
|
|
| 4. | Reapply power and observe for a minimum of | |
|
|
| 5. | If failure remains, replace the control, and then repeat | |
|
|
|
| step 4. | |
|
|
|
| ||
F5 | E0 | Door & latch switches do not | 1. If the door is latched: | ||
| a) Disconnect power and check wires and connectors | ||||
agree. |
| ||||
| from the control to the door switch, then from the door | ||||
| E1 | Solenoid not operating or latch |
| ||
|
| switch to the control. If okay, proceed to step b). | |||
| switch failure. |
| b) Replace the door switch. | ||
| E1 | Latch during clean error. |
| c) Reapply power and observe for a minimum of 1- | |
|
| minute. | |||
|
|
| |||
|
|
| 2. | If the door is not latched: | |
|
|
|
| a) Disconnect power and check wires and connectors | |
|
|
|
| from the control to the latch switch, then from the | |
|
|
|
| latch switch to the control. If okay, proceed to step b). | |
|
|
|
| b) Repeat step a) for the door switch. | |
|
|
| 3. | Measure the door switch. The door open = switch open | |
|
|
|
| small low voltage terminals. | |
|
|
| 4. | Measure the latch switch. Unlatch = switch open. CAU- | |
|
|
|
| TION: The oven light contacts are closed. | |
|
|
| 5. | If corrections are made, reconnect the control and varify | |
|
|
|
| the operation. | |
|
|
| 6. | If the failure remains, replace the control. | |
|
|
|
|
| |
Page 90
Image 90