Instruction
Page
AV-9000 Manual Revision Log
Revision Date Description
Page
AV-9000 Manual Prefix
Table of Contents
Display Programming Chart Prompts
Controllers
Profilers
Introduction and General Information
Unpacking
Installation of PEN Cartridge Assembly
AV- 9 0
Features
Operator Interface
Inputs
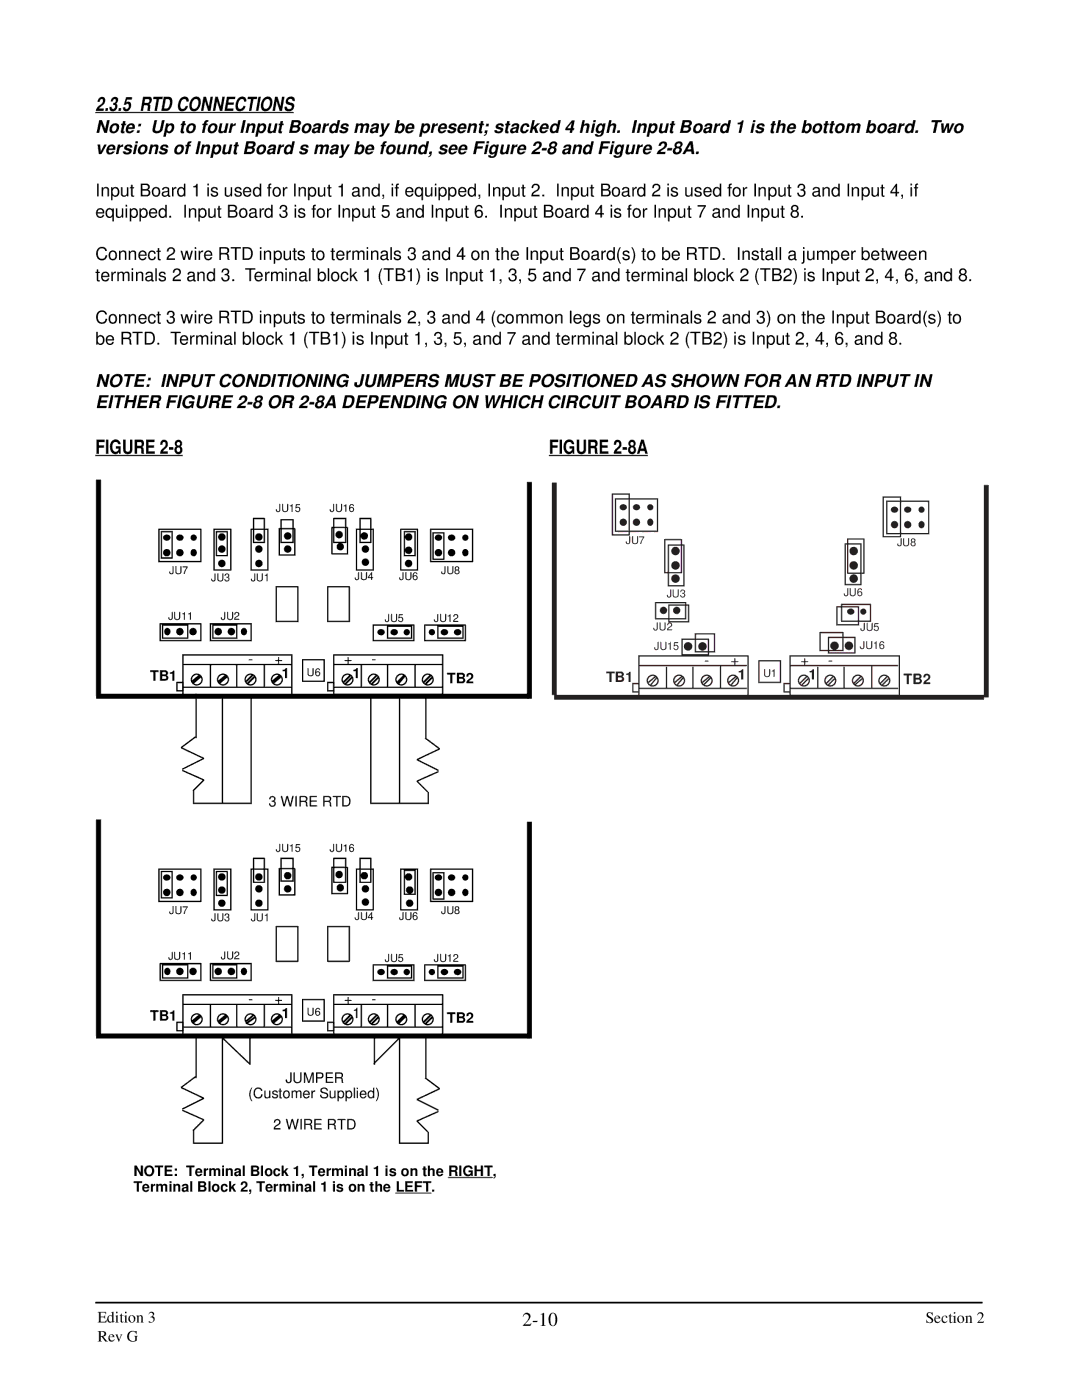
RTD
Range LIN Factory REF+LIN Deviation Resol
NNM
Sama
Input Span Factory REF+LIN Deviation Resol
Other Input Specifications
Current Outputs
On Next
Environmental and Operating Conditions
Warranty and Return Statement
Page
Installation and Wiring
17.04 432.82mm
Preparation for Wiring
MOV
Section Edition Rev G
Wiring Connections Inputs
Shipped CONFIGURATION/JUMPER Positioning
AC Power Connections
Universal Power Supply
Thermocouple Connections
RTD Connections
Voltage Connections
Current Connections
10A
Switch Input Connections
11A
SSR Driver Output
Wiring Connections Outputs
Spdt Relay Output
Isolated
Current Output
Non-isolated
4 24VDC Transmitter Power Supply
Communications
TB3 JP1 JP3
Instrument Modes
POWER-UP
Basics of Recorder Operation
Keypad Function
Display KEY Disp
Changing Parameter Settings Modify
Changing Values
Display
General
Display Details
Edition Section Rev G
Continuous Display
Chart Details
Sequential Display
Chart TAG Time Date
Chart TAG Date Time
Alarm #1
None Just Continue Print Range List Print Scales
Flow #1
Temp #1
Configure Chart Chart Type Used Rings only Chart TAG
Unit #1
PEN/COLOR Blue Green Black RED RS Chart Divisions
Recorder Number
Flow #1 Temp #1
Value DV1 IV2 IV4 DV2
Sequence of Events
Getting Started
Main Prompts
Quick Start Procedure
Input Value Configuration
Section Edition Rev G
Software Reference/Record Sheet
Input
Display TAG Input TYPE/RANGE Type Input Span
Constants
Software Reference/Record Sheet
Custom Curves
Parameter CC-3 CC-4
Derived Variables
Parameter DV-1 DV-2 DV-3 DV-4
Parameter DV-9 DV-10 DV-11 DV-12
Process Variables
PV-4
Remote SP Actuator
Controllers
Remote SP Source
Control Setpoints
Recorders
Recording Method
Totalizers
TOTAL-1 TOTAL-2 TOTAL-3 TOTAL-4
Timers
Leds
Relays
Current Outputs
Instrument Settings
Derived Actuators
Derived Actuator Equation
Operator Inputs
OI-02 OI-03
Operator Messages
Chart Messages
Parameter CM-09 CM-10 CM-11 CM-12
Software Reference/Record Sheet
CA2 F1 OFF State Text
CA2 F2 OFF State Text
CA2 F3 OFF State Text
CA2 F4 OFF State Text
CA3 F1 OFF State Text
CA3 F2 OFF State Text
CA3 F3 OFF State Text
CA3 F4 OFF State Text
CA4 F1 OFF State Text
CA4 F2 OFF State Text
CA4 F3 OFF State Text
CA4 F4 OFF State Text
Simulated Variables
Parameter SV-1 SV-2 SV-3 SV-4
Chart Programming
Major Line PEN/COLOR if Select
Minor Line PEN/COLOR if Select
Select a Color
Sequential Display Duration
Alarm Settings
Setpoint
Action Time Settings
Tuning Parameters
Enables & Passwords
Enables & Passwords Password
Configuration
Entering Configuration
U T S
Input Number
IVx Display TAG Input
IVx Copy from Input
= Initialized
If selection is NO, see Step If selection is YES
E,T,S N,C,G
MV, mA, Volt, Switch Contact go to . COMMS, go to Step
IVx TC Type
DIN
IVx RTD Type PT 100 .00385 DIN
IVx Degrees C / F
IVx Sensor Break
Upscale
IVx Input Range LOW
Units
IVx Input Range High
100.000 Units
IVx Pulse Rate High
Pulses / SEC
IVx Register Type
INT
IVx V / mA Conversion
Linear
IVx Display Units
IVx Other Units
IVx Decimal Position
Other
Units configured in step
Units correspond to units configured in or
IVx Range Limit High Units
Units correspond to
IVx Exponent 500
IVx Value Cutoff Type
None
IVx Cutoff Value
IVx Input Correct
IVx Input Correct 100
IVx Value Filter
Seconds
IVx Display Option
Both Modes
IVx Closed / 0 Descr
Closed
IVx Open / 1 Descr
Open
Constants
S T a N T S
Constant Number
Custom Curves
R V E S
CVx Value 00000 E
Output
CCx Decimal Position
Input
100
CCx Number of Points
CCx Point Pair
DV Number
Derived Variables
R I
R I a B L E S
DVxx Display TAG DER VAL
DVxx Function
DVxx Input
None Used
R I V E D R I a B L E S
OUTPUT12
OUTPUT22
OUTPUT32
R I V E D R I a B L E S
None / OFF
DVxx Reset Actuator
None / OFF
Other
DVxx Units Descrip
DVxx Decimal Posit
DVxx Display Units
DVxx
Value Filter Seconds
DVxx Display Option
Both Modes
Actuator Reset Output
Derived Variable Function
Input Prompt
LIN Linear Input Prompt
Actuator Reset Output =C*F*SQRT PRES/TEMPR*COMP
Actuator Reset Output = C*SQRT DP*PRES / TEMPR*COMP
Polynomial Input Prompt
Linear Mass Flow AGA 3 Lineaer GAS Flow Input Prompt
Actuator Reset YES Prompt
Relative Humidity Input DBT Prompt
Input WBT Prompt
Input Baro Prompt
High Peak Input Prompt Dvxx Input Actuator Reset YES
Actuator Reset YES Prompt Dvxx Reset Actuator Output
Reset Output
LOW Peak Input Prompt
Actuator Reset Output = C*F* TEMPH-TEMPL
Convert C to F Input Prompt
BTU Input Prompt
Input Temph Prompt
Process Variables
Process Value Number
PVx Copy / Initialize
O C E S S R I a B L E S
PVx Copy from PV
= Initialize
PVx Display TAG
PVx Display Units
PVx Input
None Used
PV Decimal Position
PVx Value Filter
PVx Other Units
Not Displayed Continuous Mode Sequential Mode Both Modes
L E S
PVx Display Option
PVx Display Filter
Ax1 Alarm Type
O C E
R I a
E S
O C
Ax1 Time Base
PER SEC
Ax1 Hysteresis Units
Ax2 Time Base
Rate
To units configured Process Variables
Ax2 Hysteresis
To Units configured
S S
Ax3 Time Base
PER SEC
Ax4 Alarm Type
Ax4 Time Base
Ax4 Hysteresis
PVx Loop Alarm Time
PVx Loop Alarm Inhibit
C O R D E R S
Rx Copy / Initialize
Recorder Number
Recorders
If selection was NO, proceed to step If selection was YES
Rx Recorder TAG
Rs Copy from Recrder
Rx Value to Record
Rx Chart Divisions Rings
D E R S
Rx Recording Method
Drag MIN to MAX
Rx Zone 1 High
Rx Zone 1 LOW
Division
Rx Span 1 High Units
Rx Span 1 LOW 0 units
Divisions
Rx Zone 2 High
Rx Scale 1 Interval
= no Scales
Rx Scale 2 Interval
Rx Span 2 High 0 units
Rx Filter
Totalizers
Tx Copy / Initialize
Totalizer Number
Total
T a L I Z E R S
Tx Display TAG
Pulses
Tx Input Value
Tx Time Base
T a
R S
Tx Total is Flow
TIMES1
Tx Display Option
Tx Totalizer Type
Continuous
Tx Display Format
Tx LOW Flow Cutoff Units
Tx Totalizer Preset Units
I Z E R S
None / OFF
None / OFF
Tx Pulse Every Units
Tx Pulsed Output
TMx Display TAG
Timer Number
Timer
TMx Timer Type
TMx Timer Period Format
OFF
TMx Time Format
Preset
OP INP
DA3 DA4
DA6 DA7
TMx Display Option
LED Number
D S
State or on OFF
Relay Number
Relay x Usage
Preset Total PO1
L a Y S
Time Proportioning
Relay x T.P. Value
Relay x Cycle Time
R R E N T T P U T S
COx Source
Current Output
Current Outputs
Units
20mA
COx Output on Error
Instrument TAG Recorder #1
Display Option Sequential Mode
Instrument Settings
OUTPUT42 Reset
Time TIME/DATE
Enter
Relay
Alarming on Actuator On / Continuous
Chart Rotation Trend Data Collect ALT Chart Speed
Control on Actuator On / Continuous
M E N T
Date Display Format
MM / DD / YY
Time Display Format AM / PM
T T I N G S
Current DAY
Current Time
Format 900 AM
Communications Mode
Slave
Comms BIT Rate
Comms Address
T R T T I N G S
R I V E D
T U a T O R S
Comms Parity ODD
Derived Actuator
Derived Actuators
R I V E D T U a T O R S
DAxx Copy / Initialize
DAxx Copy from DA
No YES
DAxx
R I V E D T U a T O R S E R a T O R
OIxx Copy / Initialize
Operator Input
Operator Inputs
OIxx Copy from OI
OIxx Prompt Text
Continuous Momentary
E R a T O R U T S
OIxx Actuation Style
OIxx Power UP State
OIxx When Displayed
E R
Same
Operator Messages
Operator Message
OMxx Copy / Initialize
OMxx Copy from OM
= Initialize
None / OFF
OMxx Display Mode
OMxx Line 1 Text
Message
OMxx Line 2 Text
Chart Messages
Chart Messages appears
E R a T O R A R T S a G E S
CMxx Copy / Initialize
= Factory Default
CMxx Copy from CM
None / OFF
S S a G E S
CMxx Message Text
CMxx Value
IV1 IV2
PV1 PV2 PV3 PV4 DV1
A R T S a G E
CMxx Time / Date Stamp
CMxx Orientation
Horizontal
SVx Type
SVx Display TAG
SIM VAL
100
R I a B L
SVx Other Units
SVx Display Units
SVx Decimal Position
102
SVx Range LOW Units
SVx Range High
SVx Period 1 / Freq
Minutes
SVx Display Option
103
Display Programming
T t t t t t t t t t t t t t t t t t
Cx Output
Select Setpoints
Select Manual Values
Nnn%
AMM used, default Continuous
AMM used, default 1 VAL
Duration n Seconds SEQUENCE, AMM used, default
Nnnnnnnnnnyyyyyyyyyy AMM used, see below
Chart Prompts
Change Chart
Chart Type Used Rings only
Chart Configuration
Chart TAG Unit #1
Normal Speed Hour
Normal Speed
HRS / REV
Blank Major Periods
Minor Time Periods
Major Time Periods
Major Line PEN / Color Match Scale Color
Match Scale Color Select a Color
Minor Line PEN / Color Match Scale Color
Minor Line PEN / Color RED
Black Violet
Date PEN / Color RED
Blue Green RED
Action on NEW Chart None Just Continue
Chart TAG PEN / Color RED
Stop After 1 REV
None Just Continue Print Range List Print Scales
Rotate Chart Actuatr
Chart Rotation
Collect Data Actuatr
Chart Rotation Prompt Displayed
Chart Speed Prompt Prompt not Displayed
Trend Data Collect Prompt not Displayed
Prompt not Displayed Prompt Displayed
Alarm Settings
Alarms for PV Number
Ax2 Setpoint
100 Units
Ax3 Setpoint 100 Units
Variables
Ax4 Setpoint 100 Units
Examples Time
Action Time Settings
Time 1 TAG Start Time
Time
Date
Format
Time 2 TAG Stop Time
Time
DAY of Week Actuator SUN
Will read current date
Not Displayed
DAY of Month ACT
Time Display Option Not Displayed
Enables & Passwords
Change ALL Enables
Disabled Enabled Toggle
Change ALL to Toggle
Action Time Settings
Disabled Enabled
Disabled Enabled
Profile Entry Only on Profiles
Setpoint Changes
Alarm Settings
Tuning Parameters
Operator Inputs Conf
Configuration
Derived Actuators
Simulated Variables
Chart Messages
Operator Messages
Calibration
Chart Prompts
Test
Operator Inputs
Chart Configuration
Display Prompts
Control State Access
System Prompts Password REQ
Enables & Passwords PASSWORD0
Chart Prompts PASSWORD0
Display Prompts PASSWORD0
Test
10-1
10-2
Relay Test
Display Test
Keypad Test
LED Test
10-3
ESC key will exit this test
Chart Demonstration
10-4
10-5
11-1
Specifications listed below
Calibration
11-2
Important Notes
11-3
For Inputs Board Position
11-4
Cold Junction Calibration
11-5
11-6
Parameter Defaults
Chart Calibration
CAL Which mA Output
Milliamp Output Calibration
11-7
Calibration Defaults
Solenoid Calibration
11-8
Consult Factory
11-9
Controllers
13-1
Words
Example
13-2
13-3
Controller Number
Entering Controllers
Cx COPY/INITIALIZE
=INITIALIZEX
Cx Control Type
Standard
Cx Output 1 Type
NONE/OFF
Cx Output 2 Type
13-5
Cx OUT 1 Hysteresis
Units
Cx OUT 2 Hysteresis
100%
13-7
On Error
Upper Limit
MIN
13-8
Cx Manual Actuator CAxF1
13-9
Cx Main SP Source SPx
13-10
Cx Remote SP Actuatr CAxF5
13-11
None Used
13-12
Cx Second SP Actuatr CAxF3
13-13
Cx Remote SP Ratio 000
13-14
13-15
Cx Remote SP Bias
None Used
Cx Feedforward LOW
13-16
Not Displayed
13-17
Setpoint Number
13-18
SPx Prompt Text
Setpoint
SPx Display Units
SPx Other Units
SPx Decimal Position
SPx Upper Limit
SPx Lower Limit
13-20
13-21
SPx Display Option
Not Displayed
Control State Access
CA1 Line Text
Controller
13-22
CAx Line 2 Text
SP1/SP2
CAx F1 KEY Usage Cx AUTO/MANUAL
13-23
CAx F1 Line 1 Text
Controller
CAx F1 on State Text
Manual
13-25
CAx F2 Line 1 Text
CAx F2 OFF State TXT
CAx F2 on State Text
13-26
CAx F3 on State Text
SP2
CAx F4 KEY Usage
Not Used
CAx F4 Line 1 Text
13-28
CAx F5 Line 1 Text
CAx F5 OFF State TXT
Local
13-29
13-30
CAx F5 on State Text
Remote
13-31
=FACTORY Default
Cx Copy from Contrlr
Cx SP Ramp Rate Units/HR
13-32
Cx OUT 1 Prop Band Units
13-33
13-34
Cx OUT 1 Shift Units
Cx OUT 2 Shift Units
13-35
Cx Integration Band Units
Cx Integration Shift Units
Cx OUT 1 Auto Reset
Cx OUT 2 Auto Reset
REPEATS/MIN
13-36
Cx OUT 2 Rate
Minutes
Cx OUT 1 Rate
Minutes
Following are Repeated for Each Segment
Profile Entry
14-1
14-2
14-3
Profile Settings
14-4
14-5
Current Segment
14-6
Profile Entry
Profile Control
14-7
14-8
Continue
14-9
14-10
14-11
14-12
14-13
14-14
14-15
14-16
14-17
Figure A-1 Power Supply Board
Appendix a Board Layouts
Figure A-2 Mother Board
Figure A-3 RELAY/SSR Board
3 +
JU5 JU12
JU13 JU14 JU3 JU15
JU11 JU2 TB1 JU16 JU6
Figure A-5 Motor Driver Board
Figure A-6 Current Output Board
Figure A-7 Transmitter Power Supply Board
485 Aux
Main
232 Aux
Appendix B Ranges
Thermocouple
JU7/JU8 Position Type Operating Range
Plii
Sama
RTD
USA
Alternate Speed
Appendix C Reference Section
Actuators
Chart Key
Chart Prompts
Chart Rotation Actuator
Choice
Edition
Display Sequence
Disp Key
Display Prompts Section
Edition
Major time lines
Normal Display mode
Minor time lines
Print interval
Prompt
Prompt section
Scale values
Rings and Time Lines See Chart Type Used
Scale lines
Sensor break
Tag
Count Down Preset
Text
Time between print cycles see Print interval
Hoursminutesseconds
Trend Data Collect Actuator
Trend data collection
Value
Zone
Appendix C Edition Rev G
Appendix D Examples
CPM
END
Exhaust FAN
FAN OFF
FAN on
Preempt to OFF
Total Exceed Preset
Alarm 1 Pressure HI
Derived Actuators DA1 Item Not Reset
DA2
Not
Narrow
Appendix E Accuracy Tables
Wide
385 160/480 025
Factory REF+CAL Deviation Resol Ranges Accy
Linear
Factory REF+LIN Deviation Resol Ranges Accy CAL +CAL