0470
About RF Interference
Contents
UniPak transmitter Plug-on transmitter
Series Components dual-channel
Two detachable Two 45 cm output cables
Dual-channel receiver Antennas TA3F to Xlrm Holds receiver
System Features dual-channel
If your system is equipped with a Plug-on Transmitter
Quick Overview of System Operation
Panel
ATW-R1820 Dual-channel Receiver Controls front
Rear panel
Selecting Frequencies Overview…
Battery Selection
ATW-R1820 Dual-channel Receiver Batteries
Operating the Receiver
Single-channel Operation
Using one transmitter
Setting Receiver Frequency Manually
Switch is in the 1 position
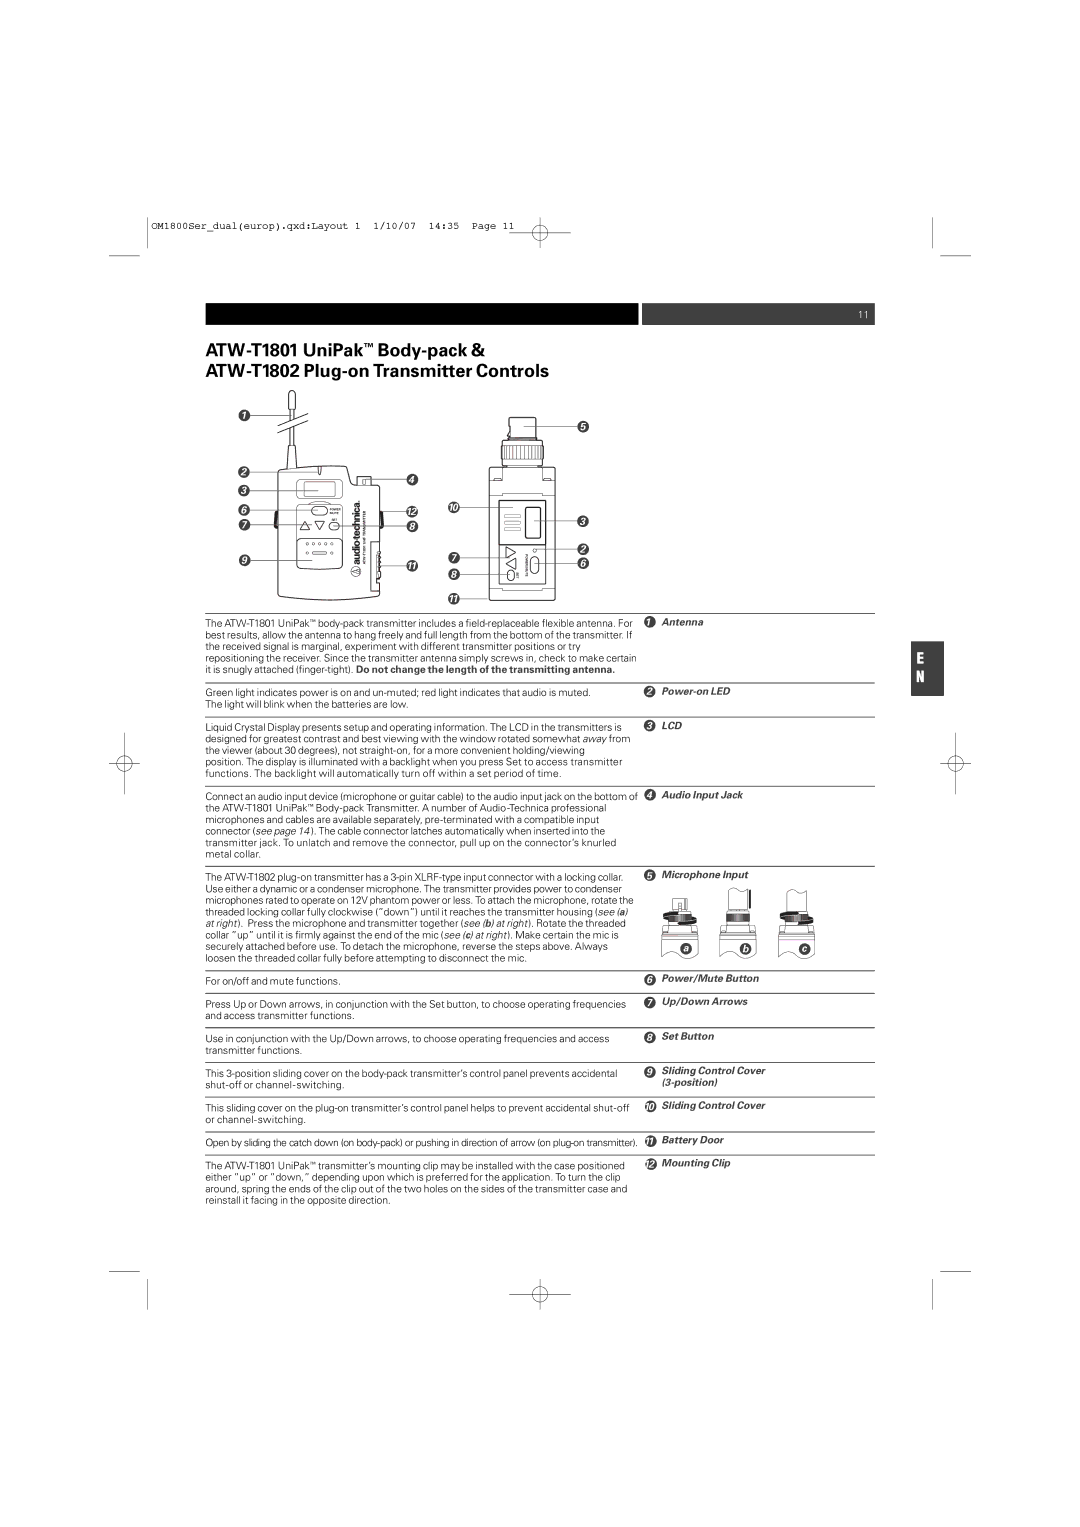
Audio Input Jack
Power/Mute Button
Battery Door
Antenna
Receiver Channel
Transmitter Batteries
Operating theTransmitter
ATW-T1801
Transmitter Functions
RF Power Adjustments on your Transmitter
Audio Input Level Gain Adjustments
Using the Mute and Un-Mute Functions
Transmitter Accessories
Available Accessories
All Wireless Essentials accessories are
Receiver Accessories
Band 541.500 566.375 MHz Band 655.500 680.375 MHz
Scanplans for 1800 Series
Band 795.500 820.000 MHz
Band 840.125 864.875 MHz
ATW-T1802 Plug-on Transmitter
Specifications
Overall System
ATW-R1820 Dual-channel Receiver
Disclaimer
Two-Years Limited Warranty
Séries
Caractéristiques Garantie
Propos des interférences HF
Émetteur de poche UniPak Émetteur « Plug-on »
Series deux canaux
Deux antennes Deux câbles de sortie 45 cm
Fonctions des systèmes Series 1800 deux canaux
Si votre système comprend un émetteur « Plug-on »
Présentation rapide du fonctionnement du système
Si votre système comprend un émetteur de poche UniPak
Les commandes du récepteur deux canaux ATW-R1820
Entrée DC Input
12 Sélecteur de signal de sortie
Panneau arrière
Potentiomètre Monitor Level
Sélection des fréquences Procédure…
Piles du récepteur deux canaux ATW-R1820
Utilisation du récepteur
Indicateur d’état des piles
Réglage manuel de la fréquence de réception
OM1800Serdualeurop.qxdLayout 1 1/10/07 1436
Antenne
Touche Power/Mute
Des commandes 3 positions
Des commandes
État des piles
Piles de l’émetteur
Utilisation de l’émetteur
Sélection des piles
ALL.LOC et modifier le réglage
Les fonctions de l’émetteur
Paramètre Description
Astuces pour obtenir de meilleurs résultats
Accessoires disponibles
Bande C 541.500 à 566.375 MHz Bande D 655.500 à 680.375 MHz
Bande E de 795,500 à 820,000 MHz
Bande F de 840,125 à 864,875 MHz
Récepteur double canal ATW-R1820
Caractéristiques
Système global
Garantie deux ans
Avertissement
0470
Inhalt
HF-Interferenz
Zweikanalempfänger Antennen TA3F zu Xlrm
Komponenten Serie 1800 Zweikanal
Zwei abnehmbare Zwei 45 cm-Ausgangskabel
Systembeschreibung Zweikanalversion
Kurzanleitung
Für die einzelnen Antennen
LED für Power/Peak Betrieb/Spitze
Antenneneingänge
Diversity-Anzeigen
Rückseite
Bedienung des Empfängers
ATW-R1820 Zweikanalempfänger Batterien
Mit einem Sendemodul
Einstellung der Empfängerfrequenz
Mit der automatischen Frequenzwahl
Einkanalbetrieb
OM1800Serdualeurop.qxdLayout 1 1/10/07 1436
Stummschaltung
Betriebs-LED
Audioeingangsbuchse
Mikrofoneingang
Bedienung des Sendemoduls
Sendemodulbatterien
Einstellung des Audio-Eingangspegels
Sendemodulfunktionen
Einstellung der HF-Leistung an Ihrem
Sendemodul
Tipps und Tricks
Hinweise
Scantabellen für die Serie
ATW-R1820 Zweikanalempfänger
± 0,005 %, Phase Lock Loop Frequenzkontrolle
Technische Daten
Gesamtsystem
Beschränkte 2-Jahres-Garantie
Haftungsausschluss
0470
Índice
Sobre las interferencias RF
Transmisor UniPak
Componentes de la Serie 1800 Series canal dual
Dos antenas
Características del sistema canal dual
Descripción rápida del funcionamiento del sistema
Controles del receptor de canal dual ATW-R1820
Panel posterior
Funcionamiento del receptor
Baterías en el receptor de canal dual ATW-R1820
Funcionamiento con un solo canal
Uso de la función de Barrido Automático
Para ajustar la frecuencia del receptor
Funcionamiento en canal dual
Funcionamiento con solo un canal
En primer lugar…
Jack de entrada de audio
Botón Power/Mute encendido
Antena
LED de encendido
Misma frecuencia que el Canal Receptor
Baterías del transmisor
Manejo del transmisor
Estado las baterías
Ajustes del nivel de entrada de audio
Bloqueo Power / Mute
Funciones del transmisor
Ajustes de la potencia RF en su transmisor
Accesorios disponibles
Funcionamiento del transmisor
Trucos para obtener los mejores resultados
Banda C 541.500 566.375 MHz Banda D 655.500 680.375 MHz
Planos de barrido para la serie
Banda E 795,500 820,000 MHz
Banda F 840,125 864,875 MHz
25 dBµV, S/N 60 dB a 5 kHz desviación, ponderación a
±0.005%, Control de frecuencia Phase Lock Loop
Especificaciones
Sistema general
Años de garantía limitada
Exoneración de responsabilidad
0470
Indice
Interferenze RF
Due Antenne
Serie 1800 componenti canale doppio
Caratteristiche del sistema canale doppio
Guida rapida all’utilizzazione del sistema
ATW-R1820 Controlli del ricevitore a doppio canale
Pannello posteriore
Utilizzazione del ricevitore
ATW-R1820 Batterie per il ricevitore a doppio canale
Del canale doppio su Hold centrale
Innanzitutto…Usare la funzione di scansione automatica
Utilizzazione con canale singolo
Usando un trasmettitore impostare
Usare la funzione di scansione automatica per Innanzitutto…
Ingresso per microfono
Tasto POWER/MUTE
Led di accensione
Presa per ingresso audio
Inserimento delle
Inserimento delle batterie del trasmettitore
Utilizzare il trasmettitore
ATW-T1801 ATW-T1802 Scelta delle batterie
Impostazioni
Funzioni del trasmettitore
Impostazione Descrizione
Suggerimenti per i risultati migliori
Accessori disponibili
Nota
Tabella delle frequenze per la serie
ATW-R1820 Ricevitore doppio canale
Caratteristiche
Sistema complessivo
ATW-T1802 Trasmettitore ad innesco
Visitate il nostro sito web
Garanzia britannica limitata di due anni
0470
Índice
Interferências RF
TransmissorUniPak
Componentes da Série 1800 canal duplo
Duas antenas Dois cabos de saída
Características do Sistema canal-duplo
Se o seu sistema estiver equipado com Transmissor Plug-on
Rápida explicação do funcionamento do sistema
Controles do Receptor Duplo Canal ATW-R1820
Painel Posterior
Funcionamento do Receptor
Pilhas do Receptor de canal duplo ATW-R1820
Para preparar a frequência do receptor
Operação canal duplo
Segundos
Utilizando a Função de Busca Automática
100
Conector de Entrada de Áudio
Botão Power/Mute
LED Indicador de Estado
Ecrã LCD
Funcionamento do Transmissor
Pilhas do Transmissor
Ajuste do Nível de Entrada de Áudio Gain
Protecções Power/Mute
Funções do Transmissor
Ajuste de Potencia RF no Transmissor
Acessórios Disponíveis
Dicas para Obter Melhores Resultados
Banda C 541.500 566.375 MHz Banda D 655.500 680.875 MHz
Planos de Busca para a série
Banda E 795.500 820.000 MHz
Banda F 840.125 864.875 MHz
ATW-T1802 Transmissor Plug-on
Especificações
Sistema Geral
ATW-R1820 Receptor de Duplo Canal
Garantia de Dois Anos
Clausula de não responsabilização
0470
Inhoud
RF interferentie
UniPak zender
Componenten van de 1800 serie twee-kanaals
Twee afneembare Twee 45cm uitgangskabels
Mogelijkheden van het systeem
Bediening in het kort
Ontvanger voorzijde
Functies van de ATW-R1820 Twee-kanaals
Achterzijde
Leeg of niet goed geplaatst
Batterijen van de ATW-R1820 Twee-kanaals ontvanger
Bedienen van de ontvanger
Apparaat is uitgeschakeld voordat u de batterijen vervangt
Single-channel gebruik
De frequentie van de ontvanger instellen
Met de Automatic Scan functie
Twee-kanaals modus
De frequentie van de ontvanger instellen Om te beginnen…
Met drie standen
Power-LED
Power/Mute-toets
Microfooningang
Bedienen van de zender
Batterijen van de zender
Audio ingangsniveau Gain
Power/Mute programmeren
Functies van de zender
RF vermogen instellen op de zender
Tips voor het beste resultaat
Verkrijgbare accessoires
Band 840,125 864,875 MHz
Scan-schema voor de 1800 Serie
Band 795,500 820,000 MHz
ATW-R1820 Twee-kanaals ontvanger
Specificaties
Specificaties voor alle systemen
ATW-T1802 Plug-on zender
Kijk ook eens op onze website
Garantievoorwaarden
OM1800Serdualeurop.qxdLayout 1 1/10/07 1436
10/07 1436
OM1800Serdualeurop.qxdLayout 1 1/10/07 1436