4 HP
Installation, Operation Maintenance Instruction
Otherwise, electric shock could occur
Safety Instructions
Otherwise, fire could occur
Otherwise, you may get an electric shock
Otherwise, it could result in a secondary accident and fire
Otherwise, fire or accident could occur
Operating Precautions
Page
Page
Contents
104
100
105
106
230V Class 0.5~5.4HP
User Selection Guide Actionmaster Specifications
460V Class 0.5~ 5.4HP
Motor Rating1 Output Capacity2 kVA
Control
Control Method
Inspection
Installation
008
Environmental Conditions
Installation
Other Precautions
Inverter
Dimensions
100 128 117.5 130.9
130 118 128 117.5 152.9
SV037ACtionMaster 150 138 128 117.5 155.0
Mccb
Basic Wiring
Wiring Power Terminals Precautions on Wiring
Power Terminals
Grounding Warning
Wires and Terminal Lugs
Screw Ring Terminals Wire6 Inverter Torque5 Mm2
Motor should be connected to the U, V, and W Terminals
Control Terminals
30A 30C 30B
Kgf·cm/lb-in
Wiring Control Terminals Precautions on Wiring
Inside Inverter
Control Circuit Terminal
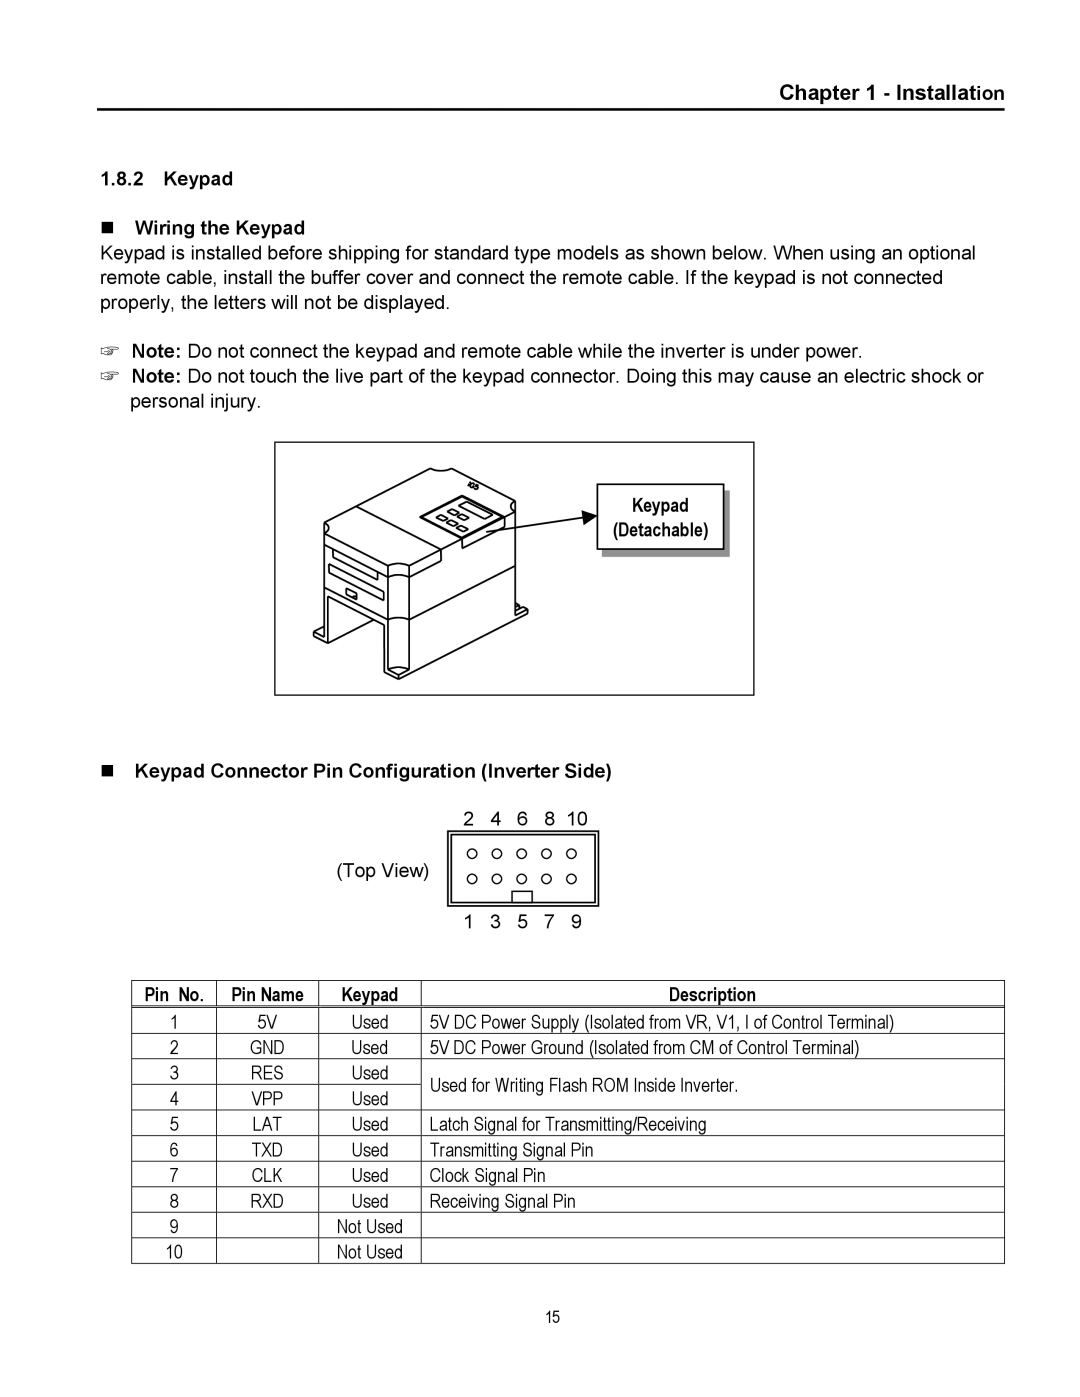
Keypad Connector Pin Configuration Inverter Side
Keypad Wiring the Keypad
Pin No
Description
Operation
Keypad and Parameter Group Setting
Segment
RUN Key
Procedures
Parameter Setting and Change
Setting the DRV Group Data
Operation
Example Changing the F5 data to
Adjusting Function and I/O Group Data
Frequency
Trip Current
Group Name Description
Parameter Group
Moving Through DRV Group Codes
Moving Through I/O Group Codes
Moving Through Function Group Codes
Operation
Operation From Keypad and Control Terminal
Operation From Control Terminal
Operation From Keypad
Drive Group DRV
Parameter List
Parameter List
Function Group 1 FU1
50 / 60 Hz FU1-37
FU1-52
FU1-53
Function Group 2 FU2
FU2-33
FU2-3214
FU2-3415
FU2-36
FU2-85
FU2-83
FU2-88
FU2-89
50 /60 Hz
Input/Output Group I/O
Yes For Step Frequency Acceleration Time To 999.9 sec
Yes For Step Frequency Deceleration Time To 999.9 sec
Yes Deceleration Time To 999.9 sec
Yes Acceleration Time To 999.9 sec
Yes FM Frequency Meter Output Current Selection Voltage
Acceleration Time To 999.9 sec
Stall
Yes Reference Free Run
Bit
Yes Modbus-RTU
Parameter Description
Related Functions DRV-04 Freq Mode FU1-20 Max Freq
DRV-00 Output Frequency
DRV-01 Acceleration Time DRV-02 Deceleration Time
DRV-04 Frequency Mode Frequency Setting Method
Parameter Description DRV DRV-03 Drive Mode Run/stop Method
Select the source of Run/Stop command
Select the source of frequency setting
DRV-05 ~ DRV-07 Step Frequency 1 ~
Parameter Description DRV
DRV-08 Output Current
DRV-09 Motor Speed
Fault Contents
DRV-12 Fault Display
DRV-10 DC Link Voltage
DRV-11 User Display Selection
Page
Parameter Description FU1
Function 1 Group FU1
FU1-00 Jump to Desired Code #
FU1-03 Run Prevention
Selects the stopping method for the inverter
FU1-07 Stop Mode
Stop Mode ‘Free-run’
Output Frequency FU1-22 Time Output Voltage
Freq. limit ‘Yes’
FU1-30 ~ FU1-37 User V/F Frequency and Voltage
Parameter Description FU1 FU1-29 Volts/Hz Pattern
FU1-39 Energy Save Level
FU1-38 Output Voltage Adjustment
Motor i2t Characteristic Curve
FU1-54 Overload Warning Level FU1-55 Overload Warning Time
St bit
FU1-59 Stall Prevention Mode Selection
This code is used to exit a group. Press Func key to exit
Parameter Description FU1 FU1-99 Return Code
Parameter Description FU2
Function 2 Group FU2
FU2-00 Jump to Desired Code #
FU2-07 Dwell Frequency FU2-08 Dwell Time
FU2-10 ~ FU2-16 Frequency Jump
FU2-19 Input/Output Phase Loss Protection Bit Set
FU2-21 Restart After Fault Reset
FU2-20 Power on Start Selection
FU2-19 Phase Loss Protection Select
Setting Range
FU2-22 Speed Search Select
Motor Speed Time Output Frequency Output Voltage
FU2-39 Carrier Frequency
Parameter Description FU2 FU2-40 Control Method Selection
This is to select the control method of inverter
Output frequency = Reference freq. + Delta freq
Delta freq
FU2-70 Reference Frequency for Accel/Decel
Parameter Description FU2 FU2-71 Accel/Decel Time Scale
FU2-72 Power On Display
FU2-73 User Display Selection
FU2-74 Gain for Motor Speed Display
FU2-79 Software Version
FU2-76 Duty of DB Dynamic Braking Resistor
FU2-81 ~ FU2-90 2nd Motor Related Functions
Displays the software version
FU2-93 Parameter Initialize
FU2-91 Parameter Read FU2-92 Parameter Write
FU2-94 Parameter Write Protection
FU2-99 Return Code
Parameter Description FU2
06 ~ I/O-10 Analog Current Input I Signal Adjustment
01 ~ I/O-05 Analog Voltage Input V1 Signal Adjustment
Parameter Description I/O
00 Jump to Desired Code #
Following table shows the selection in I/O-48
11 Criteria for Analog Input Signal Loss
Step Parameter Speed-H Speed-M Speed-L
Speed-L, Speed-M, Speed-H
2nd Function
DC-Brake
Accel/Decel Parameter
Time
V1-Ext
Wire
Up, Down
Ext Trip-A
20 Jog Frequency
15 Terminal Input Status 16 Terminal Output Status
21 ~ I/O-24 Step Frequency 4, 5, 6
Analog Hold
40 FM Frequency Meter Output 41 FM Adjustment
25 ~ I/O-38 1st ~ 7th Accel/Decel Time
Multi-Accel/Decel Time Operation
44 Multi-function Output define MO-MG
42 FDT Frequency Detection Level 43 FDT Bandwidth
FDT-2
FDT-1
FDT-3
FDT-4
Stall
IOL
46 Inverter Number 47 Baud Rate
45 Fault Output Relay 30A, 30B, 30C
99 Return Code 7-Segment Keypad
50 Communication Protocol Selection
Specifications
MODBUS-RTU Communication
Introduction
Items Specifications
Installation
Connecting the communication line
System configuration
Communication Protocol Modbus-RTU
Operating
Function Code Name
Exception Code Name
Error Response Negative Acknowledge Response
Basic Format Command Message Request
Communication Protocol CMC-BUS Ascii
Normal Response Acknowledge Response
Detail Communication Protocol
Acknowledge Response
Negative Acknowledge Response
Request for Registration of ‘n’ numbers of Address
Request for Write
Error Code
Common Parameter Description Unit Read/Write Data value HEX
Parameter Code List
Parameter Description
Read/Write Data value HEX
Value
Description Default Max. value Min. value Unit
630A
Retry delay
180
SS I-Gain
Group Parameter
Description Default Max. value Min value Unit
Parameter Description Default Max. value Min value Unit
Refer to this chapter when a trouble is occurred
Troubleshooting
MODBUS-RTU Communication
Ascii Code List
Character Hex
Space
Troubleshooting & Maintenance
Fault Display
Display Protective Description
Troubleshooting & Maintenance
Fault Inverter Fault Reset
Protective Cause Remedy
Fault Remedy
Condition Check Point
Elements Test Polarity Measured Value
How to Check Power Components
Short
Module
Precautions
Maintenance
Routine Inspection
Periodical Inspection
Daily and Periodic Inspection Items
Period Inspection
Inspection Method Criterion Measuring Instrument
Fan
Troubleshooting & Maintenance
Options
Braking Resistor
400V Class Model Number 004-4 008-4 015-4 022-4 037-4
230V, or Phase 230/460V 50/60Hz
Phase
Options
DB Resistor2
Unit mm
DIN Rail Base
103
Use Related Parameter Code
Appendix a Functions Based on the USE
Inverter
Appendix B- Peripheral Devices
CD 73/23/EEC and CD 89/336/EEC
Declaration of Conformity
Characteristics of information technology equipment
Safety of information technology equipment
EN 50178
EN 55022
Essential Requirements for CE Compliance
EMC Installation Guide
109
Footprint Filters
RFI Filters Footprint Standard for ACtionMaster Series
Revision Date Remarks
Revision History
112
Cleveland Motion Controls