Maintenance

Noses

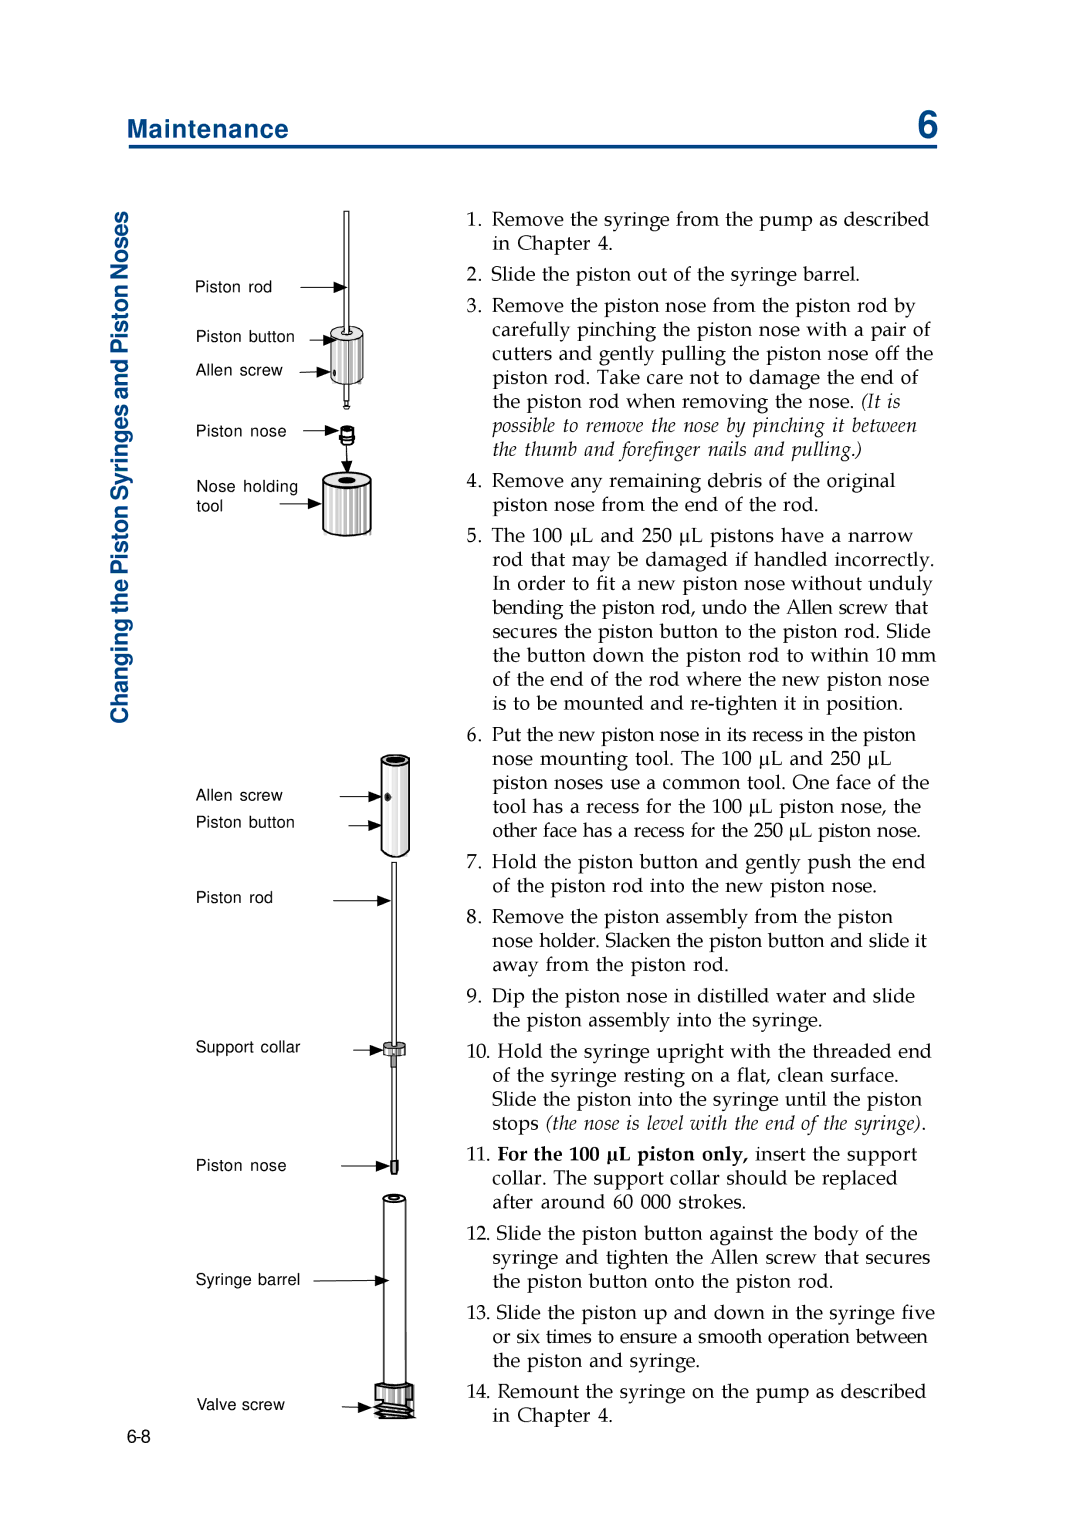
Piston rod

Piston

Piston button

and

Allen screw

Syringes

Piston nose


Nose holding

Changing the Piston

tool


Allen screw

Piston button

Piston rod

Support collar

Piston nose

Syringe barrel

Valve screw

6

1.Remove the syringe from the pump as described in Chapter 4.

2.Slide the piston out of the syringe barrel.

3.Remove the piston nose from the piston rod by carefully pinching the piston nose with a pair of cutters and gently pulling the piston nose off the piston rod. Take care not to damage the end of the piston rod when removing the nose. (It is possible to remove the nose by pinching it between the thumb and forefinger nails and pulling.)

4.Remove any remaining debris of the original piston nose from the end of the rod.

5.The 100 µL and 250 µL pistons have a narrow rod that may be damaged if handled incorrectly. In order to fit a new piston nose without unduly bending the piston rod, undo the Allen screw that secures the piston button to the piston rod. Slide the button down the piston rod to within 10 mm of the end of the rod where the new piston nose is to be mounted and re-tighten it in position.

6.Put the new piston nose in its recess in the piston nose mounting tool. The 100 µL and 250 µL piston noses use a common tool. One face of the tool has a recess for the 100 µL piston nose, the other face has a recess for the 250 µL piston nose.

7.Hold the piston button and gently push the end of the piston rod into the new piston nose.

8.Remove the piston assembly from the piston nose holder. Slacken the piston button and slide it away from the piston rod.

9.Dip the piston nose in distilled water and slide the piston assembly into the syringe.

10.Hold the syringe upright with the threaded end of the syringe resting on a flat, clean surface. Slide the piston into the syringe until the piston stops (the nose is level with the end of the syringe).

11.For the 100 µL piston only, insert the support collar. The support collar should be replaced after around 60 000 strokes.

12.Slide the piston button against the body of the syringe and tighten the Allen screw that secures the piston button onto the piston rod.

13.Slide the piston up and down in the syringe five or six times to ensure a smooth operation between the piston and syringe.

14.Remount the syringe on the pump as described in Chapter 4.

6-8

Page 92
Image 92
Gilson 402 manual Noses

402 specifications

The Gilson 402 is a highly regarded laboratory device known for its precision and reliability in liquid handling applications. Primarily utilized in research and clinical labs, this automated pipetting system significantly enhances productivity by reducing the time taken for repetitive tasks while ensuring maximum accuracy.

One of the standout features of the Gilson 402 is its intuitive user interface. The touchscreen display allows operators to easily navigate through various functions and settings, enabling quick setup and adjustments. Its intuitive design minimizes the learning curve for new users, making it accessible even for those with limited technical expertise.

The Gilson 402 employs advanced pipetting technologies, which provide exceptional reproducibility and reliability. The system is equipped with proprietary Pipette G (as used in Gilson's PIPETMAN series), which ensures precise volume delivery. This is crucial in applications such as molecular biology, where even minor discrepancies in liquid volumes can lead to significant variations in experimental outcomes.

Another key characteristic of the Gilson 402 is its versatility. The device accommodates a wide range of pipette tips, allowing users to work with varying volumes and types of samples. Whether handling delicate biological fluids or viscous solutions, the Gilson 402 adapts to different protocols seamlessly.

The automation capabilities extend to a customizable programming feature that permits users to create complex pipetting protocols with ease. Multiple-step pipetting tasks can be completed effortlessly, reducing the likelihood of errors caused by manual handling.

Equipped with high-precision motors and sensors, the Gilson 402 also features built-in calibration and quality control functions. This guarantees that the system remains accurate over time and can easily be adjusted to maintain compliance with stringent laboratory standards.

In summary, the Gilson 402 is a cutting-edge liquid handling solution that combines advanced technology with user-friendly features. Its reliability, precision, and versatility make it an indispensable tool in modern laboratories. Whether used for routine tasks or complex experiments, the Gilson 402 enhances efficiency, promotes accuracy, and ultimately supports groundbreaking scientific research.