SHOOTING OPERATION
| • The recorded contents can be checked on the LCD moni- | |
Basic Recording Operation | ||
tor, in the viewfinder or on a monitor connected to the | ||
(Cont’d) | video signal output connectors. | |
| ||
| 1. In the | |
| camera lens section. |
HEADER REC Function
If the Record-Standby Mode Contin- ues
Setting the time before the tape protection mode is engaged The time before the tape protection mode is engaged from the
When the
In the tape protect mode, STOP is shown as the VTR mode indication on the LCD monitor and in the viewfinder screen. (STATUS 1 screen)
VTR mode indication
To start recording from the tape protect mode, press the REC/VTR trigger button.
•The drum starts rotating, and recording starts after about 3 seconds.
To return to the
CAUTION
This function does not work when using RET button is used as FOCUS ASSIST button.
Checking Recorded Contents in
Check Function)
This function is available only when this device is in the standby mode.
In standby mode, about 5 seconds of the last part of the con- tent recorded in DV format can be played back, and about 7 seconds when the content was recorded in HDV format can be played back.
1. RET button
•The tape rewinds and about 6 seconds of the content recorded in DV format is played back, and about 8 sec- onds of the content recorded in HDV format is played back. After playback, this device returns to standby mode at the position on the tape where the RET button was pressed.
If you continue to hold down the RET button, up to about 18 seconds of content recorded in DV format and up to about 20 seconds of content recorded in HDV format can be rewound and played back.
•Pressing the REC/VTR trigger button during playback will put this device in REC standby mode. The camera will automatically return to recording mode after play- back.
CAUTION
•This function does not work when using RET button is used as FOCUS ASSIST button.
•This function does not work when this device is in the stop mode.
•During recording check, the following indication will appear if the error rate increases due to head clogging, etc.
“HEAD CLEANING REQUIRED!” is shown on the LCD monitor or in the viewfinder. (When the STATUS 0, 1, 4 screen is displayed.)
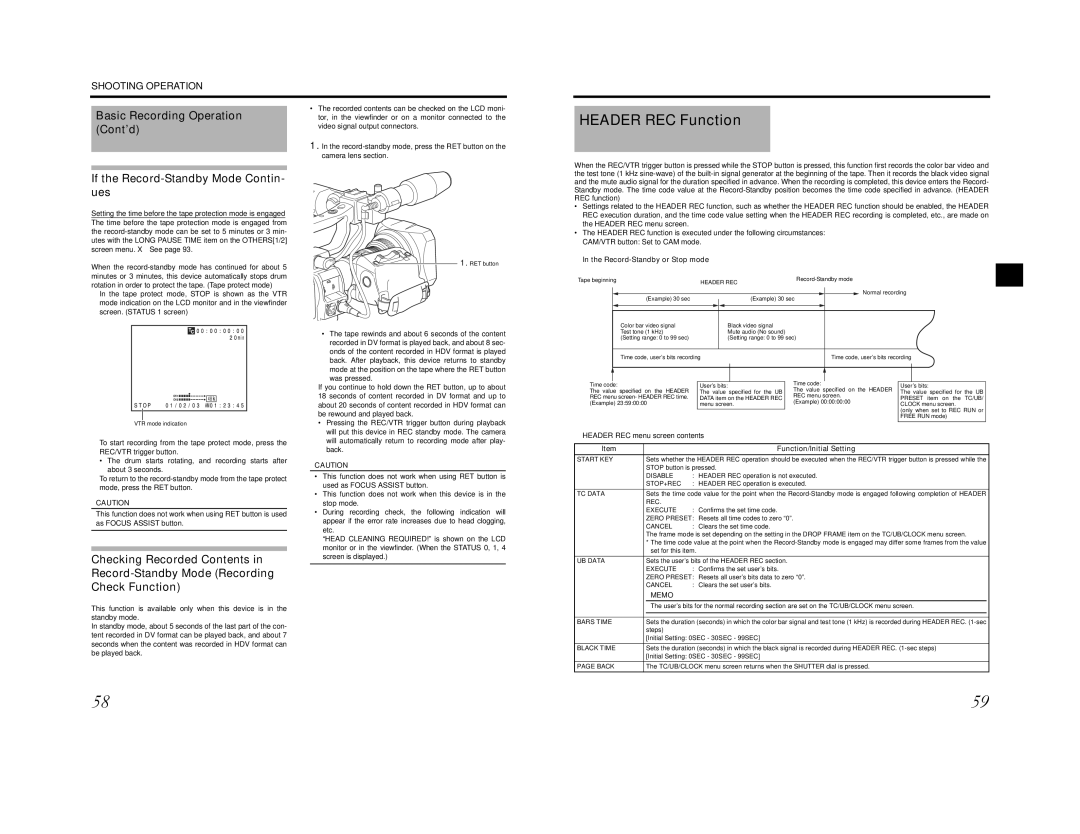
When the REC/VTR trigger button is pressed while the STOP button is pressed, this function first records the color bar video and the test tone (1 kHz
•Settings related to the HEADER REC function, such as whether the HEADER REC function should be enabled, the HEADER REC execution duration, and the time code value setting when the HEADER REC recording is completed, etc., are made on the HEADER REC menu screen.
•The HEADER REC function is executed under the following circumstances: CAM/VTR button: Set to CAM mode.
In the Record-Standby or Stop mode
Tape beginning | HEADER REC | |
|
|
(Example) 30 sec | Normal recording |
(Example) 30 sec |
| Color bar video signal | Black video signal |
|
|
|
|
| ||
| Test tone (1 kHz) | Mute audio (No sound) |
|
|
|
|
| ||
| (Setting range: 0 to 99 sec) | (Setting range: 0 to 99 sec) |
|
|
| ||||
|
|
|
|
|
|
|
|
|
|
| Time code, user’s bits recording |
| Time code, user’s bits recording | ||||||
|
|
|
|
|
|
|
|
| |
|
|
|
|
|
|
|
|
|
|
|
|
|
|
|
|
|
| ||
|
|
|
|
|
|
|
|
| |
Time code: | User’s bits: |
| Time code: | User’s bits: | |||||
The value specified on the HEADER | The value specified for the UB |
| The value specified on the HEADER | The value specified for the UB | |||||
REC menu screen- HEADER REC time. | DATA item on the HEADER REC |
| REC menu screen. | PRESET item on the TC/UB/ | |||||
(Example) 23:59:00:00 | menu screen. |
| (Example) 00:00:00:00 | CLOCK menu screen. | |||||
|
|
|
|
|
|
| (only when set to REC RUN or | ||
|
|
|
|
|
|
| |||
|
|
|
|
|
|
| FREE RUN mode) | ||
HEADER REC menu screen contents
Item |
| Function/Initial Setting |
|
START KEY | Sets whether the HEADER REC operation should be executed when the REC/VTR trigger button is pressed while the |
| |
| STOP button is pressed. |
| |
| DISABLE | : HEADER REC operation is not executed. |
|
| STOP+REC | : HEADER REC operation is executed. |
|
TC DATA | Sets the time code value for the point when the |
| |
| REC. |
|
|
| EXECUTE | : Confirms the set time code. |
|
| ZERO PRESET: Resets all time codes to zero “0”. |
| |
| CANCEL | : Clears the set time code. |
|
| The frame mode is set depending on the setting in the DROP FRAME item on the TC/UB/CLOCK menu screen. |
| |
| * The time code value at the point when the |
| |
| set for this item. |
| |
UB DATA | Sets the user’s bits of the HEADER REC section. |
| |
| EXECUTE | : Confirms the set user’s bits. |
|
| ZERO PRESET: Resets all user’s bits data to zero “0”. |
| |
| CANCEL | : Clears the set user’s bits. |
|
| MEMO |
|
|
| The user’s bits for the normal recording section are set on the TC/UB/CLOCK menu screen. |
| |
|
|
| |
|
|
| |
BARS TIME | Sets the duration (seconds) in which the color bar signal and test tone (1 kHz) is recorded during HEADER REC. |
| |
| steps) |
|
|
| [Initial Setting: 0SEC - 30SEC - 99SEC] |
| |
BLACK TIME | Sets the duration (seconds) in which the black signal is recorded during HEADER REC. |
| |
| [Initial Setting: 0SEC - 30SEC - 99SEC] |
| |
PAGE BACK | The TC/UB/CLOCK menu screen returns when the SHUTTER dial is pressed. |
| |
58 | 59 |