PLAYBACK MODE
USING EXTERNAL COMPONENTS
Outputting Audio
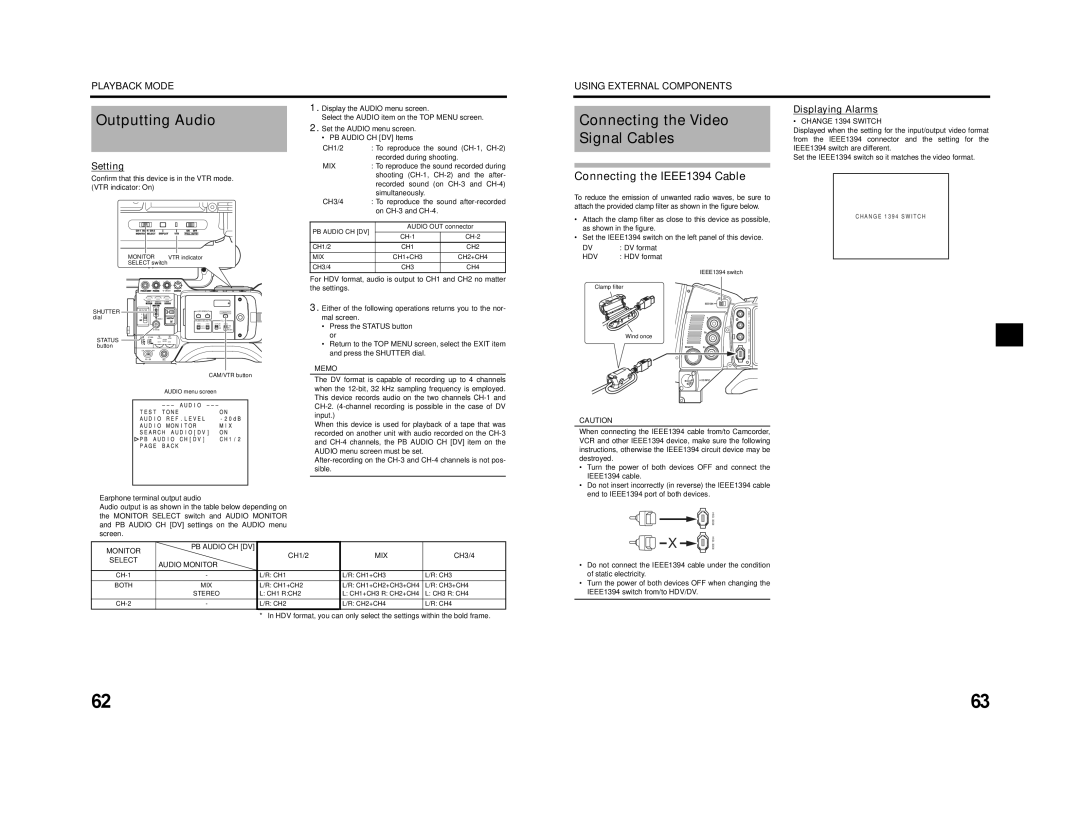
Setting
1.Display the AUDIO menu screen.
Select the AUDIO item on the TOP MENU screen.
2.Set the AUDIO menu screen.
• PB AUDIO CH [DV] Items
CH1/2 | : To reproduce the sound |
| recorded during shooting. |
MIX | : To reproduce the sound recorded during |
| Displaying Alarms | |
Connecting the Video | ||
• CHANGE 1394 SWITCH | ||
Signal Cables | Displayed when the setting for the input/output video format | |
from the IEEE1394 connector and the setting for the | ||
| IEEE1394 switch are different. | |
| Set the IEEE1394 switch so it matches the video format. | |
|
|
Confirm that this device is in the VTR mode. (VTR indicator: On)
| MONITOR |
| VTR indicator |
|
| SELECT switch |
| ||
|
|
| VF BRIGHT |
|
| USER 1 | USER 2 | USER 3 |
|
SHUTTER | 2 |
| - + |
|
| ND FILTER |
| LCD BRIGHT |
|
|
|
| CAM/VTR | |
dial | 1 |
|
|
|
| MENU | AUDIO SELECT | TC | |
TC
UB
STATUS
STATUS button
POWERREC
CAM/VTR button
AUDIO menu screen
Earphone terminal output audio
Audio output is as shown in the table below depending on the MONITOR SELECT switch and AUDIO MONITOR and PB AUDIO CH [DV] settings on the AUDIO menu screen.
|
| shooting | |
|
| recorded sound (on | |
|
| simultaneously. |
|
CH3/4 | : To reproduce the sound | ||
|
| on |
|
|
|
|
|
PB AUDIO CH [DV] |
| AUDIO OUT connector | |
|
| ||
CH1/2 |
| CH1 | CH2 |
MIX |
| CH1+CH3 | CH2+CH4 |
CH3/4 |
| CH3 | CH4 |
For HDV format, audio is output to CH1 and CH2 no matter the settings.
3.Either of the following operations returns you to the nor- mal screen.
•Press the STATUS button or
•Return to the TOP MENU screen, select the EXIT item and press the SHUTTER dial.
MEMO
The DV format is capable of recording up to 4 channels when the
When this device is used for playback of a tape that was recorded on another unit with audio recorded on the
Connecting the IEEE1394 Cable
To reduce the emission of unwanted radio waves, be sure to attach the provided clamp filter as shown in the figure below.
•Attach the clamp filter as close to this device as possible, as shown in the figure.
•Set the IEEE1394 switch on the left panel of this device.
DV | : DV format |
|
HDV | : HDV format |
|
|
| IEEE1394 switch |
Clamp filter |
| |
|
| VIDEO |
| Wind once | |
|
| IEEE 1394 |
CAUTION
When connecting the IEEE1394 cable from/to Camcorder, VCR and other IEEE1394 device, make sure the following instructions, otherwise the IEEE1394 circuit device may be destroyed.
•Turn the power of both devices OFF and connect the IEEE1394 cable.
•Do not insert incorrectly (in reverse) the IEEE1394 cable end to IEEE1394 port of both devices.
| IEEE 1394 |
X | 1394 |
C H A N G E 1 3 9 4 S W I T C H
MONITOR | PB AUDIO CH [DV] | CH1/2 | MIX | CH3/4 | |
| |||||
SELECT | AUDIO MONITOR | ||||
|
|
| |||
|
|
|
| ||
- | L/R: CH1 | L/R: CH1+CH3 | L/R: CH3 | ||
BOTH | MIX | L/R: CH1+CH2 | L/R: CH1+CH2+CH3+CH4 | L/R: CH3+CH4 | |
| STEREO | L: CH1 R:CH2 | L: CH1+CH3 R: CH2+CH4 | L: CH3 R: CH4 | |
- | L/R: CH2 | L/R: CH2+CH4 | L/R: CH4 |
* In HDV format, you can only select the settings within the bold frame.
IEEE |
•Do not connect the IEEE1394 cable under the condition of static electricity.
•Turn the power of both devices OFF when changing the IEEE1394 switch from/to HDV/DV.
62 | 63 |