USING EXTERNAL COMPONENTS
| Displaying Alarms | |
Connecting the Video | ||
• CHANGE 1394 SWITCH | ||
Signal Cables | Displayed when the setting for the input/output video format | |
from the IEEE1394 connector and the setting for the | ||
| IEEE1394 switch are different. | |
| Set the IEEE1394 switch so it matches the video format. | |
|
|
Recording Composite Video Signals from an External Device
Operation
Start and stop recording with the REC/VTR trigger button.
•EE images of input signals are output in
CAUTION
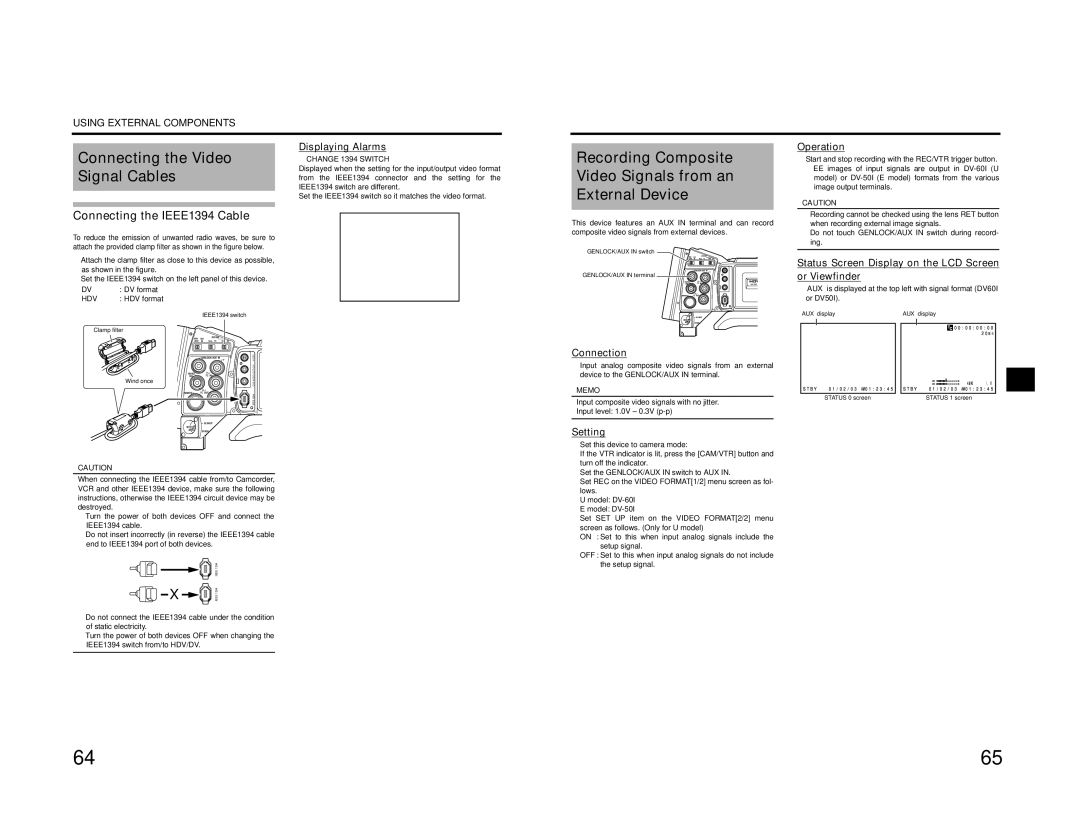
Connecting the IEEE1394 Cable
To reduce the emission of unwanted radio waves, be sure to attach the provided clamp filter as shown in the figure below.
•Attach the clamp filter as close to this device as possible, as shown in the figure.
•Set the IEEE1394 switch on the left panel of this device.
DV | : DV format |
|
HDV | : HDV format |
|
|
| IEEE1394 switch |
Clamp filter |
| |
|
| VIDEO |
| Wind once | |
| CH2 | |
|
| |
|
| IEEE 1394 |
CAUTION
When connecting the IEEE1394 cable from/to Camcorder, VCR and other IEEE1394 device, make sure the following instructions, otherwise the IEEE1394 circuit device may be destroyed.
•Turn the power of both devices OFF and connect the IEEE1394 cable.
•Do not insert incorrectly (in reverse) the IEEE1394 cable end to IEEE1394 port of both devices.
| IEEE 1394 |
X | IEEE 1394 |
•Do not connect the IEEE1394 cable under the condition of static electricity.
•Turn the power of both devices OFF when changing the IEEE1394 switch from/to HDV/DV.
C H A N G E 1 3 9 4 S W I T C H
This device features an AUX IN terminal and can record composite video signals from external devices.
GENLOCK/AUX IN switch
GENLOCK/AUX IN terminal | |
| |
| IEEE 1394 |
Connection
Input analog composite video signals from an external device to the GENLOCK/AUX IN terminal.
MEMO
Input composite video signals with no jitter.
Input level: 1.0V ± 0.3V
Setting
Set this device to camera mode:
If the VTR indicator is lit, press the [CAM/VTR] button and turn off the indicator.
Set the GENLOCK/AUX IN switch to AUX IN.
Set REC on the VIDEO FORMAT[1/2] menu screen as fol- lows.
U model:
E model:
Set SET UP item on the VIDEO FORMAT[2/2] menu screen as follows. (Only for U model)
ON : Set to this when input analog signals include the setup signal.
OFF : Set to this when input analog signals do not include the setup signal.
•Recording cannot be checked using the lens RET button when recording external image signals.
•Do not touch GENLOCK/AUX IN switch during record- ing.
Status Screen Display on the LCD Screen or Viewfinder
•“AUX” is displayed at the top left with signal format (DV60I or DV50I).
“AUX” display |
| “AUX” display | ||||
|
|
|
|
|
|
|
|
|
|
|
|
|
|
D V - 6 0 I A U X |
| D V - 6 0 I A U X |
|
| ||
1 2 . 0![]()
STATUS 0 screen | STATUS 1 screen |
64 | 65 |