PREPARATIONS
PREPARATIONS FOR OPERATION
| • | When you use an Anton Bauer battery, the remaining | |
Battery Operation | |||
| battery (capacity or time) can be displayed in the STA- | ||
(Cont’d) |
| TUS 1 screen of the LCD screen or viewfinder. Set BAT- | |
| TERY INFO. on the LCD/VF[3/4] menu screen to | ||
|
| CAPA% or TIME to display the remaining battery. When | |
|
| using the IDX Endura battery, the remaining capacity (%) | |
|
| can be displayed. X See page 88. |
Turning the Power ON
Turning the Power OFF
1. Place this device in the |
2. Set the POWER switch to OFF. |
3. Remove the battery pack or the power supply to the DC |
Precautions for the Battery Opera- tion
• | Do not detach the battery pack while recording is taking |
| place. |
• | Do not connect or disconnect the DC cable while operat- |
| ing with a battery pack. |
| The following symptoms may occur if the DC cable is con- |
| nected or disconnected while operating with a battery |
| pack. |
| • The power is cut off for a moment when the DC cable is |
| disconnected. |
| • Noise to the video and audio signals occurs. Audio sig- |
| nal are muted. |
• | When operation is continued with DC input after the bat- |
| tery pack capacity has been used up, set the POWER |
| switch to OFF after the DC power is applied. Then switch |
| ON again. |
• If this device is left with the battery pack attached, a small | |
| amount of power is consumed even if the POWER switch |
| on this device is set to OFF. |
Operating Time with Battery Pack
When a fully charged battery pack is attached, the approxi- mate continuous operating time is as follows
Battery Pack | Continuous Operating Time (at 25°C (77°F)) |
Dionic 90 | Approx. 3.2 hours |
(U model) |
|
Approx. 2.5 hours | |
(E model) |
|
•Battery operating time may differ depending on the age of the battery pack, charging conditions and the operating environment, etc. Use the values in the table on the above for approximate reference times.
•Operating time is reduced in areas with a cold environ- ment.
•Operating time is reduced when the power zoom lens and LCD are used frequently.
Turning the Power ON
1.Set the POWER switch to ON.
This device turns on in Camera mode.
The operation differs according to whether this device is in the Camera mode or in the VTR mode.
The mode switches each time you press the CAM/VTR button. When the mode is switched, the VTR indicator displays the following statuses.
While the mode is being switched : Flashing
In VTR mode |
|
|
|
|
|
|
|
| : Lit |
| ||||||
In Camera mode |
|
|
|
|
|
|
|
| : Off |
| ||||||
|
|
|
|
|
|
|
|
|
|
|
|
|
|
|
|
|
|
|
|
|
|
|
|
|
|
|
|
|
|
|
|
|
|
|
|
|
|
|
|
|
|
|
|
|
|
|
|
|
|
|
|
|
|
|
|
|
|
|
|
|
|
|
|
|
|
|
|
INPUT connector. (When the camera is not going to be |
used for a longer period.) |
CAUTION
•Do not set the POWER switch to OFF while recording is taking place.
Confirm that the “STBY” or “STOP” indication is shown in the VTR operation mode indication area before the power is turned off.
Should the POWER switch accidentally be set to OFF during a recording, wait at least 5 seconds before turning the power on again.
•Always set the POWER switch to OFF before discon- necting the power supply.
Do not remove the battery pack or turn AC adapter OFF while the POWER switch on the camera is still set to ON.
Remove the battery pack when this device is not going to |
be used. |
Precautions for the Battery Pack
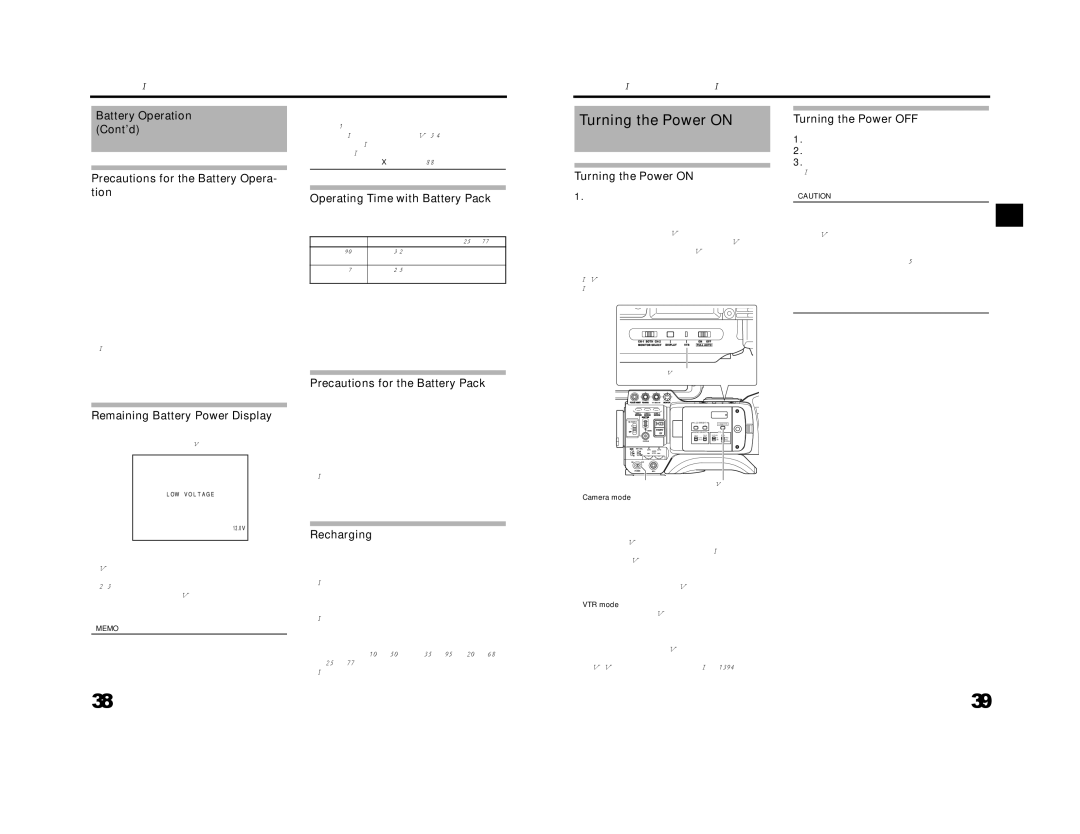
VTR indicator
Remaining Battery Power Display
LCD monitor/Viewfinder
• When the battery pack is not in use, it must be stored in a |
cool, dry place. |
Do not leave the battery pack in a place where it might be |
subject to a high temperature (under direct sunlight in a |
car, etc.), this could cause leakage of the fluid or shorten |
service life. |
• When the terminal section of the battery pack gets dirty, |
the operating time will be shortened. |
• If the operating time becomes greatly reduced even imme- |
VF BRIGHT
USER 1 | USER 2 | USER 3 |
ND FILTER
2
1
MENU
STATUS
POWERREC
LCD BRIGHT | CAM/VTR | |
- | + | |
AUDIO SELECT | TC | |
DISPLAY GENE. | ||
|
| TC |
|
| UB |
diately after recharging, the service life of the battery pack |
is nearly finished. |
Purchase a new battery pack. |
POWER switch | CAM/VTR button |
Camera mode
This device enters the Camera mode. The camera image is displayed in the viewfinder or on the LCD monitor. When a recordable videocassette is loaded, this device enters
When the remaining battery power is nearly exhausted, the following warnings will be generated.
Viewfinder screen or LCD monitor
When a Status screen is displayed (excluding the STATUS 2, 3 screen in the Camera mode)
• Alarm indication: LOW VOLTAGE displayed.
FRONT and BACK TALLY lamp on camera: Blinks
Monitoring loudspeaker and PHONES jack: Alarm sound
MEMO
•After the remaining battery power warnings appear, this device automatically stops operation if the battery power operation is continued.
Recharging
•Recharge the battery pack after completely discharging it. Repeated recharging with residual charge remaining could result in reduced battery capacity.
•If the battery capacity is reduced by repeating incomplete recharging, or recharging without discharging, once dis- charge the battery pack completely, then recharge it to restore the battery capacity.
•If the battery pack is recharged with its internal tempera- ture raised immediately after use, recharging may not be performed completely.
•Perform charging in an environment where the tempera- ture is between 10°C (50°F) and 35°C (95°F). 20°C (68°F) to 25°C (77°F) is the ideal temperature range for charging. If the environment is too cold, charging may not complete.
the
*Playback is also possible in the Camera mode. Playback operation becomes possible when the STOP
button is pressed to set the VTR operation mode indica- tor to indicate “STOP”.
VTR mode
This device enters the VTR mode. The camera image will not be displayed in the viewfinder or on the LCD monitor. When a videocassette is loaded, this device enters the stop mode.
“STOP” is displayed in the VTR operation mode indication area of the LCD monitor and/or in the viewfinder. HDV/DV input is possible through the IEEE1394 connector.
38 | 39 |