English
Keep These Instructions Clean only with a DRY Cloth
Important Safety Instructions
CE Mark for European Harmonized Standards
Keeping foreign matter out of your equipment
Data Handling
Service and USER’S Assistance
LCD Display
Trademarks
Balance Slider
Keyboard
HOW TO…
Table of Contents
Page
Effects
Disk edit environment
225
Midi Controllers
Introduction
Live Performing
Welcome
Useful Links
About this Manual
Reloading the Factory Data
Loading the Operating System
Start UP
Demo
Damper Pedal
Music Stand
B C ` a
Front Panel
Mode section
Master Volume
Variation 1-4 Note Length buttons
Style section Numeric Keypad
Fill 1-2 Note Length buttons
Ending 1-2 DOT, Triplet buttons
-/+
Intro 1-2 buttons
Single Touch Setting F1-F4 Function Keys buttons
VOLUME/VALUE Mute A-H buttons
TEMPO/VALUE section
Perform
Keyboard Mode section
Program
PROGRAM/PERFORMANCE section
Transpose
Pads 1-4, Stop
Octave
Balance slider
Display Controls
Display and User Interface
MixerFX Send
DiskLoad
Operating modes
Interface Structure
Message Windows
Symbols and Icons
Rear Panel
Power switch
Input 1
Basic Guide
Playing on the Keyboard
Basic Operations
SELECTING, MUTING/UNMUTING and Soloing a Track
Style Change button
Selecting a Performance
StereoGrand
Data type Parameters
Selecting a Style
Selecting a Program
Single Touch button
Piano TU1
Song Selection
No song
Playing in Realtime
Tutorial
SoftBeat
Playing a Style
Sync
Playing a Song
Need more information?
BSNew Song
Recording a Song
Record
RecNewSong
New Song
Editing a Song
Load Song
Change the volume
MixerVolume
MySong
Song Edit Menu
Other editings
Arabic Scale
Midi
What is MIDI?
Midifiles
General Midi Standard
Connections and settings
Midi Setup
Control Channel
Connecting the PA50 to AN External Sequencer
Connecting the PA50 to a Midi Accordion
Connection and settings
Local Off
Keyboard
Playing Another Instrument with the PA50
Sequencer
Arranger
Reference Guide
How to make the Direct FD bank
Style Play Operating Mode
WHAT’S a STYLE?
Styles and Performances
Main
HOW to Select Programs
Style Tracks
Menu
Write Window
Edit page Structure
Write to
2 Mixer PAN
1 Mixer Volume
3 Mixer FX Send
MixerPan
5 Tuning Scale
4 Tuning Detune
7 FX A/B Select
8 FX C/D Select
10 FX B Editing
9 FX a Editing
11 FX C Editing
12 FX D Editing
Reset
14 Track Mode
15 Track INTERNAL/EXTERNAL
TrackMode
RT CtlDmpr&Expr
16 R.T. Controls Damper
RT CtlJoystick
RT CtlDynRange
StyCtlDrums
20 Style Controls DRUM/FILL
23 Preferences Lock
22 Pads
StyCtlWrap/Rng
Pads
PrefCtl Gbl
Chord Recognition Mode
Memory Mode
Scale Mode
Chord Chord Variations CVs
STYLE’S Structure
Listening to the Style While in RECORD/ Edit Mode
Style IMPORT/EXPORT Entering the Record Mode
Exit and SAVE/ABORT Style
What to record
List of Recorded Events
Fast Delete Using the Control Panel Buttons
NewBossa
NewBossa V1-CV1
Resol Resolution
Meter
Original Key/Chord
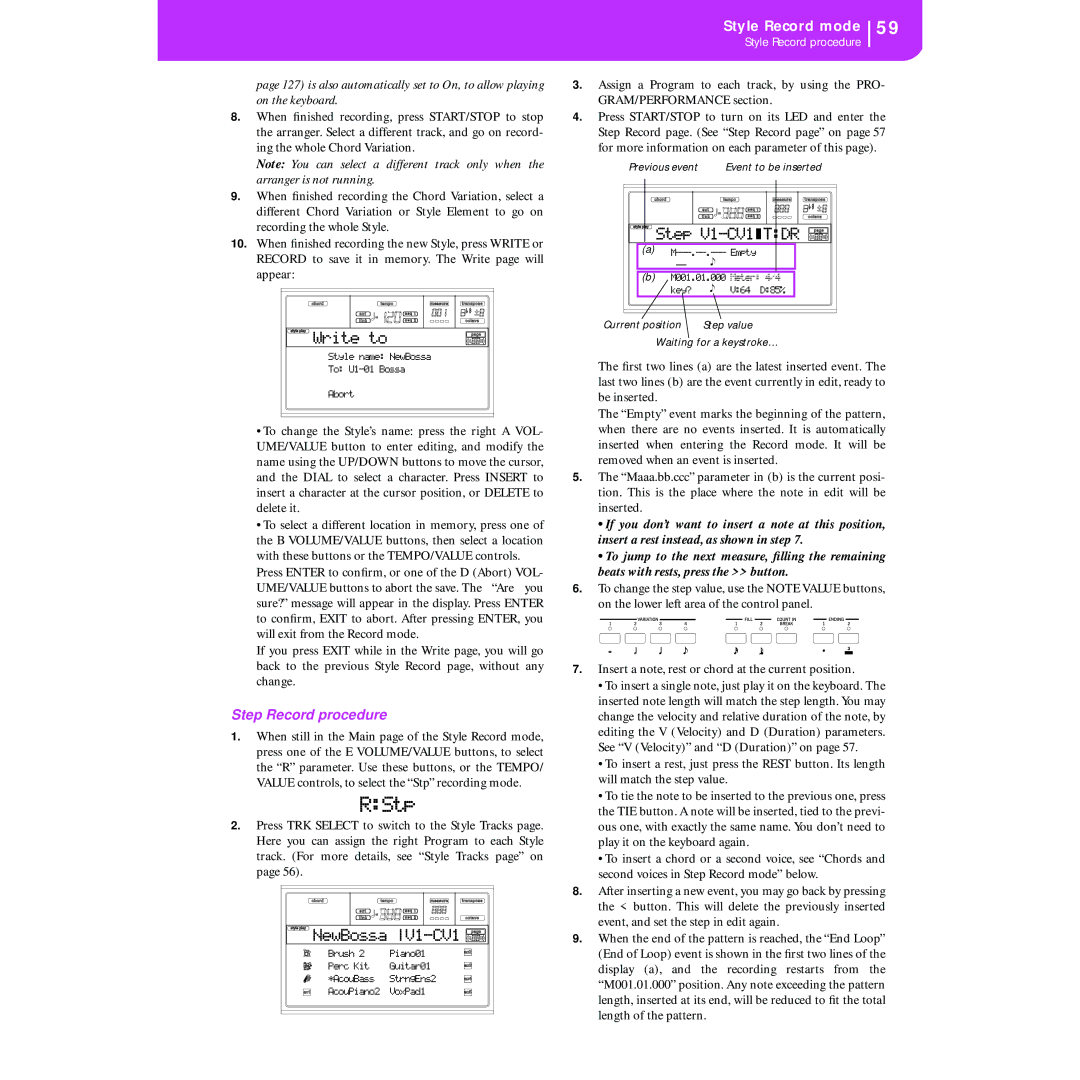
Step Record
Buttons used in Step Record mode
Step V1-CV1 TDR
Realtime Record procedure
Style Record Procedure
Preparing to record
RStp
Step Record procedure
Ex.2
Chords and second voices in Step Record mode
All edit pages share the same structure
Record Menu
EditQuantize
2 Edit Transpose
1 Edit Quantize
EditTranspose
4 Event Edit
3 Edit Velocity
Transport, navigation and editing controls
EditVelocity
5 Event Filter
Event Edit Procedure
Edit Ev. Filter
F3 and F4 buttons
Position
7 Edit Delete ALL
6 Edit Delete
EditDelete
EditDelete All
9 Style Element Controls Programs
8 Edit Copy
Copying on a Chord Variation with a different length
EditCopy
11 Style Element Controls Keyboard Range
10 Style Element Controls Expression
Tension
Song Play Operating Mode
Effects in Song Play Mode
Master VOLUME, Sequencer VOLUME, Balance
Groove Quantize Window
Groove Quantize
Selected Sequencer
Tracks 9-16
Tracks 1-8
Song Select
S1MySong
Playing a Jukebox File
Lyrics
Lyrics display on an external monitor
S1Michelle
Song Play icon
Song Play Menu
3 Mixer FX Send C/D
3 Mixer FX Send A/B
MixerFXSend
4 FX C/D Select
4 FX A/B Select
5 FX a Editing
6 FX B Editing
6 FX D Editing
7 Track Mode
8 Track INTERNAL/EXTERNAL
10 Preferences
9 Jukebox
JB ListNEWNAME
JBX Save
Saving a List of Songs
How to save a list of Songs contained in a folder
Press Song Play to select the Song Play operative mode
How to save a list of Songs contained in a Jukebox file
HOW to Playback a Song
Backing Sequence Operating Mode
Realtime Recording Mode
Backing SEQUENCE, Song and Song Play Modes
Step Chord/Acc
CHORD/ACC Step Recording
Backing Sequence icon
Load Song
Save Song
Load Song
BSSave Song
Realtime Recording
Perf
Tempo
Transport controls
HOW to Delete a Whole Song
Song icon
Fast Track Deletion
Scroll the list up
Master Transpose saved with the Song
Play/Mute status saved with the Song
Save Song
Step Record Procedure
Realtime Record Procedure
Step Owr
Chords and second voices
Moved to the nearest 1/16 division. When
Song Record
You select 1/8, all notes are moved to
Nearest 1/8 division
SEQ1 PLAY/STOP button
Track status icons
3 Mixer FX Block
5 Tuning Detune
MixerFX Block
7 Tuning PITCHBEND/SCALE
6 Tuning Scale
TuningPB/Scale
8 FX A/B Select
11 FX B Editing
10 FX a Editing
12 FX C Editing
13 FX D Editing
16 Track INTERNAL/EXTERNAL
15 Track Mode
18 Edit Transpose
17 Edit Quantize
19 Edit Velocity
32… 1/4
21 Edit CUT Measures
20 Edit Delete
22 Edit Insert Measures
EditCut Meas
24 Event Edit
23 Edit Copy
FromTrk From Track ToTrk To Track
EditEv.Filter
25 Event Filter
Ev Note
105
Program Operating Mode
Effects
Midi channel
Compare Function
HOW to Select Oscillators
Erase PROGRAM/OSCILLATOR
‘WRITE’ Window
Single Trigger
Oscillators
Legato
Priority
DK Samples
Pitch modulation
3 Pitch
Pitch EG modulation
Pitch Osc1
5 Pitch LFO2
4 Pitch LFO1
6 Pitch EG
Portamento
Pitch EG ‘Level’ modulation
Pitch envelope
Pitch EG ‘Time’ modulation
Pitch EG
Filter Osc1
7 Filter
Resonance modulation
8 Filter Modulation
Filter B
Filter keyboard tracking
Filter EG modulation
9 Filter LFO1
Filter A/B modulation
Filter LFO1Osc1
11 Filter EG
10 Filter LFO2
Filter LFO1 modulation
Filter envelope
Filter EG ‘Time’ modulation
Filter EG ‘Level’ modulation
13 AMP Modulation
12 AMP
Pan modulation
Amplifier keyboard tracking
15 AMP LFO2
14 AMP LFO1
16 AMP EG
Amp EG ‘Time’ modulation
Amp EG ‘Level’ modulation
Break Point Level Swing
AMS1T Alternate Modulation Source 1 Time
Attack Time Swing Wave
Delay
Release Time
AMS2 Alternate Modulation Source
Frequency MIDI/Tempo Sync
19 Effects
Frequency modulation
Effects
21 FX2 Editing
20 FX1 Editing
AMS Alternate Modulation Source List
123
JS -Y & AT/2 Joy Stick -Y & After Touch/2
JS +Y & AT/2 Joy Stick +Y & After Touch/2
125
Global Edit Environment
1 General Controls
GblMidi Setup
4 Midi Setup
2 Master Transpose
GblM.Transpose
6 Midi in Channels
5 Midi Controls
GblMIDI Ctl
GblMidi In Chnl
8 Midi in Controls
7 Midi in Controls
GblMidiIn Ctl
10 Midi OUT Channels
9 Midi in Filters
11 Midi OUT Filters
Floppy Disk Handling
WRITE/DISK in USE LED
Possible problems
Precautions
Loading Older I-SERIES Data
Disk Structure
132
File Types
File and Folder Size Display
Navigation Tools
Structure
1 Load
Loading all the User data
Loading a single bank
Loading all data of a specified type
Loading a single item
2 Save
file/folder …contains… …and will create on Type… Disk…
Saving all data of a specific type
Saving the whole memory content
Saving a single bank
Saving a single item
Creating a new .SET folder
NEWNAME.SET
3 Copy
Copying a whole folder or folder’s content
Copying a single file
DiskCopy from
5 Format
4 Erase
6 NEW DIR
8 Utilities
7 Rename
DiskRename
DiskUtilities1
9 Utilities
Restore Data
DiskUtilities2
Global Protect
Appendix
144
Factory Data
Styles
145
146
Single Touch Settings STS
Style Elements
147
Programs Bank Order
Bank Organ
Name CC00 CC32
Bank Guitar
Bank Strings & Vocals
149
Bank Trumpet & Trombone
Bank Brass
Name CC00 CC32 Bank Woodwind
Bank Sax
Bank Synth
Bank Bass
151
Bank SFX
Bank Drum & Perc
153
CC00 CC32 Name Pa50 Bank
Programs Program Change Order
Name Pa50 Bank
155
SFX
156
157
158
159
CC00 CC32 Name
Drum Kits
161
Drum KIT Instruments
162
163
164
165
166
167
168
169
170
171
172
Performances
173
174
Effects
Diagrams
Dynamic Modulation Sources
FILTER/DYNAMIC
Limiter
Compressor
Multiband Limiter
MBandLimit
Attack, d Release
Side PEQ Insert, g Side PEQ Cutoff Hz, g Q, g Gain dB
006 OD/HGainWah
Gate
Param.4B Eq
009 Wah/AutoWah
Graph.7B Eq
Random Filt
Excit/Enhan
Talking Mod
Sub Oscill
Formant Shift
Decimator
Stereo Decimator
Pre LPF
Analog Rec
PITCH/PHASE MOD
Chorus
Harm.Chorus
Multitap Chorus/Delay
MTap Ch/Dly
Stereo Harmonic Chorus
Flanger
Ensemble
Shimmer
Stereo Flanger
Envel.Flang
RandomFlang
Stereo Phaser
Phaser
189
EG Attack, d EG Decay
Stereo Envelope Phaser
Stereo Random Phaser
RandomPhser
Envel.Phser
Stereo Biphase Modulation
BiphaseMod
Vibrato
Stereo Vibrato
029 2Voice Res
AutoFadeMod
Stereo Auto Fade Modulation
Doppler
193
Scratch Source, b Response
Scratch
Envelope Select, c Src, d Threshold
Response
Tremolo
MOD./P.SHIFT
EnvelTremol
Auto-Pan
LFO Phase
Depth= 100, Envelope Amount=
Stereo Auto Pan
RingModulat
Phaser/Trem
Detune
OSC Mode
Fixed Frequency Hz
Input Level Dmod %, d Src
PitchShift
199
Pitch Shifter
Feedback Position, f Feedback
RotarySpeak
PitShiftMod
Horn Acceleration, e Rotor Acceleration
Manual Speed Ctrl
Mic Distance, g Mic Spread
Early Refl
ER/DELAY
AutoReverse
Cross Delay
043 L/C/R Delay
Stereo/Cross Delay
High Damp %, e Low Damp %
204
045 M.Tap Delay Modul.Delay
Stereo Dynamic Delay
Dynam.Delay
205
Control Target
AutoPan Dly
Stereo Auto Panning Delay
Stereo BPM Delay
BPM Delay
LCR BPM Dly
Reverb
056 Rev. Room
Pre Delay msec, b Pre Delay Thru %
057 R.BriteRoom
ER Level, d Reverb Level
058 Par4Eq-Exc
Mono Mono Chain
059 Par4Eq-Wah
Parametric 4-Band EQ Exciter
Parametric 4-Band EQ Phaser
Output Mode
060 4EqPhsrChFl
061 Par4Eq-Phsr
062 P4Eq-TapDly
Parametric 4-Band EQ Multitap Delay
Cmp-AutoWah
Compressor Wah/Auto Wah
Cmp-OD/HiG
Cmp-AmpSim
Compressor Amp Simulation
Compressor Overdrive/Hi.Gain
Cmp-ChorFlg
Cmp-Par.4Eq
Compressor Parametric 4-Band EQ
Compressor Chorus/Flanger
Compressor Phaser
Cmp-Phaser
Compressor Multitap Delay
215
Lim-ChorFlg
Lim-Par.4Eq
Limiter Parametric 4-Band EQ
Limiter Chorus/Flanger
217
Lim-Phaser
Lim-MTapDly
Exc-Compr
Exc-Limiter
218
Exc-ChorFlg
Exciter Limiter
Exc-MTapDly
Exc-Phaser
079 OD/HG-Amp S
Overdrive/Hi.Gain Chorus/Flanger
080 OD/HG-ChoFl
Overdrive/Hi.Gain Multitap Delay
Overdrive/Hi.Gain Phaser
221
081 OD/HG-Phser
Decim-Amp S
Wah-AmpSim
Decim-Cmp
AmpS-Tremol
Chorus/Flanger Multitap Delay
087 Ch/Fl-MTDly
Amp Simulation Tremolo
Phser-ChoFl
Phaser Chorus/Flanger
Rev-Gate
Reverb Gate
Assignable Parameters
List of Functions Assignable to the Footswitch
225
Function Meaning
List of Sounds Assignable to the Pads
226
Scales
List of Functions Assignable to the Pads
CC Name Pa50 Function
Midi Controllers
229
Midi Implementation Chart
230
Parameters
Control panel and operating modes parameters
231
Song Play Mode
Style and Song parameters
232
233
Recognized Chords
234
Error Messages
Error Messages & Troubleshooting
235
Program
Disk mode
Overwrite on Backup? Enter/Exit
Insert Backup FD n.n and Press Enter
File Not Found Press Exit
Format Completed Press Exit
Problem
Troubleshooting
General problems
Disk related problems
239
Technical Specifications
Model Korg Pa50
Balance 10, 18, 27
Alphabetical Index
Pads 18
241
Alphabetical Index
Page
Address