FRANÇAIS

Gebruiksstand Foto:

NEDERLANDS

Mode Photo – Réglage des diverses fonctions

Diverse functies instellen (Settings)

Fonction Program AE (exposition automatique programmable)

Belichtingsprogramma instellen (Program AE)

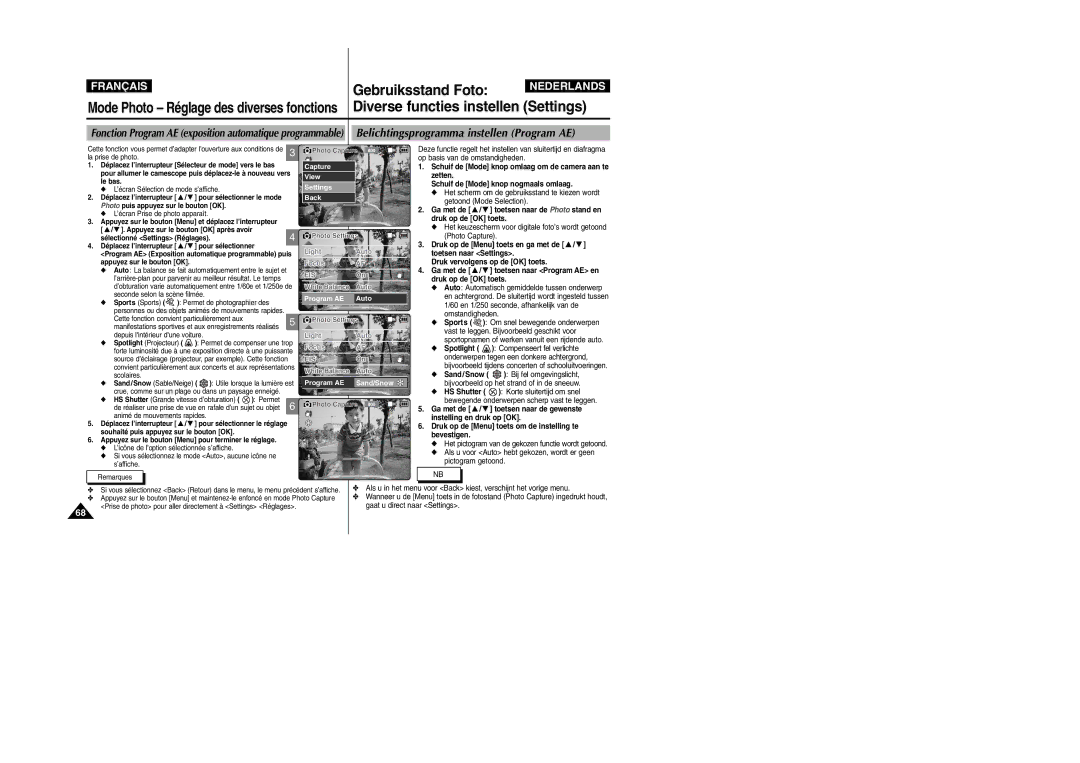
Cette fonction vous permet d’adapter l’ouverture aux conditions de

3

la prise de photo.


1.

Déplacez l’interrupteur [Sélecteur de mode] vers le bas


pour allumer le camescope puis déplacez-le à nouveau vers


le bas.


L’écran Sélection de mode s’affiche.


2.

Déplacez l’interrupteur [ / ] pour sélectionner le mode


Photo puis appuyez sur le bouton [OK].


L’écran Prise de photo apparaît.


3.

Appuyez sur le bouton [Menu] et déplacez l’interrupteur


[ / ]. Appuyez sur le bouton [OK] après avoir

4


sélectionné <Settings> (Réglages).

4.Déplacez l’interrupteur [ / ] pour sélectionner

<Program AE> (Exposition automatique programmable) puis appuyez sur le bouton [OK].

Auto: La balance se fait automatiquement entre le sujet et l’arrière-plan pour parvenir au meilleur résultat. Le temps d’obturation varie automatiquement entre 1/60e et 1/250e de seconde selon la scène filmée.

Sports (Sports) ( ): Permet de photographier des personnes ou des objets animés de mouvements rapides.

Cette fonction convient particulièrement aux

5

manifestations sportives et aux enregistrements réalisés


depuis l'intérieur d'une voiture.


Spotlight (Projecteur) ( ): Permet de compenser une trop forte luminosité due à une exposition directe à une puissante source d’éclairage (projecteur, par exemple). Cette fonction convient particulièrement aux concerts et aux représentations scolaires.

Sand/Snow (Sable/Neige) ( ): Utile lorsque la lumière est crue, comme sur un plage ou dans un paysage enneigé.

HS Shutter (Grande vitesse d’obturation) ( ): Permet

de réaliser une prise de vue en rafale d’un sujet ou objet 6 animé de mouvements rapides.

5.Déplacez l’interrupteur [ / ] pour sélectionner le réglage souhaité puis appuyez sur le bouton [OK].

6.Appuyez sur le bouton [Menu] pour terminer le réglage.

L’icône de l’option sélectionnée s’affiche.

Si vous sélectionnez le mode <Auto>, aucune icône ne s’affiche.

Photo Capture

800

Deze functie regelt het instellen van sluitertijd en diafragma


op basis van de omstandigheden.

Capture


1. Schuif de [Mode] knop omlaag om de camera aan te

View


zetten.

Settings


Schuif de [Mode] knop nogmaals omlaag.


Het scherm om de gebruiksstand te kiezen wordt

Back


getoond (Mode Selection).


2. Ga met de [ / ] toetsen naar de Photo stand en


druk op de [OK] toets.


Het keuzescherm voor digitale foto’s wordt getoond

Photo Settings


(Photo Capture).

Light

Auto

3. Druk op de [Menu] toets en ga met de [ / ]

toetsen naar <Settings>.

Focus

AF

Druk vervolgens op de [OK] toets.

EIS

On

4. Ga met de [ / ] toetsen naar <Program AE> en

druk op de [OK] toets.

White Balance


Auto

Auto: Automatisch gemiddelde tussen onderwerp

Program AE

Auto


en achtergrond. De sluitertijd wordt ingesteld tussen


1/60 en 1/250 seconde, afhankelijk van de

Photo Settings


omstandigheden.

Sports ( ): Om snel bewegende onderwerpen

Light

Auto


vast te leggen. Bijvoorbeeld geschikt voor


sportopnamen of werken vanuit een rijdende auto.

Focus


AF

Spotlight (

): Compenseert fel verlichte

EIS

On


onderwerpen tegen een donkere achtergrond,

White Balance

Auto


bijvoorbeeld tijdens concerten of schooluitvoeringen.

Sand/Snow (

): Bij fel omgevingslicht,


Program AE

Sand/Snow


bijvoorbeeld op het strand of in de sneeuw.


HS Shutter (

): Korte sluitertijd om snel

Photo Capture 800


bewegende onderwerpen scherp vast te leggen.

5. Ga met de [ / ] toetsen naar de gewenste


instelling en druk op [OK].


6. Druk op de [Menu] toets om de instelling te

Capturing...

bevestigen.


BLC


Het pictogram van de gekozen functie wordt getoond.

Als u voor <Auto> hebt gekozen, wordt er geen

pictogram getoond.

Remarques

Si vous sélectionnez <Back> (Retour) dans le menu, le menu précédent s’affiche.

Appuyez sur le bouton [Menu] et maintenez-le enfoncé en mode Photo Capture <Prise de photo> pour aller directement à <Settings> <Réglages>.

NB

Als u in het menu voor <Back> kiest, verschijnt het vorige menu.

Wanneer u de [Menu] toets in de fotostand (Photo Capture) ingedrukt houdt, gaat u direct naar <Settings>.

68

Page 68
Image 68
Samsung VP-X110L/XEF Op basis van de omstandigheden, Zetten, Het scherm om de gebruiksstand te kiezen wordt, Photo Capture

VP-M110S/XEF, VP-M110B/XEF, VP-M110R/XEF, VP-X110L/XEF, VP-M110S/XET specifications

The Samsung VP-M110S/XET, VP-X110L/XEF, VP-M110R/XEF, VP-M110B/XEF, and VP-M110S/XEF represent a remarkable range of consumer camcorders designed for video enthusiasts and casual users alike. These models incorporate cutting-edge technology and features, enabling users to capture high-quality footage with ease.

One of the main features of these camcorders is their impressive video resolution capabilities. Most models in this lineup support recording in full HD, providing crystal-clear video quality that enhances the viewing experience. The 1080p resolution ensures that details are sharp, making these camcorders ideal for personal projects or family events.

The VP-M110 series also includes advanced optical zoom functionality. Leveraging high-quality lenses, these camcorders allow users to zoom in on distant subjects without losing clarity. Whether capturing sporting events or wildlife, the optical zoom feature ensures that the focus remains precise, enabling users to capture captivating footage from afar.

Users will also appreciate the array of manual settings that the VP-M110 series offers. For those who wish to take greater control over their recording experience, these camcorders provide options such as manual focus, exposure settings, and white balance adjustments. This versatility allows videographers to be creative and adapt their shooting style to various environments and lighting conditions.

The VP-X110L/XEF model stands out with its unique design and user-friendly interface. Its lightweight and compact form factor make it portable, catering to users who are always on the go. Moreover, the intuitive touch screen interface simplifies navigation, making it easy for users to adjust settings or review recordings.

In terms of connectivity, these camcorders come equipped with HDMI and USB outputs, allowing for straightforward connection to televisions and computer systems. This feature enhances versatility, enabling users to enjoy instant playback on larger screens or transfer content to editing software with minimal fuss.

Battery life is another critical aspect of these camcorders. With extended recording times, users can capture moments without frequently worrying about battery depletion. Additionally, the ability to charge via standard USB ports increases convenience, making it easier to keep the device ready for action.

Overall, the Samsung VP-M110S/XET, VP-X110L/XEF, VP-M110R/XEF, VP-M110B/XEF, and VP-M110S/XEF are equipped with modern features and technologies that cater to both novice and experienced videographers. With their high-resolution video capabilities, optical zoom, manual controls, and user-friendly interfaces, these camcorders offer an impressive solution for anyone looking to document life's moments beautifully and effectively.