MX-M182D MX-M202D MX-M232D
Model MX-M182
Contents
104
100
101
103
113
110
111
112
Meaning of R in Original and Paper Size Indications
Using the Manual
Introduction
About the Manuals
Rspf
Differences Between Models
Conventions Used in this Manual
SPF
Software
Before Software Setup
Hardware and Software Requirements
Double-click the Setup icon
Installing the Software
Power on the Machine
Turn the power switch to the on position
Click the MFP Driver button
When installing is finished, click the Close button
This completes the installation of the software
Interface cable
Connecting to a Computer
Connecting a USB Cable
System requirements for USB 2.0 Hi-Speed mode
Click the Next button
Using the Machine AS a Shared Printer
You will return to the window of . Click the Close button
Configuring the Printer Driver
Click the OK button
Setting UP Button Manager
Windows XP/Vista/7
Click the Sharp MX-XXXX icon and select Properties
Select Sharp Button Manager AA in Send to this application
Windows
Driver cannot be installed Windows 2000/XP
Troubleshooting
Plug and Play window does not appear
Select the driver from the list, and remove the software
Click Uninstall a program
Removing the software
Click the Start button, and then click Control Panel
Part Names and Functions
Right side cover when the SPF/RSPF is installed
Document cover when installed
Original guides when the SPF/RSPF is installed
Feeding roller cover when the SPF/RSPF is installed
Operation Panel
Auto Image key
Start key / indicator
Paper Select key
Copy Ratio key
100%
Example Copy mode
Operation in COPY, PRINT, SCAN, and FAX Modes
Display base screen
Power save modes
Power on and OFF
Power on
Power OFF
Special papers
Paper tray type Paper type Size Weight Capacity
Loading Paper
Paper
Gently push the paper tray into the machine
Loading Paper
Loading the paper tray
Push the pressure plate down
Loading the bypass tray
Important points when inserting paper in the bypass tray
Unfold the bypass tray
Paper Size SET
Changing the Paper Size Setting of a Tray
Envelopes
Copy
Auto
Disabling Enabling Auto Tray Switching
Auto Tray Switching
Paper
Copies MADE000,000 REMAINING050,000
Auditing Mode
Number of Accounts in Auditing Mode
Using Auditing Mode
Make sure that the desired paper tray is selected
Normal Copying
Copying from the document glass
Close the SPF/RSPF
Copy is delivered to
Copying from the SPF/RSPF
Press the Start key to begin
Copying
Originals that can be used in the SPF/RSPF
Stream feeding mode
Removing the document cover
Copying books or originals with folds or creases
Points concerning the position of the printed copy image
Text
Making a Copy Darker or Lighter
Auto
Text/photo
Selecting the Tray
Setting the Number of Copies
Auto tray switching when there are two or more paper trays
Important note when making a large number of copies
Selecting an inch original size
Selecting the Original Size
ORIG. Size Enter
ORIG. Size Enter Inch
Size Input
Extra
OKORIG. Size Enter
Extra
Press the Auto Image key
Reducing or Enlarging a Copy
Automatic Ratio Selection
Press the Paper Select key to select the desired tray
Copy Ratio
Manual Ratio Selection Preset Copy RATIOS/ZOOM
86% 100%
Margin Shift
Modes
Set the vertical ratio with the , , , or keys
Adjust
XY Zoom
OFF
Glass
Automatic TWO-SIDED Copying MX-M182D/MX-M202D/MX-M232D
Original → Paper Usable paper
Document
Select 1 to 2 with the or key, or with the 2-SIDED Copy key
TWO-SIDED Copying of ONE-SIDED Originals
Binding Change OFF
Press the 2-SIDED Copy key
Copy Mode Binding Change on
Select 2 to 2 with the or key, or with the 2-SIDED Copy key
Select 2 to 1 with the or key, or with the 2-SIDED Copy key
Copy Mode
Place original B as shown below
TWO-SIDED Copying Using the Bypass Tray
Checkmark appears
Dual page Copying
Erase Dual Copy
Okoff
Replace the previous originals and press the Start key
Interrupting a Copy RUN
Sort copy Group copy
Convenient Copy Functions
Sort COPY/GROUP Copy
This section explains major convenient copy functions
Offset function
Offset function enabled Offset function disabled
Sort
Sort
1 Copy
Pattern
Okchange
OK2in1/4in1
2in1
Right
Margin Shift OFF Down
Centre
Erasing Shadows around the Edges of a Copy
Erase
Edge
Select the erasure width with the or key
SIZEmm
Card Shot
Card Shot
Front side of the card is scanned
ID Card Copy
A5-A3 Size Factory default setting
Front Back Centre Line
Press the Start key
Online
Basic Printing
Offline
Make sure that Sharp MX-xxxx is selected as the printer
Pausing a Print JOB
When the job separator tray is Note installed
If the Tray Runs OUT of Paper During Printing
Click the Printing Preferences button in the General tab
Opening the Printer Driver from the Start Button
Printer Driver Setting Screen
Printing Multiple Pages on ONE
A3 or Ledger
Rotating the Print Image 180 Degrees
Rotate 180 degrees
Check the Fit To Paper Size button
Select the zoom ratio
Click the Advanced tab in the printer driver setup screen
Printing Faint Text and Lines in Black
Text To Black/Vector To Black
Printing a Watermark
Adjusting the Brightness and Contrast of the Image
How to Print a Watermark
To adjust a setting, drag Slide bar or Click the or button
Bound at the side Bound at the top
TWO-SIDED Printing
Printing result
Sided Book Sided Tablet Vertical Horizontal
Using saved settings
Saving Frequently Used Print Settings
Saving Settings AT the Time of Printing
User Settings
Outline of the Print Status Window
Scanning Overview
SC4
Scanning Using the Keys on the Machine
SC2
SC3
Click to save your settings and exit the dialog box
Scan Setup area Set the scan conditions
Button Manager
This completes the settings
Button Manager Settings
Button Manager scan menu factory default
Setting screen Button Manager will open
Select Sharp MFP Twain AA, and click the Select button
Only when using the Rspf
Scanning from Your Computer
Scanning from a TWAIN-COMPLIANT Application
Specify the scanning area and set the scan preferences
When you are ready to begin scanning, click the Scan button
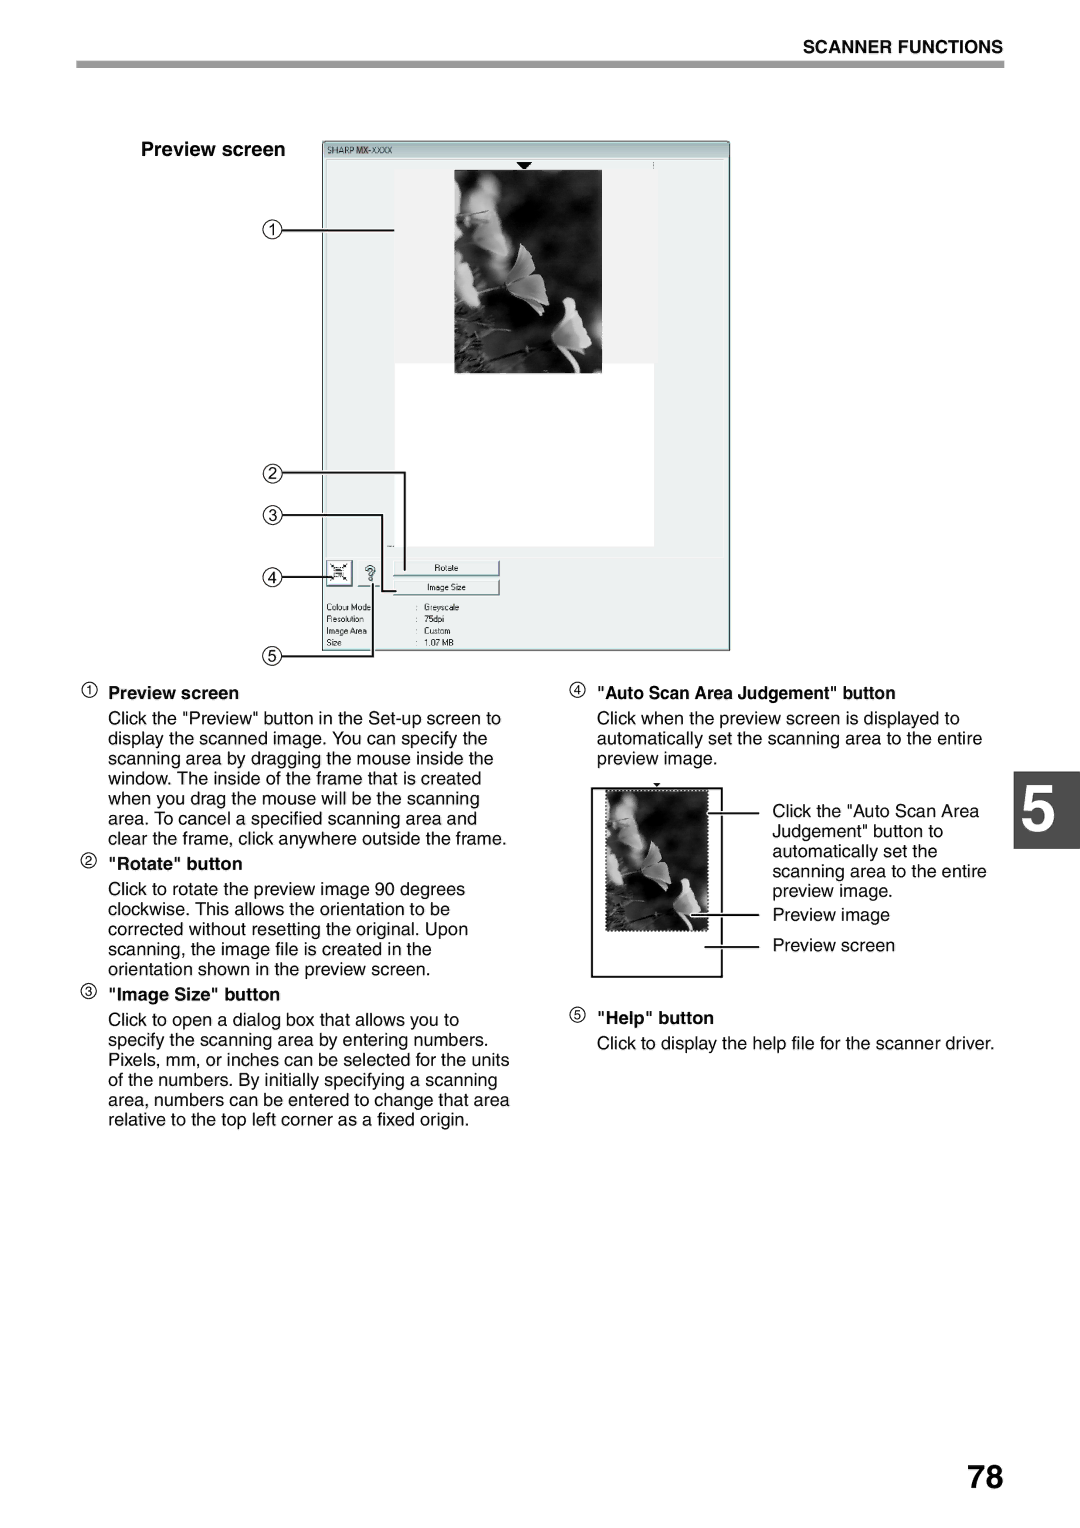
Set-up screen
Scanner driver settings
Image Size button
Preview screen
Preview screen
Rotate button
Scan screen WIA driver will appear
Click the Scan button
Scanner and Camera Wizard will appear
Scanning from the Scanner and Camera Wizard Windows XP
Click the Finish button
Printing and Scanning Problems
MACHINE/COPYING Problems
This chapter describes troubleshooting and misfeed removal
MACHINE/COPYING Problems
Pieces of paper inside machine
Problem Cause and solution Misfeed occurs
Paper is outside of the specified size and weight Range
Paper is not loaded properly
Automatically selected or the copy
Display or the Data indicator is blinking
Original is curled or folded
Original has many solid black areas Original size is not
Start indicator blinks
Problem Cause and solution Any other indicators turned off
Display turns off
Printing and Scanning Problems
Uneven
Orientation of document setting is not correct
Printed, but the print data has not
117 Been printed completely
Poor scanning quality
You have not specified a suitable resolution
Brightness and contrast settings are not suitable
Lighter than expected
There is not enough machine memory
MB of expansion memory
Message Action
Section B
Misfeed Removal
Misfeed in the SPF/RSPF
Remove the misfed original
Section C
Misfeed in the Bypass Tray
Misfeed in the paper feed area
Misfeed in the Machine
Close the front cover and side cover
Injury
Misfeed in the fusing area
Close the side cover
Misfeed in the transport area
Be careful not to tear the misfed paper during removal
Close the upper paper tray
Misfeed in the Upper Paper Tray
Push the upper paper tray in completely
Close the lower side cover
Misfeed in the Lower Paper Tray
Open the lower side cover
Remove the misfed paper
Replacing the Toner Cartridge
Required indicator
Checking the Total Output Count
Routine Maintenance
Cleaning the Document Glass and SPF/RSPF/DOCUMENT Cover
Routine Maintenance
Cleaning the Transfer Charger
Cleaning the Bypass Tray Paper Feed Roller
Display Contrast
Adjusting the Display Contrast
Contrast of the display can be adjusted as explained below
ORIG. Size
Specifications
Specifications Printer and Scanner
Printer Function
Scanner Function
Optional Equipment
Single Pass FEEDER/REVERSING Single Pass Feeder
Dimensions
Document Cover
AR-D36 AR-D37
Power supply
Sheet Paper Feed UNIT/2 X 250-SHEET Paper Feed Unit
Part names
Store paper in the wrapper and lying flat
Storage of Supplies
Proper Storage
Store the supplies in a location that is
Programming AN Administrator Password
Programs for Copy Mode
System Settings
Programming AN Administrator Password
Change Admin PW
Program name
System Settings List
Programs for Copy Mode
Programs for general use of the machine
Copier
Using the System Settings
Account Control
Auditing Mode
Reset Account
Reset 1 ACC
ACC. # Control
ACC. # Control
Delete Change
ACC. # Security
Cancel Jobs of Invalid Accounts
Account Limit
Single ACC. Limit
Offset Function
Waiting Copy Lamp Setting
USB2.0 Mode
Device Control
Operation Setting
Keys Touch Sound AT Initial Point
Disable Auto KEY Repeat
Disable Paper Size SET
KEY Touch Sound
Energy Save
Erase Adjust
Copy Settings
Exposure Adjust
Margin Default
Stream Feeding
Card Shot Default
Default Tray SET
Default Exposure
Sort Auto Select
Photo Mode Default
Disable Auto Paper Selection
Disable 2-SIDED Copy
Operation Guide