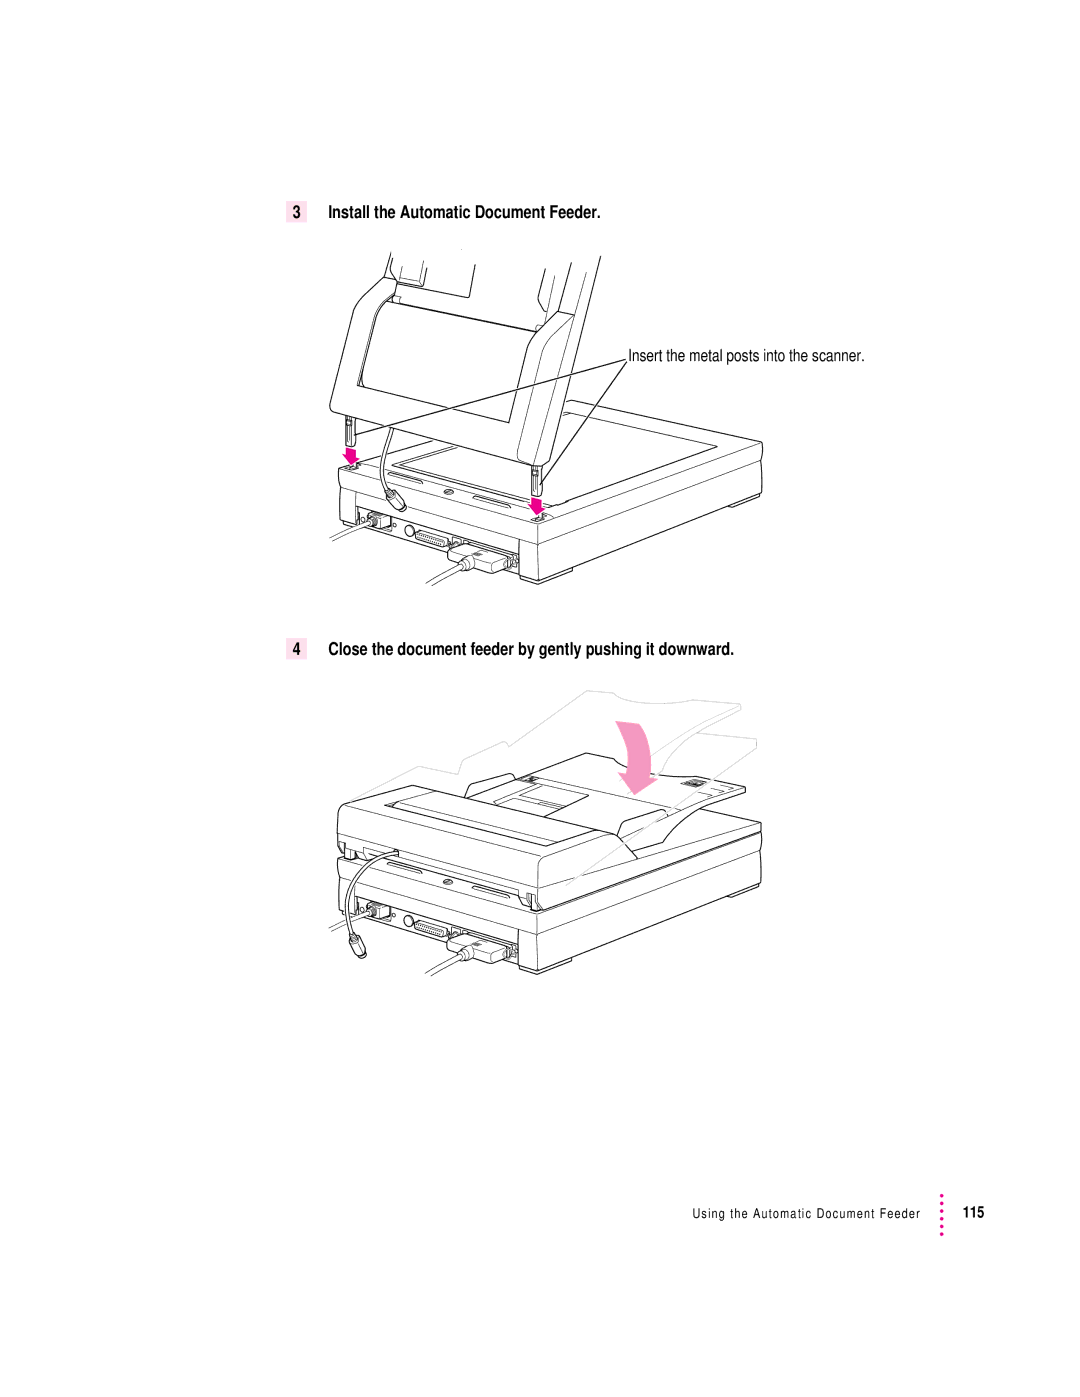
Color OneScanner
Apple
User’s Manual for the Color OneScanner 600/27 and 1200/30
K Apple Computer, Inc
Contents
2 Setting Up the Scanner
1 Welcome
4 Scanning Images
3 Installing the Scanner Software
5 Editing Scanned Images
Dispatcher Commands
Troubleshooting
Index
Scanner Maintenance
Communications regulation information
FCC statement
Radio and television interference
DOC statement
VCCI statement
viii Communications Regulation Information
1 Welcome
What you need to know
System requirements
Dispatcher Commands
In this manual
Setting Up the Scanner
Installing the Scanner
Troubleshooting
In the appendixes
Technical Specifications
Technical features of the Apple Color
m safely using your scanner
2 Setting Up the Scanner
m connecting the scanner to a Macintosh computer
m plugging in the scanner and switching it on
Choosing a SCSI cable
Unpacking the scanner and accessory kit
To use a different arrangement configuration
To connect the scanner directly to the Macintosh
To connect the scanner at the end of a SCSI chain
Environmental considerations
Choosing the right location
Carrying the scanner
Safety precautions
Power cord socket
Apple Color OneScanner at a glance
SCSI connector small SCSI connector large
On/off switch
Locking and unlocking the scanner
Setting the SCSI ID number and termination
About the SCSI ID number
You may not need this step. You can skip this topic if
About SCSI termination
Connecting the scanner to your Macintosh
3 Gently tighten the thumbscrews on the cable
Connecting the SCSI cable
You’re now ready to attach the power cord
Follow these steps to connect the scanner directly to your computer
Connecting the power cord
Switching the power on
Where to go from here
Important safety information
Page
About the disks
3 Installing the Scanner Software
Installing the scanner software
A status box keeps you informed of progress during installation
Installing the plug-in module for use by other applications
Assigning the Xerox TextBridge 3.0H application to the Dispatcher
The Dispatcher window opens on the Macintosh desktop
Setting up ColorSync
26 Chapter
Installing Kai’s Power Tools and Convolver
Where to go from here
Will you be using the scanner only for images?
4 Scanning Images
Preparing originals
What you can scan
Aligning a single original
Aligning bound originals
Removing and replacing the scanner cover
Opening the OneScanner Dispatcher application
Buttons
How the OneScanner Dispatcher application is organized
34 Chapter
Drag-and-drop icons
Scanning with automatic settings
The Apple Color OneScanner dialog box opens
Preview of the scan Preview area
5 Click Preview
Note These adjustments take extra time and won’t work with all images
The scanner scans the original
Saving a scanned image
Windows BMP A format commonly used on MS-DOS and MS-Windows computers
For photographs, full-color art, or grayscale art, choose Photograph
Assigning a fax application to the Dispatcher
Faxing or printing directly from the scanner
For text and simple line drawings, choose Text/Line Art
5 Click Fax or Copy
Opening a saved image from an archive
2 Click Archive
Printing or faxing a saved image from an archive
Renaming a saved image in an archive
The image is sent to the printer or fax application
Unassigned drag-and-drop icon
Adding your own drag-and-drop applications
You can now use the icon to drag and drop scanned images
Scanning directly into a graphics application
2 Choose the application’s Acquire command
1 Open the application you want to use
4 Click Preview, and change scanner options if necessary
5 Click Scan
Select a portion of the preview image and then click Scan
Scanning with custom settings
Setting the resolution
Things to think about when you set the resolution
For this output device
Recommended resolutions for maximum efficiency
Recommended scanning resolutions
Set the scanning resolution at
Changing the tone brightness and contrast
Brightness
Contrast
The Tone dialog box appears
Changing the threshold
m If you want to customize the threshold settings yourself, you can
Changing image size and ruler units
Viewing and changing image size dimensions
Changing the ruler units
Viewing image file size
Copyright regulations USA
Page
m use the tools to edit your images
5 Editing Scanned Images
This chapter tells you how to
m open a saved image and show the editing tools
62 Chapter
Opening a saved image
1 Double-click the OneScanner Dispatcher icon
2 Click Image Edit
3 Open the folder that contains your saved images
4 To open the image document, double-click an image name
Close box Scroll bar Resize tool
Image-editing overview
Tool palette
Brush palette
Color palette
Showing and hiding the palettes
Regular shape
Selecting images
2 Drag the lasso to trace an area around the shape you want to select
Irregular shape
Whole image
1 Click the lasso
m Click the tool to make it active
Using the tools to edit an image
Using a tool
Moving a selection
Filling a space with color
Zooming in
Erasing a selection
Adding text
Spray painting
Drawing lines
Cloning
Painting with brushes
In the example, you’d click a point in the shrubbery
Smudging
Copying, cutting, or deleting a selection
Copying within an image document
Copying and pasting into another application
Undoing an action
Zooming in and out
Cutting
Editing Scanned Images
Inverting an image from positive to negative
To invert an image
m Open the image and choose Invert from the Image menu
Adjusting the brightness and contrast
Changing the color balance
Sharpening an image
Amount The amount determines what percentage of change will occur. The default setting is 50 percent. Increase up to 100 decrease down to 1. A higher percentage makes the effect stronger
2 Choose the units you want to use from the Units pop-up menu
Resizing an image
1 Open the image and choose Resize from the Image menu
Pop-up menu
1 Select the area you want to remain in the image
Cropping an image
To crop an image
The area around the selection is deleted
Flipping an image
Rotating an image
1 From the Image menu, choose an option from the Rotate pop-up menu
3 Type the number of degrees you want and click OK
Setting the image depth
Setting ColorSync preferences
88 Chapter
Changing the way you view an archive
To change the view
1 Open the archive you want to look at
6 Scanning Text
90 Chapter
Scanning a text document into the TextBridge application
3 Click Scan to open the Apple Color OneScanner dialog box
Moving a text image to the TextBridge application
Drag the text image to the TextBridge icon
The TextBridge dialog box opens
4 Click Go
5 See your TextBridge manual for information about the next steps
Converting a text image into an HTML document
7 Dispatcher Commands
m provides a quick reference for advanced users
The chapter is organized by menu
96 Chapter
File menu
Opens the Apple Color OneScanner dialog box
New Scan
New Image
Dispatcher Commands
Open Image
New Archive
Open Archive
Scan Router
Close
Pop-up menu with file format choices
Get Info
Save
For more information, see “Saving a Scanned Image” in Chapter
Print
Page Setup
Save As
Revert
Undo Redo
Edit menu
Print Archive View
Quit
Select All Deselect
Image menu
Paste
Clear
Invert
Zoom In
Zoom Out
Actual Size
Sharpen
Resize
Crop
Effects
Flip
Rotate
Image Depth
Hide Show Tools
Window menu
ColorSync Preferences
View By
Dispatcher
Image-editing tools
Hide Show Colors
Hide Show Brushes
Color palette
Brush palette
Zoom Gives you a closer or more distant view of an image
Page
Cleaning the scanner
8 Scanner Maintenance
5 Dry the damp areas with a clean, soft, dry cloth
Setting up the Automatic Document Feeder
9 Using the Automatic Document Feeder
To connect the document feeder
4 Close the document feeder by gently pushing it downward
3 Install the Automatic Document Feeder
Using the Automatic Document Feeder
Insert the metal posts into the scanner
7 Switch on the scanner and then switch on your Macintosh
Automatic Document Feeder at a glance
Avoid valuable documents
Choosing originals to scan
These originals work best
These originals may cause trouble
Scanning with the document feeder
5 Open the OneScanner Dispatcher if necessary
Using the Automatic Document Feeder
Document guide
Paper-height limit mark
The Apple Color OneScanner dialog opens
Bypassing the document feeder
Follow the path
Clearing paper jams
To clear a paper jam that occurs at the beginning of a scan
Paper jams at the beginning of a scan
First, lift the document tray
Paper jams at the end of a scan
1 Lift the document feeder cover, as shown
Document feeder cover
4 Close the document feeder cover
Using the Automatic Document Feeder
3 Close the document tray
Document tray
2 Lift the document tray to get to the jammed paper
Paper jams inside the document feeder
1 Lift the document feeder cover, as shown
Document feeder cover
First, lower the delivery guide sheet Then, remove the jammed paper
Using the Automatic Document Feeder
3 Press the two tabs below inward
Tab Tab
Chapter
5 Reinsert the delivery guide sheet
6 Close the document feeder and feeder cover
Raise the delivery guide sheet and insert it under the plastic flap
Cleaning the document feeder
Maintenance
Removing and replacing the delivery guide sheet
3 Remove the document feeder by grasping both sides of the document feeder cover and lifting upward, as shown
Remove the delivery guide sheet Open the flap
5 Press the two tabs inward
Tab Tab
6 Open the flap and remove the delivery guide sheet, as shown
9 Replace the document feeder on the scanner
Removing and replacing the paper separator
the separator straight up and out of the document feeder
Using the Automatic Document Feeder
Chapter
Make sure that the separator is securely in place
4 Close the document feeder cover
Document feeder cover
Setting up the Transparent Media Adapter
10 Using the Transparent Media Adapter
To connect the adapter
Diffuser
Using the Transparent Media Adapter
3 Turn the Transparent Media Adapter over and unlock it
Press to
5 Install the metal posts through the guide and into the holes
6 Close the adapter
Chapter
Handling film
Inserting film into a film guide for scanning
To insert film into the film guide
image should face down
3 Lift the tab and insert negatives or positives for scanning
Lift the tab and slide the
film into the guide. The
Scanning with the Transparent Media Adapter
Using the Transparent Media Adapter
To scan with the adapter
Transparent media alignment guide Light correction zone
Top of film guide
Slide the film guide under the left-hand edge of the scan bed
4 If necessary, open the OneScanner Dispatcher 5 Click Scan
Choose the appropriate setting
Using the Transparent Media Adapter
3 Close the Transparent Media Adapter
Bypassing the adapter
Maintenance
Cleaning the exterior of the adapter
Cleaning the diffuser
Troubleshooting
Color quality is unsatisfactory
The image is reversed
m The diffuser may be dirty
Appendix A Technical Specifications
Physical
Technical
Power requirements
Environmental
m With the document feeder
Scanning and hardware problems
Appendix B Troubleshooting
Everything on my monitor screen is frozen
m The scanner carriage may be locked
Problems with the Automatic Document Feeder
Image quality problems
Appendix C Assembling a SCSI Chain
About SCSI ID numbers
Each device has a unique ID number
About SCSI termination
Factory setting
Factory setting
Connecting the SCSI devices
162 Appendix C
Assembling the SCSI chain
Scanner Termination
Scanner is the only device connected to the Macintosh
No other external SCSI devices are set up
The scanner is connected directly to the Macintosh
The scanner is at the outside end of a SCSI chain
Scanner is at the end of the SCSI chain
Macintosh PowerBook only
All Macintosh computers except Macintosh IIfx and PowerBook
The scanner is connected directly to the Macintosh
Scanner is at the beginning of the SCSI chain
Other external SCSI devices are set up beyond the scanner
Macintosh PowerBook only
The scanner is between two other external SCSI devices
Scanner is in the middle of the SCSI chain
All Macintosh computers except Macintosh IIfx and PowerBook
The scanner is in the middle of a SCSI chain
Index
Page
Page
Page
Page
Page
Page
flipping inverting from positive to negative 77 opening
Page
X, Y
030-9440-A
Apple Computer, Inc
1 Infinite Loop
Cupertino, California