Easy Thread Cassette System
Included Accessories
Accessories
Cover a
Names of Machine Parts and Their Functions
Front view
Cover B
Needle and presser foot section
Right-side/rear view
Cover C
Operation buttons
Cover D
Operation panel
Cover E
Optional Accessories
Following are available as optional accessories
List of Embroidery Cards
Sewing Machine Features
Introduction
Contents
Stitch Settings
Adjusting the Thread Tension
Adjusting the Stitch Width and Length
Useful Functions
Sewing combined patterns
Maintenance
Sewing the Various Built-In Decorative Patterns
Designing a Pattern My Custom Stitch
Troubleshooting
Index
Important Safety Instructions
For Users in the UK, EIRE, Malta and Cyprus only
BlueNeutral Brown Live
Congratulations on Choosing OUR Machine
Getting Ready
Power supply precautions
Turning the Machine On/Off
Turning on the machine
Turning off the machine
Turning the Machine On/Off
Utility stitch selection screen
LCD liquid crystal display operation
Viewing the LCD
Stitch group selection screen
Changing the Machine Settings
LCD liquid crystal display operation
DWhenkey. settings are complete, press Back
Settings screen appears
Switch screens using Previous page key Next page key
CPress the item to be set
Checking machine operating procedures
Winding the bobbin
Winding/Installing the Bobbin
Bobbin precautions
CSwing up the bobbin thread spool pin
Winding/Installing the Bobbin
Thread is cut to a suitable length
LPress Start/stop button once
ASlide the bobbin cover latch to the right
Installing the bobbin
Install the bobbin wound with thread
Bobbin cover opens
Cutter cuts the thread
Be careful not to drop the bobbin
Be sure to insert the bobbin correctly
GReattach the bobbin cover
Upper Threading
Upper Threading
About the spool of thread
Spools that can be loaded into the thread cassette
Loading the spool into the thread cassette
Thread cassette is raised
Close until it clicks
Follow arrow 2 indicated on the thread cassette
Follow arrow 5 indicated on the thread cassette
ACheck that the thread cassette indicator is lit up in green
Threading the needle
When embroidering, go to e
EClose the thread cassette compartment cover
Using the extra spool pin
Upper threading is finished
APlacepin. the spool of thread onto the extra spool
Refer to Replacing the needle
Extra spool pin is now installed
ARemove the needle
CReplace the needle
Using the twin needle
For details, refer to Replacing the needle
JTurnstitch.on the sewing machine and select a
FInstall the twin needle
KPresspanel. Settings key in the operation
Press
AInsert the bobbin into the shuttle
Pulling up the bobbin thread
MPress Back key
NStart sewing
SE-BrotherEsgml.book Page 34 Monday, June 30, 2003 344 PM
Replacing the Needle
Needle precautions
Replacing the Needle
This section provides information on sewing machine needles
Ball point needle gold colored
Needle types and their uses
Thread and needle number
Transparent nylon thread
Correct needle
Checking the needle
Replacing the needle
Incorrect needle
Install the twin needle in the same way
APlace the needle in the hole in the needle- changing tool
HLowerneedle.the needle-changing tool off
Needle is installed
Needle can be removed from the needle bar
Needle-changing tool can not be used for the twin needle
Presser foot precautions
Replacing the Presser Foot
Replacing the presser foot
Replacing the Presser Foot
Presser foot is attached
Removing the presser foot holder
ARemove the presser foot
For details, refer to Replacing the presser foot
Sewing Cylindrical Pieces
Sewing Cylindrical Pieces
Free-arm sewing
ASlide the flap off to the left
SE-BrotherEsgml.book Page 44 Monday, June 30, 2003 344 PM
Sewing Basics
General sewing procedure
Sewing
Attach the presser foot
Selecting stitching
Sewing
CTurn on the sewing machine
Positioning the fabric
CPlace the fabric under the presser foot
Fabric is now positioned to be sewn
Starting to sew
For U.S.A. only Foot controller Model N5V
Machine stops sewing with the needle lowered in the fabric
HCut the threads
Machine stops sewing
Securing the stitching
For details, refer to Starting to sew Machine starts sewing
Machine starts sewing in the normal sewing direction
Release the start/stop button or foot controller
When you have finished sewing, cut the threads
Cutting the thread
Sewing stitches
Using the thread cutter
Correct thread tension
Adjusting the Thread Tension
Thread tension
Upper thread is too tight
Adjusting the Thread Tension
Changing the upper thread tension
CTest it until the thread tension is suitable
Adjusting the Stitch Width and Length
Adjusting the stitch width
BSelect a stitch
Adjusting the stitch length
Adjusting the Stitch Width and Length
Stitch length can be adjusted on the LCD
SE-BrotherEsgml.book Page 58 Monday, June 30, 2003 344 PM
CPress on the LCD
Useful Functions
Useful Functions
Once
Automatically cutting the thread
EOnce you have reached the end
Mirroring stitches
DSet the fabric in place, and press Start/ stop button once
Thread is cut here
Changing the sewing direction
Useful Sewing Tips
Trial sewing
Sewing curves
Sewing stretch fabrics
Sewing thick fabrics
Sewing thin fabrics
Useful Sewing Tips
Aligning the fabric with the guide foot
Sewing an even seam
Allowance
Aligning the fabric with the presser foot
Utility Stitches
Stitch Settings
Utility stitches
Stitch Settings
Stitch Name
Stitch Settings
Quilting background stitching 7.0 4.0
Yes Pattern for making adjustment
Other stitches
Yes
BAttach the presser foot
Selecting Stitching
Stitch types
DPresspanel. Menu key on the operation
Selecting Stitching
FSelect the stitch type
GPress the stitch selection
Sewing overcasting stitches using overcasting foot G
Overcasting Stitches
AAttach overcasting foot G
Sewing overcasting stitches using zigzag foot J
Overcasting Stitches
AAttach zigzag foot J
Sewing overcasting stitches using the side cutter
HPosition the fabric in the side cutter
If the fabric is not positioned correctly,
ILowersewing.the presser foot lever, and then start
Basic Stitching
Basting
Basic stitching
Basic Stitching
FWhen sewing is finished, cut the thread
For details, refer to Adjusting the stitch width
EStart sewing
CAttach blind hem foot R
Blind Hem Stitching
Stitch
DSelect a stitch
Needle is too far to the left
Blind Hem Stitching
If the needle catches too much of the hem fold
Hem
Buttonhole Stitching
Buttonhole sewing
Buttonhole Stitching
CAttach buttonhole foot a
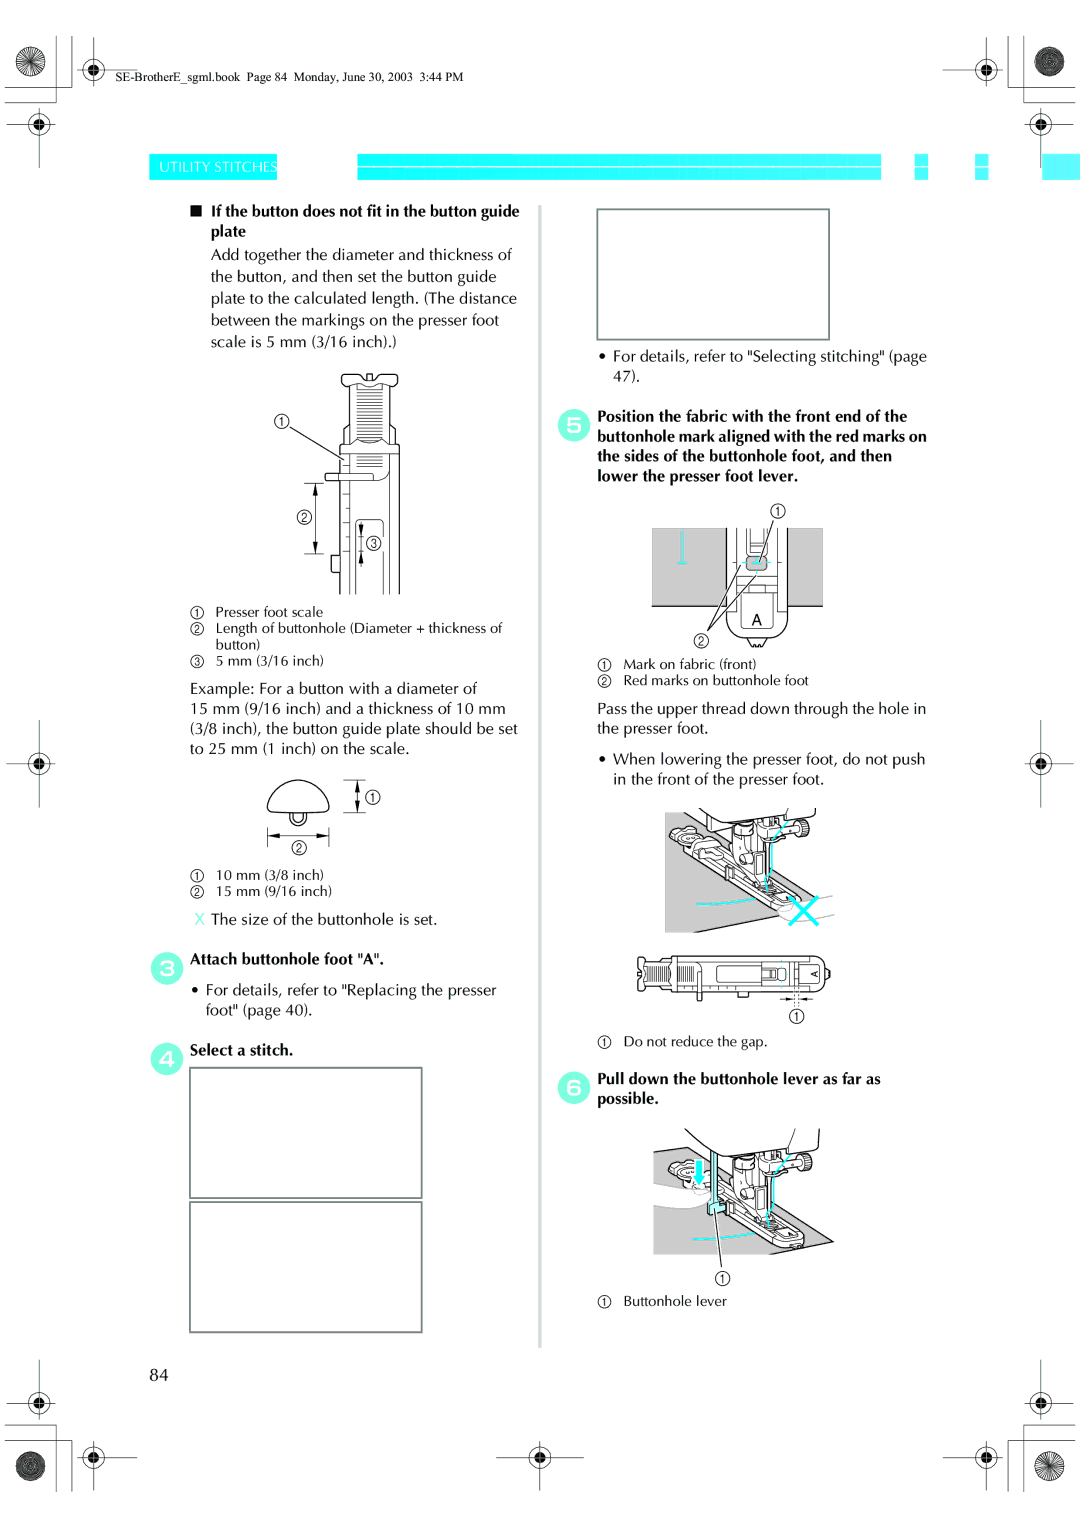
If the button does not fit in the button guide plate
Size of the buttonhole is set
FPullpossible.down the buttonhole lever as far as
Buttonhole lever b Bracket
Sewing buttonholes on stretch fabrics
Attach button-sewing foot M
Button sewing
Feed dogs are lowered
DSelect stitch
Do not press the thread cutter button
Zipper Insertion
Zipper Insertion
Inserting a centered zipper
Zipper can be sewn in place
ITopstitch around the zipper
JRemove the basting stitching
Inserting a side zipper
Wrong side of fabric b 3 mm 1/8 inch
SE-BrotherEsgml.book Page 92 Monday, June 30, 2003 344 PM
NTopstitch around the zipper
Elastic attaching
Sewing Stretch Fabrics and Elastic Tape
Stretch stitching
CSew the fabric without stretching it
Sewing Stretch Fabrics and Elastic Tape
Appliqué, Patchwork and Quilt Stitching
Appliqué stitching
Quilting
Appliqué, Patchwork and Quilt Stitching
DAttach zigzag foot J
Piecing
Edge of the fabric, and sew using stitch
Patchwork crazy quilt stitching
Select stitch 57 or
BRemove the presser foot holder
Quilting
For a seam allowance on the left side
For details, refer to Removing the presser foot holder
100
Turnstitch.on the sewing machine, and then select a
Free-motion quilting
Refer to Removing the presser foot holder
Normally, the drop feed lever is positioned at the right
AConnect the foot controller
Satin stitching
102
EPress Back key
Bar tack stitching
Reinforcement Stitching
Triple stretch stitching
Reinforcement Stitching
Mm 1/16 inch in front of the pocket opening
104
BAttach buttonhole foot a
EPullpossible.down the buttonhole lever as far as
Darning
CSelect stitch 52 or
106
Eyelet stitch
Eyelet Stitching
Eyelet Stitching
AAttach monogramming foot N
Decorative Stitching
108
CAttach zigzag foot J Select stitch 26 or
Fagoting
Decorative Stitching
Set the stitch width to 7.0 mm 1/4 inch
Scallop stitching
Smocking
110
FStitch between the straight stitches
Shell tuck stitching
Select stitch 25 , 26 or
CSelecttension.stitch 20 , and then increase the thread
Joining
112
Select stitch 22 , 23 or
BAttach monogramming foot N
AInstall the wing needle
Heirloom stitching
DStart sewing
114
Pattern is flipped
DSew along the center of the unfrayed section
Sewing patterns
Sewing the Various Built-In Decorative Patterns
Sewing beautiful patterns
116
Sewing the Various Built-In Decorative Patterns
Changing satin stitch length
Realigning the pattern
Select
118
Sewing combined patterns
Sewing combined patterns
Combining patterns
BSelect the first pattern
120
Storing a pattern
Deleting a stored pattern
DCheck the contents if they can be deleted, then Press
122
ASelect one of the stitch groups except
Designing a Pattern My Custom Stitch
Designing a Pattern My Custom Stitch
Drawing a sketch of the pattern
Prepare a grid sheet set
BPress Menu key on the operation Panel, and then press
Entering the pattern data
124
HAfter all points have been entered, press
To revise the pattern, press
Examples of designs
126
Point
Embroidery
Steps for embroidering will be explained here
Embroidering neatly
What to prepare
128
Embroidering neatly
Needle
Embroidery step by step
130
Attaching the embroidery foot
Attaching the embroidery foot
Attaching the embroidery foot
BTurn off the sewing machine
Remove the presser foot holder
132
Turn the screwdriver toward the back
Set the embroidery foot perpendicular
EAttach the presser foot holder
Removing the embroidery foot
BTurn off the sewing machine CRaise the presser foot lever
For details, refer to Attaching the presser foot holder
Attaching the embroidery unit
Embroidery unit precautions
Attaching the embroidery unit
134
ESlide the embroidery unit onto the sewing machine arm
Attaching the embroidery unit
DRemove the embroidery unit cover
FTurn on the sewing machine
Removing the embroidery unit
136
BRemove the embroidery frame
Embroidery unit separates from the sewing machine
Attaching a stabilizer material to the fabric
† When it cannot be ironed or placed in the hoop
Preparing the fabric
138
Setting the fabric in the embroidery frame
Preparing the fabric
140
BPlace the embroidery sheet on the inner frame
For details, refer to
We recommend stabilizer material for embroidery
142
Attaching the embroidery frame
Attaching the embroidery frame
BRaise the presser foot lever
Removing the embroidery frame
Attaching the embroidery frame
Remove the embroidery frame
Embroidery pattern types
Selecting embroidery patterns
Copyright Information
144
Operation keys
LCD liquid crystal display operation
Selecting embroidery patterns
LCD button
Selecting characters
146
† Example Welcome
Pattern selection screen is displayed
Selecting embroidery patterns
APress embroidery pattern
BSelect the pattern
APress the frame pattern
Selecting a frame pattern
148
BSelect the frame shape
Using an embroidery card
ESelect a pattern
Embroidering
Embroidering a pattern
150
Embroidering
Applique Position will be displayed on the LCD
Appliquéing
152
Applique will be displayed on the LCD
SE-BrotherEsgml.book Page 153 Monday, June 30, 2003 344 PM
Convenient Functions
Adjusting the layout
CCheck and adjust the layout
154
BSelect5. the pocket for storage from pockets
Storing characters
Convenient Functions
CPress
CAfter checking the content, press
156
APress Memory key
Resewing
Adjusting the thread tension
DSet up the correct color for the upper thread
Tight Loose
158
Thread runs out partway through a design
Stopping while embroidering
DRestart the embroidery
ETurn off the sewing machine
160
Appendix
Cleaning the shuttle
Maintenance
Cleaning the machine surface
162
Grasp the shuttle, and then pull it out
Maintenance
DRemove the shuttle
Do not apply oil to the shuttle
164
Troubleshooting
Correctly install the needle
Presser foot lever is raised Lower the presser foot lever
Remove the tangle thread. If
Troubleshooting
Upper thread was not Threaded correctly for example
Shuttle
166
Is tangled or
Skipped
168
LCD
Error messages
Error Message Probable Cause
170
SE-BrotherEsgml.book Page 171 Monday, June 30, 2003 344 PM
Nothing appears in the LCD
Operation beep
172
Screen for changing the beep setting appears
Cancelling the operation beep
Press Settings key in the operation Bpanel
CPress Next page key. dPress OFF for the buzzer
Index
174
Index
176
66, 78
English 885-S15/S14 XC6369-1211