Manuals
/
Lexmark
/
Computer Equipment
/
Printer
Lexmark
912
manual
149
Models:
912
1
154
207
207
Download
207 pages
10.74 Kb
151
152
153
154
155
156
157
158
Page 154
Image 154
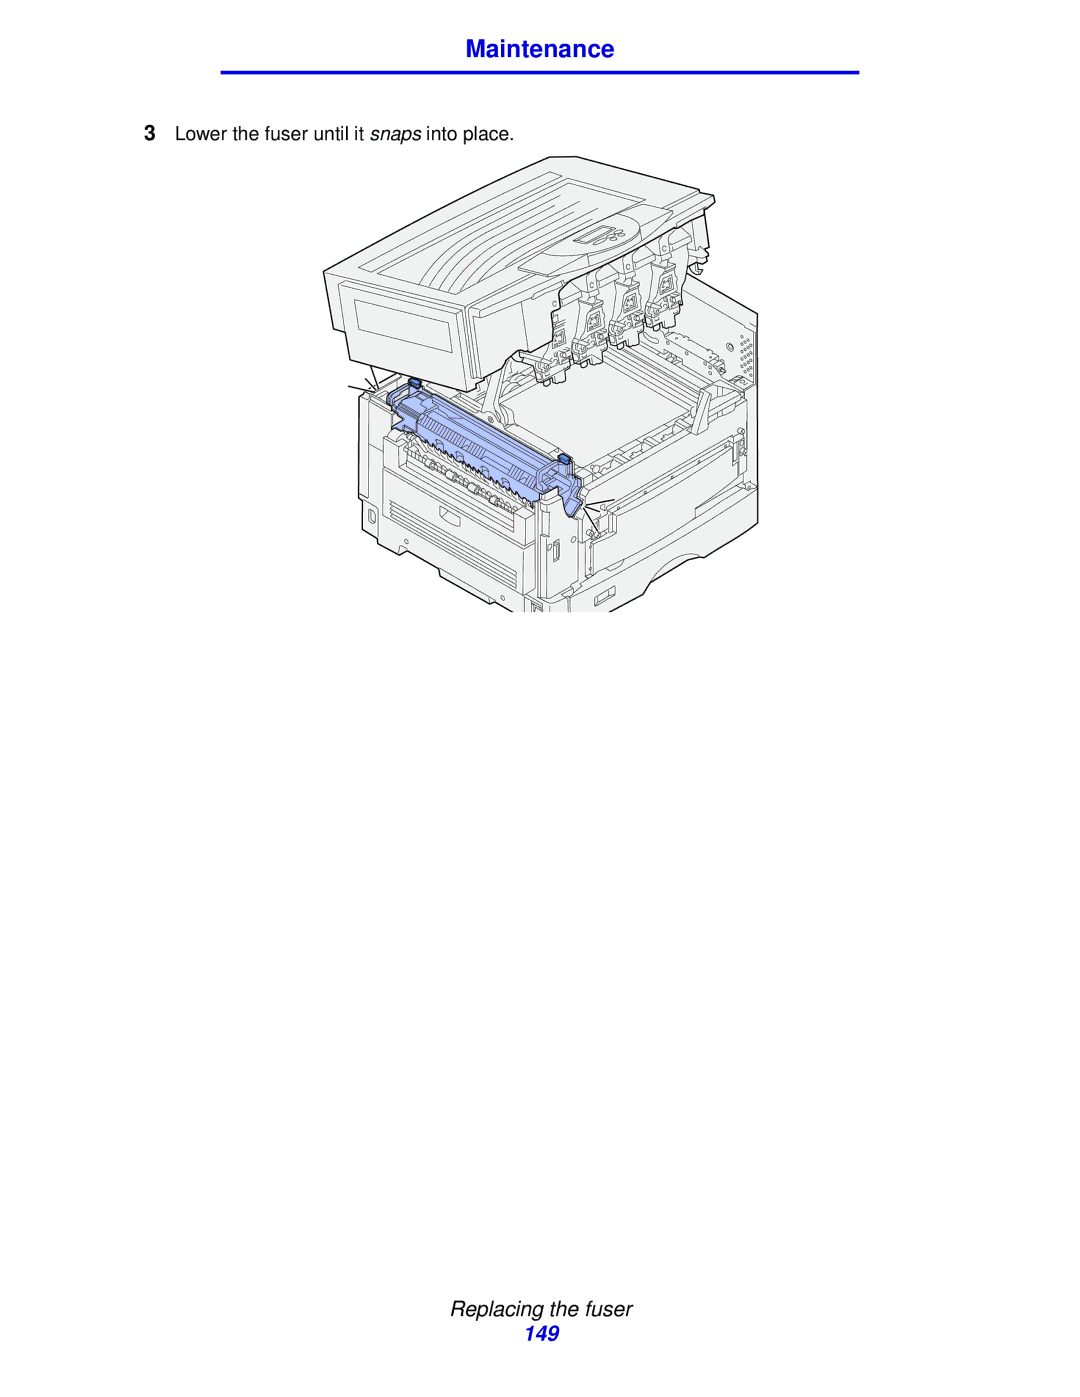
Maintenance
3
Lower the fuser until it
snaps
into place.
Replacing the fuser
149
Page 153
Page 155
Page 154
Image 154
Page 153
Page 155
Contents
C912
Edition notice
Table of Contents
Using printer menus
Troubleshooting 189
Trademarks
Trademarks
Licensing notice
Licensing notice
Safety information
Electronic emission notices
Industry Canada compliance statement
Energy Star
Noise emission levels
Japanese Vcci notice United Kingdom Telecommunications Act
Printer overview
Memory
Print speed
Paper handling
Printing
Using the operator panel buttons
Understanding the operator panel
Changing printer settings
Menu
Printing the menu settings
Menus Disabled
Sending a job to print
Canceling a print job
Loading a paper tray
Loading paper
Printing
Printing
Loading other paper sizes
Capacity
Paper dimensions
Loading the multipurpose feeder
Trouble-free printing
Printing
Printing
Loading envelopes
Loading paper, transparencies, labels, and card stock
Loading letterhead
Closing the multipurpose feeder
Close the multipurpose feeder
Accessing held jobs from the operator panel
Using the Print and Hold function
Printing and deleting held jobs
Reserve Print
Recognizing when format errors occur
Repeat Print
Verify Print
Printing confidential jobs
Enter PIN
Configuring the operator panel for custom size media
Using the multipurpose feeder
Printing with custom size specialty media
Configuring your printer’s driver
To set the paper size for the multipurpose feeder
For Windows NT, Windows 2000, and Windows XP
For Mac OS
For Mac OS X
Storing print media
Tips for successful printing
Avoiding paper jams
Understanding fonts
Resident fonts
Printing
Printing
Printing
Printing
Symbol sets for PCL 6 emulation
Symbol sets
Resident bit mapped fonts
Downloadable fonts
ISO 6 Ascii
Hebrew and Arabic fonts
Euro support
FontVision
Media guidelines
Paper
Media guidelines
Duplexer
Transparencies
Envelopes
Labels
Card stock
Card stock
Finishing Menu
Setup Menu
Supplies Menu Color Menu
Infrared Menu
Disabling operator panel menus
Enabling operator panel menus
Color
Color Menu
Correction
Print Mode
Manual Color
Finishing Menu
Hole Punch
Duplex
Duplex Bind
Multipage
Offset Pages
Print
View
Separator
Infrared Menu
Job Buffering
Transmit Delay
Infrared Buffer
Window Size
Cancel Job
Cancel Fax
Job Menu
Job
Reset Active
Confidential
Held Jobs
Network Menu
SmartSwitch
Setup
Std Net
Status
Parallel Menu
Advanced
Honor Init
Parallel
Disabled
Mode
PCL Emul Menu
Orientation
Font Source
Lines per
Pitch
Tray
Symbol Set
Renumber
Assign Type
Configure
Paper Menu
Bins
Types
Custom
Output Bin
Paper
Loading
Paper Size
Paper Source
Paper Type
Substitute
Paper Weight
Size
Universal
Fax Setup
Fax Menu
Fax Logs
Log Paper Type
Fax Send
Fax Receive
Fax Output Bin
PostScript Menu
Data Bits
Serial Menu
Baud
Honor DSR
422
Parity
RS-232/RS
RS-422
Serial Buffer
Robust XON
Serial
Setup Menu
Target
Recovery
Download
Jam
Protect
Power Saver
Print Area
Usage
Timeout
Printer
Resource
Wait Timeout
Staple Alarm
Toner Alarm
15...65535
Supplies Menu
Replace
Supplies Life
Supplies
USB Menu
Defragment
Utilities Menu
USB Buffer
Yes
Remove Held
Defaults
Factory
Jobs
Print Demo
Job Acct Stat
Directory
Samples
Activating Menu
Canceling Fax
Canceling Job
Changes
Clearing Job
Check device
Connection
Accounting Stat
Disabling Menus
Disk Recovery
Fuser?
Disk Corrupted
Formatting Disk
Maintenance
Not Be Restored
Formatting Flash
Invalid Engine Code
Install device
Or Cancel Job
Invalid
Power Saver
Menus Disabled
Installed
Network Card
Print Jobs on Disk
Printing Menu Settings
Printer Calibrating
Printing Alignment
Resetting the Printer
Programming Error Px
Resetting
Queuing and Deleting
Stop?
Restore Held Jobs. Go
Defaults
Restoring Factory
Tray x Missing
Emul Error Load
Config Error
Unsupported Disk
Memory
Short Paper
Res Save Off Deficient
Insufficient Collation
Memory Full
Held Jobs May Not Be Restored
Insufficient Memory
Complex
4x Unsupported
Sense Error
Error
Firmware Card
Configuration
Disabled
USB Port x Disabled
Input Config Error
Too Many Disks
Too Many
Bins Attached
Too Many Flash
Belt
Unformatted Disk
Format
Exhausted
All Photo
Engine Code
CRC Failure
Devs Exhausted
Color
Service message
Abnormal
Toner Empty
Clearing paper jams
Identifying paper jam areas
Paper Jam x Pages Jammed Check Areas A-F, T1- 5, MPF
Check Areas A,B
114
115
116
117
Check Area C
Check Area D
120
121
Removing small size paper from the duplex unit
123
124
125
Check Area E
Check Area F
128
Paper Jam Check MP Feeder
24x Paper Jam Check Tray
Paper Jam
131
Paper Jam Check Tray
133
Conserving supplies
Determining supply status
Toner Darkness
Multipage Print
Canceling a print job
Using the Print and Hold
Verify Print
Ordering an oil coating roll
Ordering supplies
Ordering a fuser
Ordering a transfer belt
Replacing supplies
Order the appropriate toner cartridge
Storing supplies
Recycling used supplies
Replacing a photodeveloper
Removing a photodeveloper
140
Installing a photodeveloper
142
Replacing the fuser
Removing the duplex unit Replacing the transfer belt
Complete the steps in Preparing for maintenance
Preparing for maintenance
Removing the fuser
145
146
147
Installing the fuser
149
150
151
Replacing the oil coating roll
Message Did you replace Fuser? appears
Removing the oil coating roll
154
155
Replacing the transfer belt
Replacing the fuser Replacing the transfer belt
Removing the transfer belt
158
159
160
Installing the transfer belt
162
163
164
Replacing a toner cartridge
Removing the duplex unit Replacing a toner cartridge
Removing a toner cartridge
167
Installing a toner cartridge
169
Resetting the maintenance counter
171
172
Cleaning the LEDs
174
Closing the top cover
176
Opening the top cover
Replacing the fuser Clearing paper jams
Removing the duplex unit
180
Removing the high capacity feeder
182
183
Removing the system board access cover
Installing the system board access cover
Locating memory and network options
186
Removing an optional drawer
188
Troubleshooting
Calling for service
Troubleshooting
Multipurpose feeder for an illustration
Index
193
194
195
196
197
198
199
200
201
Top
Page
Image
Contents