B2520 / B2540
| Must be parametered according to |
| Features | |
Field | Description |
|
| |
|
|
|
| |
|
|
|
| |
| This dialing prefix shall be |
|
| |
Dialling prefix | automatically inserted in front of the |
|
| |
| number before sending on this line. |
|
| |
|
|
| - PC | |
Type of dialing | the type of switchboard your |
| ||
| terminal is connected to. |
| ||
|
|
| ||
| Displays a Communication |
| ||
Header | Identification Line (LIC) on the |
| 11 | |
documents you send or on the |
| |||
|
| |||
|
|
| ||
| documents you receive. |
|
| |
|
|
|
| |
| Corrects communication errors due |
|
| |
| to line disturbance. This option |
|
| |
ECM | ensures that received documents |
|
| |
are integral. On the other hand, | 3 Click on the icon | to display the available fields. | ||
| ||||
| communication times may be longer |
|
| |
| if the line is bad. |
|
| |
|
|
|
| |
Number of attempts | Number of attempts the Terminal |
|
| |
must make if send fails. |
|
| ||
|
|
| ||
|
|
|
| |
Interval between | Duraton between two send |
|
| |
attempts | attempts. |
|
| |
|
|
|
|
Cover sheet
The cover sheet is part of a fax document automatically generated by your terminal, on which there is information concerning the sender, the recipient, the date, the time sent, comments, etc...
This page may be sent alone or in front of a fax document, but always at the same time as the document. A document may be sent with a cover sheet from the multifunction terminal or from the central processing unit. In the latter case, some of the information in the cover sheet may be provided by yourself when making the send request. It is necessary to create model cover sheets before sending a document using them. On the other hand, once the cover sheet is created, a model cover sheet may be used for all documents sent.
Your terminal offers the possibility of creating and customizing some model cover sheets which you can choose when sending a fax.
Creating a cover sheet
It is necessary to create a model cover sheet before sending a fax with it.
1From the tab COVER PAGE, click on the button NEW.
2Select the model cover sheet you have created using the menu FILE.
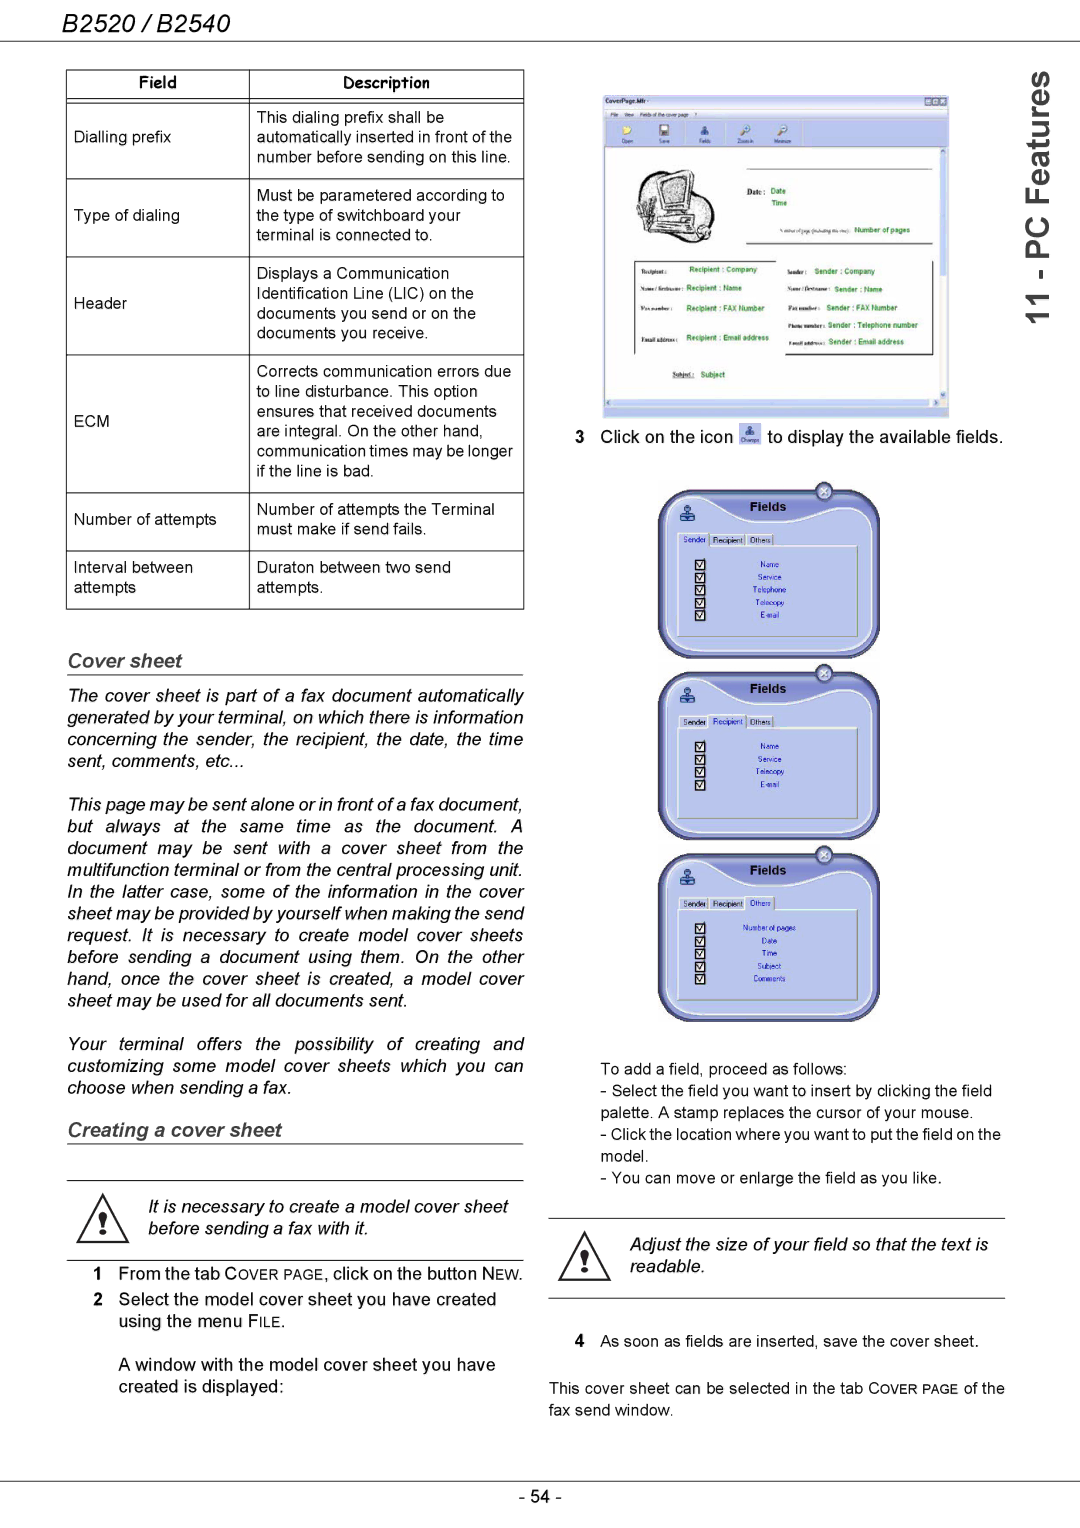
A window with the model cover sheet you have created is displayed:
To add a field, proceed as follows:
-Select the field you want to insert by clicking the field palette. A stamp replaces the cursor of your mouse.
-Click the location where you want to put the field on the model.
-You can move or enlarge the field as you like.
Adjust the size of your field so that the text is readable.
4As soon as fields are inserted, save the cover sheet.
This cover sheet can be selected in the tab COVER PAGE of the fax send window.
- 54 -
