VOR INBETRIEBNAHME/PRIMA DELL’USO

BEDIENELEMENTE

UBICAZIONE E USO DEI COMANDI E INDICAZIONI

Geräteoberseite


Pannello superiore


7 8

9

0


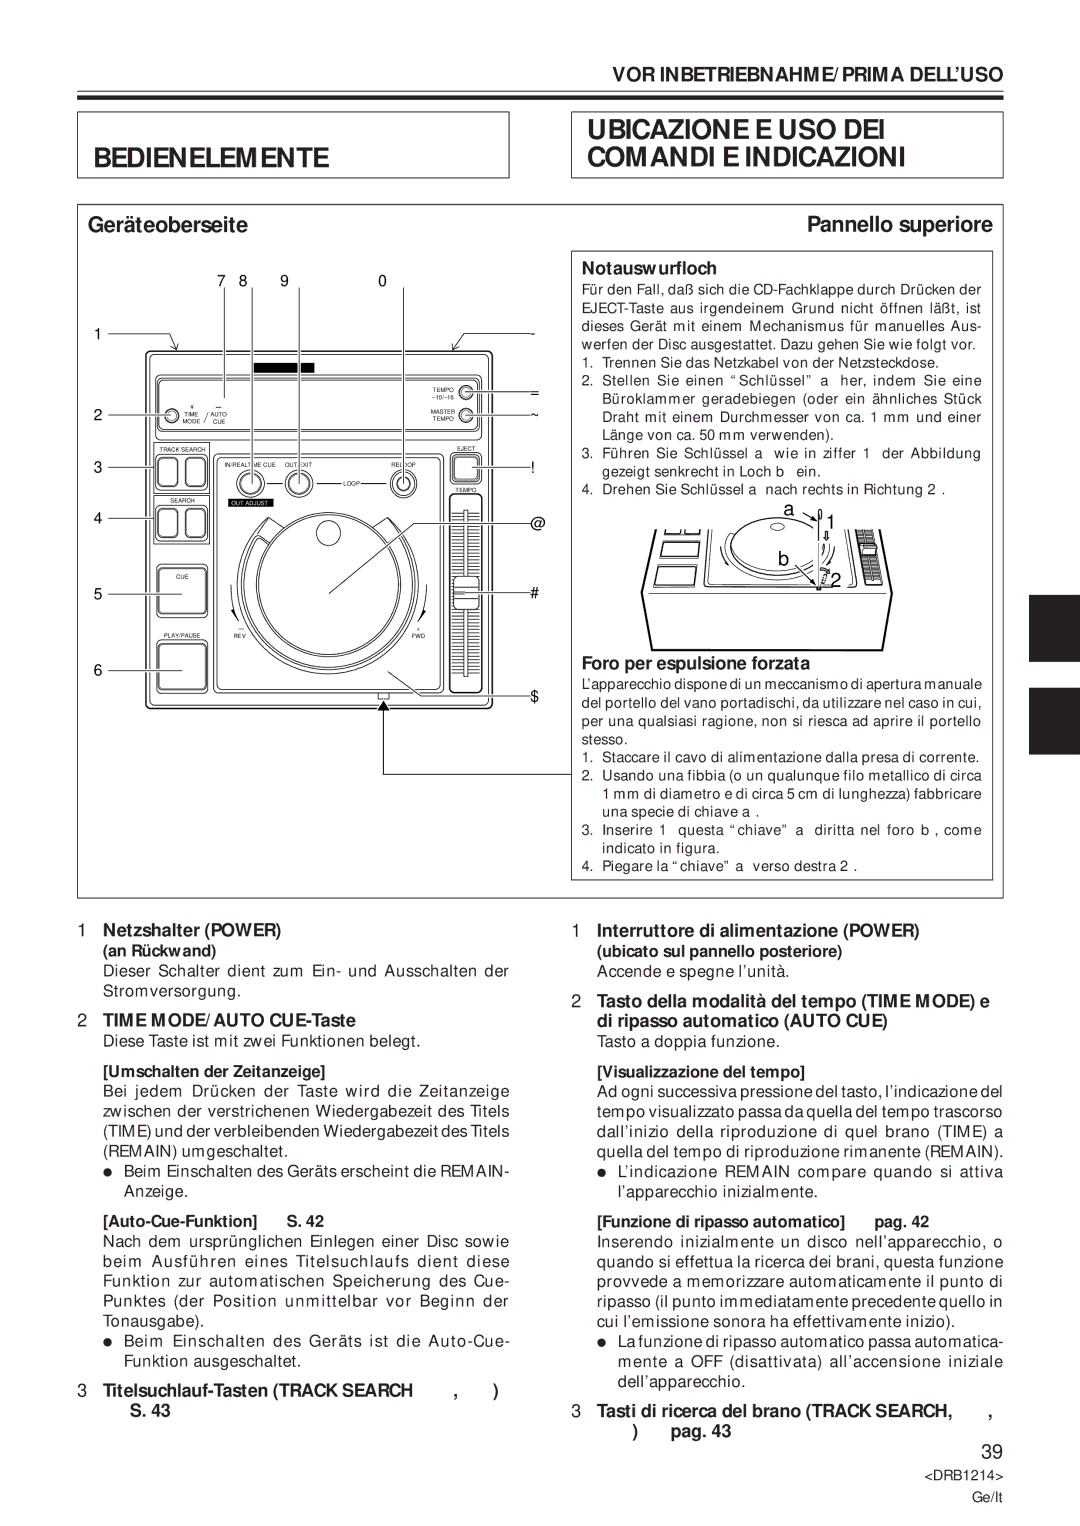
Notauswurfloch


Für den Fall, daß sich die CD-Fachklappe durch Drücken der


EJECT-Taste aus irgendeinem Grund nicht öffnen läßt, ist

1


-

dieses Gerät mit einem Mechanismus für manuelles Aus-


werfen der Disc ausgestattet. Dazu gehen Sie wie folgt vor.


D PROFESSIONAL

COMPACT DISC PLAYER CDJ-500S


1. Trennen Sie das Netzkabel von der Netzsteckdose.


'


TEMPO

=

2. Stellen Sie einen “Schlüssel” a her, indem Sie eine


Büroklammer geradebiegen (oder ein ähnliches Stück


±10/±16


2


MASTER

~

Draht mit einem Durchmesser von ca. 1 mm und einer


TIME

AUTO


TEMPO


MODE

CUE


Länge von ca. 50 mm verwenden).


TRACK SEARCH


EJECT


3. Führen Sie Schlüssel a wie in ziffer 1 der Abbildung

3


IN/REALTIME CUE

OUT/EXIT

RELOOP

0

!

4

¢￿

gezeigt senkrecht in Loch b ein.


LOOP

TEMPO


4. Drehen Sie Schlüssel a nach rechts in Richtung 2.


SEARCH


OUT ADJUST


a


4

1

Á￿


@

1


CUE


b


6

2


CUE


5


#


PLAY/PAUSE


+


REV


FWD


6


Foro per espulsione forzata


6


L’apparecchio dispone di un meccanismo di apertura manuale


$


del portello del vano portadischi, da utilizzare nel caso in cui,


per una qualsiasi ragione, non si riesca ad aprire il portello


stesso.


1. Staccare il cavo di alimentazione dalla presa di corrente.


2. Usando una fibbia (o un qualunque filo metallico di circa


1 mm di diametro e di circa 5 cm di lunghezza) fabbricare


una specie di chiave a.


3. Inserire 1 questa “chiave” a diritta nel foro b, come


indicato in figura.


4. Piegare la “chiave” a verso destra 2.

1 Netzshalter (POWER)


1 Interruttore di alimentazione (POWER)

(an Rückwand)


(ubicato sul pannello posteriore)

Dieser Schalter dient zum Ein- und Ausschalten der Stromversorgung.

2TIME MODE/AUTO CUE-Taste

Diese Taste ist mit zwei Funktionen belegt.

[Umschalten der Zeitanzeige]

Bei jedem Drücken der Taste wird die Zeitanzeige zwischen der verstrichenen Wiedergabezeit des Titels (TIME) und der verbleibenden Wiedergabezeit des Titels (REMAIN) umgeschaltet.

ÖBeim Einschalten des Geräts erscheint die REMAIN- Anzeige.

[Auto-Cue-Funktion] ] S. 42

Nach dem ursprünglichen Einlegen einer Disc sowie beim Ausführen eines Titelsuchlaufs dient diese Funktion zur automatischen Speicherung des Cue- Punktes (der Position unmittelbar vor Beginn der Tonausgabe).

ÖBeim Einschalten des Geräts ist die Auto-Cue- Funktion ausgeschaltet.

3Titelsuchlauf-Tasten (TRACK SEARCH 4, ¢) ] S. 43

Accende e spegne l’unità.

2Tasto della modalità del tempo (TIME MODE) e di ripasso automatico (AUTO CUE)

Tasto a doppia funzione.

[Visualizzazione del tempo]

Ad ogni successiva pressione del tasto, l’indicazione del tempo visualizzato passa da quella del tempo trascorso dall’inizio della riproduzione di quel brano (TIME) a quella del tempo di riproduzione rimanente (REMAIN).

ÖL’indicazione REMAIN compare quando si attiva l’apparecchio inizialmente.

[Funzione di ripasso automatico] ] pag. 42

Inserendo inizialmente un disco nell’apparecchio, o quando si effettua la ricerca dei brani, questa funzione provvede a memorizzare automaticamente il punto di ripasso (il punto immediatamente precedente quello in cui l’emissione sonora ha effettivamente inizio).

ÖLa funzione di ripasso automatico passa automatica- mente a OFF (disattivata) all’accensione iniziale dell’apparecchio.

3Tasti di ricerca del brano (TRACK SEARCH, 4, ¢ ) ] pag. 43

39

<DRB1214>

Ge/It

Page 39
Image 39
Pioneer CDJ-500S user service Bedienelemente Ubicazione E USO DEI Comandi E Indicazioni, Geräteoberseite

CDJ-500S specifications

The Pioneer CDJ-500S is a significant model in the evolution of digital DJing, launched in the late 1990s. This compact CD player is revered for its innovative features and user-friendly design, making it a noteworthy tool in the arsenal of many DJs. The CDJ-500S was one of the first CD players to effectively blend the convenience of digital formats with the tactile feel of traditional turntables.

One of the standout features of the CDJ-500S is its ability to handle both CD and CD-R media, allowing DJs to use a variety of formats for their sets. The player is equipped with a direct drive mechanism that provides stability and precision, essential for seamless mixing. The auto-cue function significantly enhances the DJing experience by enabling easy track navigation. DJs can quickly find the start of a track, ensuring smooth transitions during live performances.

The CDJ-500S also features an expansive LCD display that provides essential information including track time, playback status, and BPM, enhancing the user’s ability to monitor track progress easily. Its intuitive control layout includes pitch control for adjusting the tempo, allowing users to beat-match tracks effortlessly. The player supports pitch ranges of ±8%, ±16%, and even ±100% for extreme control, catering to a variety of mixing styles.

Another remarkable technology employed in the CDJ-500S is the seamless loop function, enabling DJs to create tight loops on the fly. This feature allows artists to experiment with repeating sections, crafting unique moments during their performances. The player includes an onboard memory function that can store cues and loops, allowing for immediate recall during a live set.

In terms of connectivity, the CDJ-500S provides standard audio outputs, allowing for easy integration into any mixing setup. Additionally, it incorporates a headphone output with a cueing function, enabling DJs to pre-listen to tracks before transitioning them into the mix.

The Pioneer CDJ-500S has earned its place in DJ history due to its robust build, reliability, and innovative features. Although newer models have since surpassed it, the CDJ-500S remains a beloved choice for those who appreciate its blend of simplicity and functionality, proving that it laid the groundwork for the advanced CDJs we see today.

Overall, the CDJ-500S is a testament to Pioneer’s commitment to pushing the boundaries of DJ technology and set a new standard for digital mixing.