VOR INBETRIEBNAHME/PRIMA DELL’USO

VORSICHTSHINWEISE ZUM BETRIEB

Reinigung und Umgang mit CDs

ÖDie auf einer Disc aufgezeichneten Signale werden durch das Vorhandensein von Fingerabdrücken oder Schmutzflecken auf der Abspielfläche nicht direkt beeinträchtigt. Je nach dem Ausmaß der Verschmutzung kann jedoch die Helligkeit des von

der Abspielfläche reflektierten Lichts reduziert werden, wodurch eine Beeinträchtigung der Klangqualität

verursacht wird. Discs stets sauber halten, indem sie ab und zu mit einem weichen Tuch abgerieben werden, das von der Mitte der Disc aus zum Rand hin geführt wird.

ÖBei starker Verschmutzung einer Disc ein weiches Tuch in Wasser eintauchen, gut auswringen und Schmutz vorsichtig von der Oberfläche der Disc entfernen. Danach die Disc mit einem weichen, trockenen Tuch vorsichtig trocknen.

ÖAuf keinen Fall für herkömmliche Schallplatten bestimmte Antistatik-Reinigungssprays, Benzin, Farbverdünner oder andere leichtflüchtige Lösungsmittel zum Reinigen von Com- pact Discs verwenden, da diese Mittel die Oberfläche der Disc angreifen.

ÖMit diesem CD-Spieler nur Compact Discs verwenden, die die unten abgebildete Markierung tragen (optische Digitalaudio- Disc).

ÖBeim Halten von CDs nicht die Seite mit der Signalaufzeichnung (die Seite, die in allen Regenbogenfarben schillert) berühren. Eine Disc immer an den Rändern oder am Mittelloch und am Rand halten.

ÖWeder gummierte Etiketten noch Klebestreifen auf die mit dem Etikett versehene Oberfläche (Abspielseite) einer Disc kleben. Darauf achten, die Etikettenseite nicht zu zerkratzen.

ÖDie Compact Disc rotiert mit hoher Geschwindigkeit im CD- Spieler. Daher nicht versuchen, eine schadhafte (gesprungene oder verzogene) Disc abzuspielen.

AVVERTENZE PER L’USO

Pulizia e maneggio dei CD

ÖLa presenza di ditate o grumi di sporco sulla superficie del disco non influisce direttamente sui segnali registrati, ma, a seconda del grado di contaminazione, la luminosità della luce riflessa dalla superficie dei segnali può risultare ridotta, con una conseguente degradazione della qualità del suono. Tenere sempre i dischi puliti, strofinandoli dolcemente con un panno morbido, e dall'interno verso l’esterno.

ÖSe il disco risulta particolarmente sporco, bagnare il panno in acqua, strizzarlo bene, togliere lo sporco dal disco ed asciugare poi accuratamente il disco con un panno asciutto.

ÖNon fare uso sul disco di liquidi per pulizia a spray o di agenti anti elettricità statica. Evitare anche di pulire il disco con benzina od altri solventi volatili che potrebbero danneggiare la superficie del disco.

ÖCon questo apparecchio utilizzare solamente dischi che riportino il marchio indicato qui sotto (dischi digitali audio, a lettura ottica).

ÖQuando si afferrano dei CD, non toccare la superficie recante i segnali (la superficie iridescente del lato opposto al lato etichettato).

ÖNon incollare etichette o nastro adesivo sulle superfici del disco, ed evitare inoltre di scalfirle o di danneggiare l’etichetta esistente.

ÖAll’interno dell’apparecchio il disco ruota ad alta velocità. Evitare quindi l’uso di dischi danneggiati (deformati o incrinati).

'

'

Rackmontage

Montaggio dello scaffale

1

2


3 4

Schraube/Vite in dotazione

3-ø5


Abstandshalter/


Distanziale in


Vorderseite/


Schraube/


dotazione


Lato anteriore


Vite


176.8


40


133.4


52.7


Einheit: mm


Unità: mm


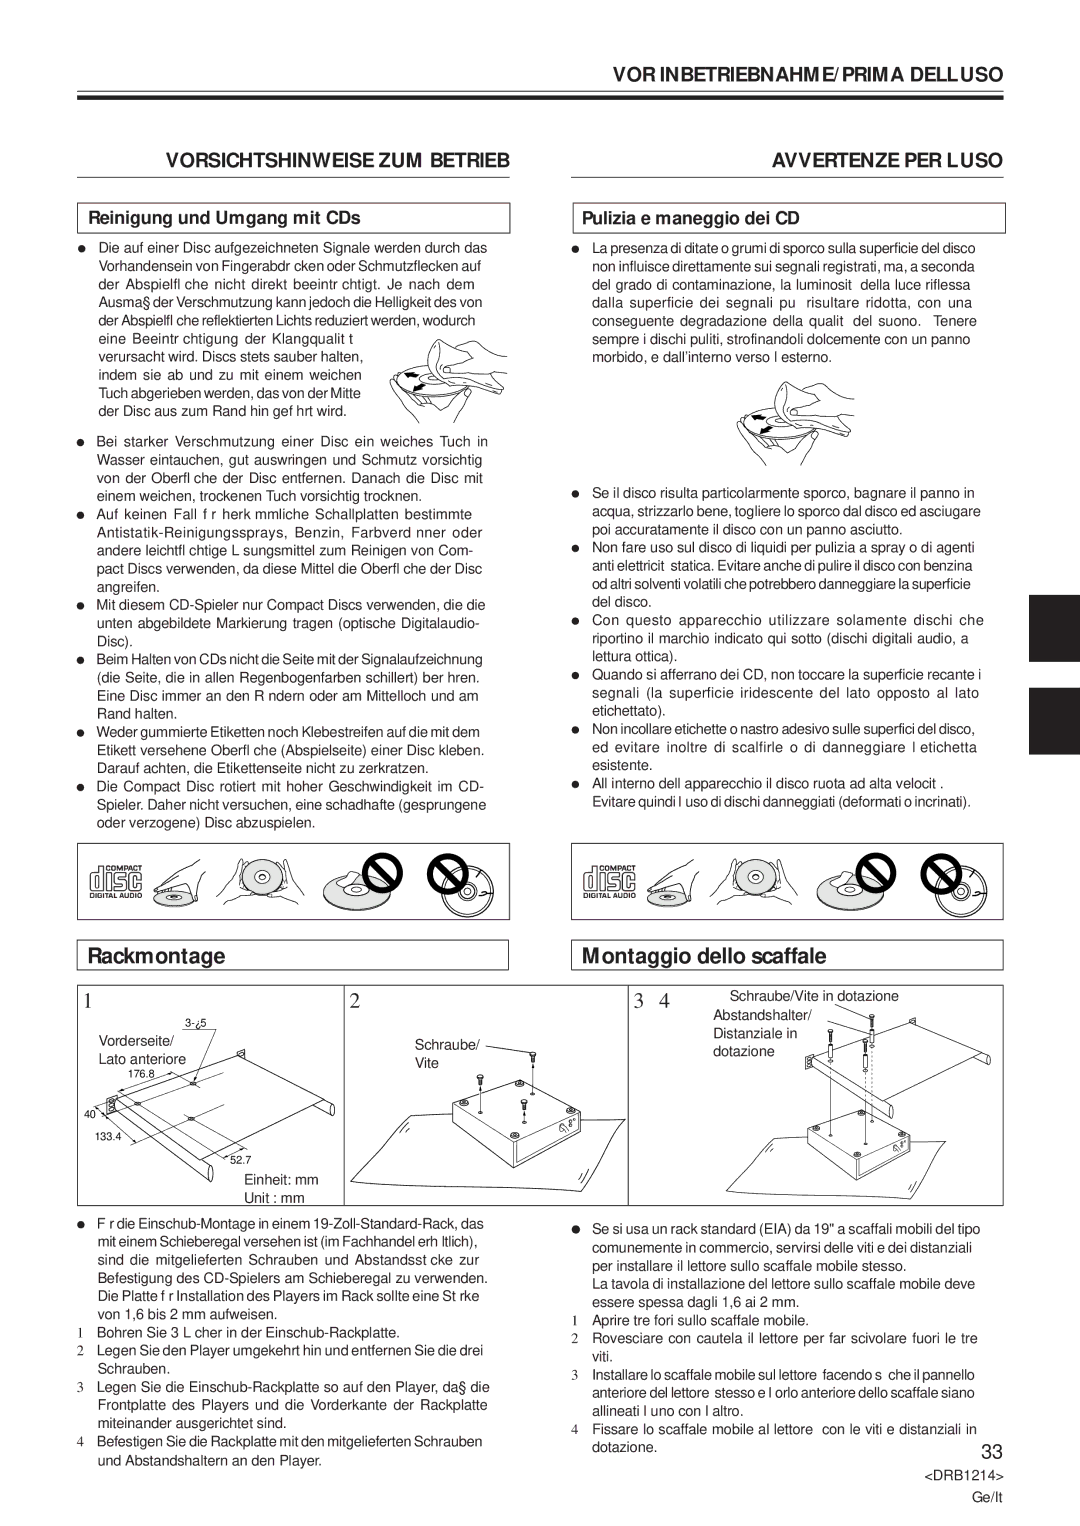
Ö Für die Einschub-Montage in einem 19-Zoll-Standard-Rack, das

Ö Se si usa un rack standard (EIA) da 19" a scaffali mobili del tipo

mit einem Schieberegal versehen ist (im Fachhandel erhältlich),

comunemente in commercio, servirsi delle viti e dei distanziali

sind die mitgelieferten Schrauben und Abstandsstücke zur

per installare il lettore sullo scaffale mobile stesso.

Befestigung des CD-Spielers am Schieberegal zu verwenden.

La tavola di installazione del lettore sullo scaffale mobile deve

Die Platte für Installation des Players im Rack sollte eine Stärke

essere spessa dagli 1,6 ai 2 mm.


von 1,6 bis 2 mm aufweisen.


1 Aprire tre fori sullo scaffale mobile.


1 Bohren Sie 3 Löcher in der Einschub-Rackplatte.


2 Rovesciare con cautela il lettore per far scivolare fuori le tre

2 Legen Sie den Player umgekehrt hin und entfernen Sie die drei

viti.


Schrauben.


3 Installare lo scaffale mobile sul lettore facendo sì che il pannello

3 Legen Sie die Einschub-Rackplatte so auf den Player, daß die

anteriore del lettore stesso e l’orlo anteriore dello scaffale siano

Frontplatte des Players und die Vorderkante der Rackplatte

allineati l’uno con l’altro.


miteinander ausgerichtet sind.


4 Fissare lo scaffale mobile al lettore

con le viti e distanziali in

4 Befestigen Sie die Rackplatte mit den mitgelieferten Schrauben

dotazione.


33

und Abstandshaltern an den Player.


<DRB1214>

Ge/It

Page 33
Image 33
Pioneer CDJ-500S user service Rackmontage Montaggio dello scaffale, Reinigung und Umgang mit CDs, Pulizia e maneggio dei CD

CDJ-500S specifications

The Pioneer CDJ-500S is a significant model in the evolution of digital DJing, launched in the late 1990s. This compact CD player is revered for its innovative features and user-friendly design, making it a noteworthy tool in the arsenal of many DJs. The CDJ-500S was one of the first CD players to effectively blend the convenience of digital formats with the tactile feel of traditional turntables.

One of the standout features of the CDJ-500S is its ability to handle both CD and CD-R media, allowing DJs to use a variety of formats for their sets. The player is equipped with a direct drive mechanism that provides stability and precision, essential for seamless mixing. The auto-cue function significantly enhances the DJing experience by enabling easy track navigation. DJs can quickly find the start of a track, ensuring smooth transitions during live performances.

The CDJ-500S also features an expansive LCD display that provides essential information including track time, playback status, and BPM, enhancing the user’s ability to monitor track progress easily. Its intuitive control layout includes pitch control for adjusting the tempo, allowing users to beat-match tracks effortlessly. The player supports pitch ranges of ±8%, ±16%, and even ±100% for extreme control, catering to a variety of mixing styles.

Another remarkable technology employed in the CDJ-500S is the seamless loop function, enabling DJs to create tight loops on the fly. This feature allows artists to experiment with repeating sections, crafting unique moments during their performances. The player includes an onboard memory function that can store cues and loops, allowing for immediate recall during a live set.

In terms of connectivity, the CDJ-500S provides standard audio outputs, allowing for easy integration into any mixing setup. Additionally, it incorporates a headphone output with a cueing function, enabling DJs to pre-listen to tracks before transitioning them into the mix.

The Pioneer CDJ-500S has earned its place in DJ history due to its robust build, reliability, and innovative features. Although newer models have since surpassed it, the CDJ-500S remains a beloved choice for those who appreciate its blend of simplicity and functionality, proving that it laid the groundwork for the advanced CDJs we see today.

Overall, the CDJ-500S is a testament to Pioneer’s commitment to pushing the boundaries of DJ technology and set a new standard for digital mixing.