1MENU CONFIGURATION AND OPERATIONS
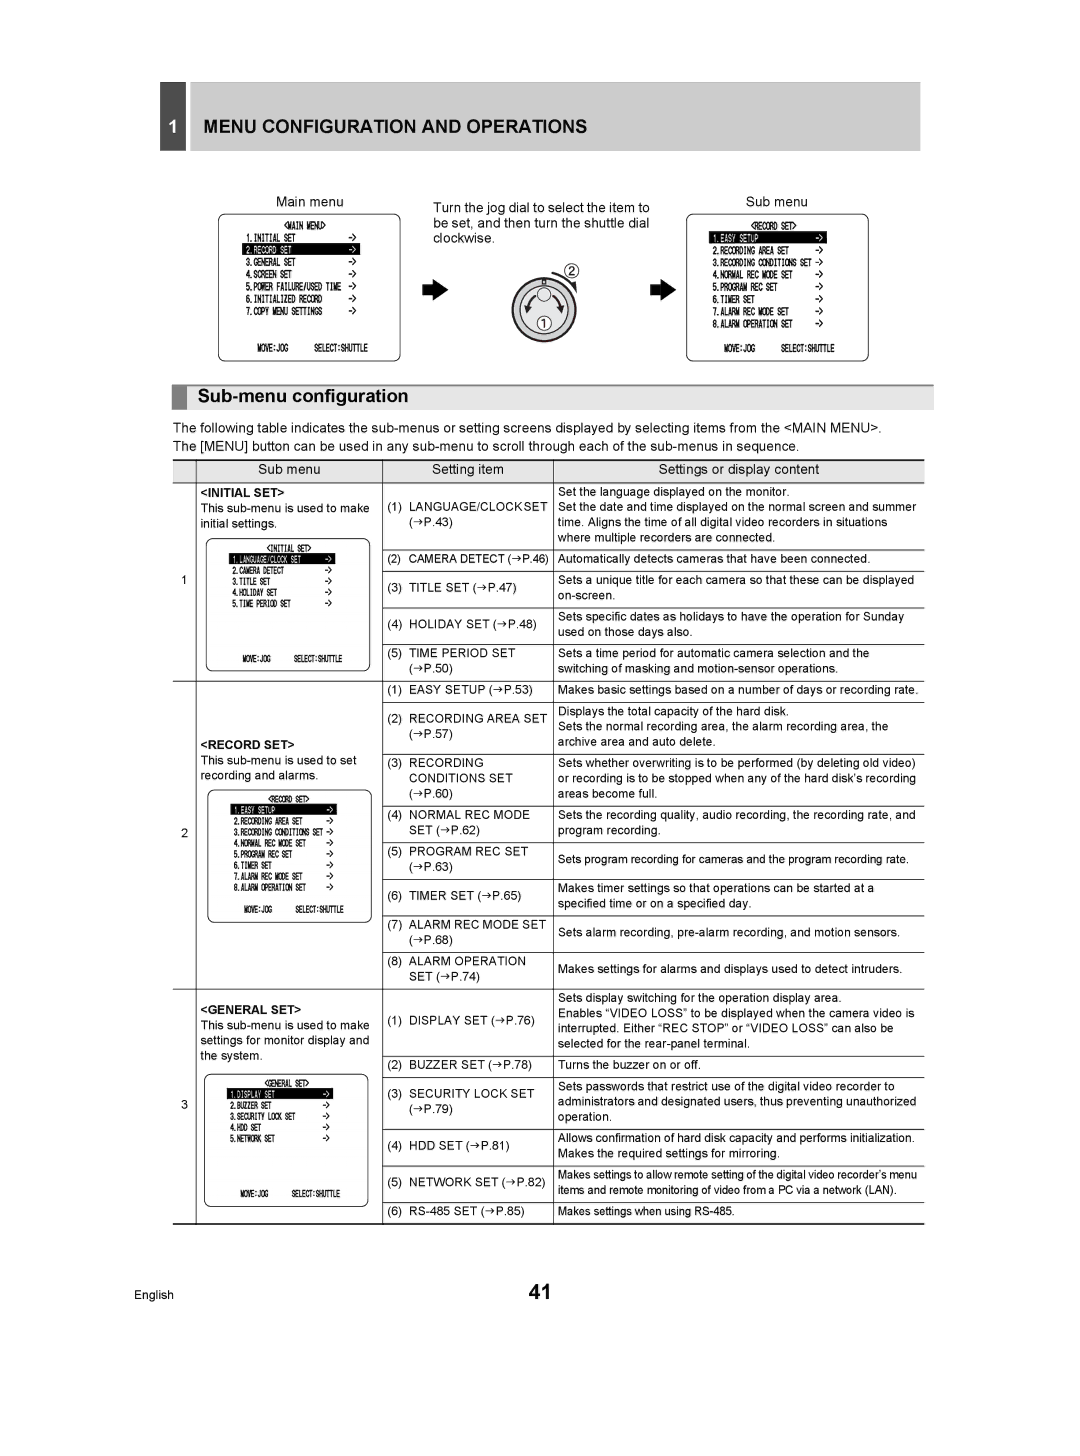
Main menu | Turn the jog dial to select the item to | Sub menu |
| be set, and then turn the shuttle dial |
|
| clockwise. |
|
Sub-menu configuration
The following table indicates the
| Sub menu |
| Setting item | Settings or display content |
| <INITIAL SET> |
|
| Set the language displayed on the monitor. |
| This | (1) | LANGUAGE/CLOCK SET | Set the date and time displayed on the normal screen and summer |
| initial settings. |
| (JP.43) | time. Aligns the time of all digital video recorders in situations |
|
|
|
| where multiple recorders are connected. |
|
|
|
|
|
|
| (2) | CAMERA DETECT (JP.46) | Automatically detects cameras that have been connected. |
1 |
|
|
|
|
| (3) | TITLE SET (JP.47) | Sets a unique title for each camera so that these can be displayed | |
|
| |||
|
|
|
| |
|
|
|
|
|
|
| (4) | HOLIDAY SET (JP.48) | Sets specific dates as holidays to have the operation for Sunday |
|
| used on those days also. | ||
|
|
|
| |
|
|
|
|
|
|
| (5) | TIME PERIOD SET | Sets a time period for automatic camera selection and the |
|
|
| (JP.50) | switching of masking and |
|
|
|
|
|
|
| (1) | EASY SETUP (JP.53) | Makes basic settings based on a number of days or recording rate. |
|
|
|
|
|
|
| (2) | RECORDING AREA SET | Displays the total capacity of the hard disk. |
|
|
| (JP.57) | Sets the normal recording area, the alarm recording area, the |
| <RECORD SET> |
| archive area and auto delete. | |
|
|
| ||
| This |
|
|
|
| (3) | RECORDING | Sets whether overwriting is to be performed (by deleting old video) | |
| recording and alarms. |
| CONDITIONS SET | or recording is to be stopped when any of the hard disk’s recording |
|
|
| (JP.60) | areas become full. |
|
|
|
|
|
|
| (4) | NORMAL REC MODE | Sets the recording quality, audio recording, the recording rate, and |
2 |
|
| SET (JP.62) | program recording. |
|
| (5) | PROGRAM REC SET | Sets program recording for cameras and the program recording rate. |
|
|
| (JP.63) | |
|
|
|
| |
|
|
|
|
|
|
| (6) | TIMER SET (JP.65) | Makes timer settings so that operations can be started at a |
|
| specified time or on a specified day. | ||
|
|
|
| |
|
|
|
|
|
|
| (7) | ALARM REC MODE SET | Sets alarm recording, |
|
|
| (JP.68) |
|
|
| (8) | ALARM OPERATION | Makes settings for alarms and displays used to detect intruders. |
|
|
| SET (JP.74) | |
|
|
|
| |
|
|
|
|
|
| <GENERAL SET> |
|
| Sets display switching for the operation display area. |
| (1) | DISPLAY SET (JP.76) | Enables “VIDEO LOSS” to be displayed when the camera video is | |
| This | interrupted. Either “REC STOP” or “VIDEO LOSS” can also be | ||
|
|
| ||
| settings for monitor display and |
|
| selected for the |
| the system. |
|
|
|
| (2) | BUZZER SET (JP.78) | Turns the buzzer on or off. | |
|
| |||
|
|
|
|
|
|
| (3) | SECURITY LOCK SET | Sets passwords that restrict use of the digital video recorder to |
3 |
| administrators and designated users, thus preventing unauthorized | ||
|
| (JP.79) | ||
|
|
| operation. | |
|
|
|
| |
|
|
|
|
|
|
| (4) | HDD SET (JP.81) | Allows confirmation of hard disk capacity and performs initialization. |
|
| Makes the required settings for mirroring. | ||
|
|
|
| |
|
|
|
|
|
|
| (5) | NETWORK SET (JP.82) | Makes settings to allow remote setting of the digital video recorder’s menu |
|
| items and remote monitoring of video from a PC via a network (LAN). | ||
|
|
|
|
|
|
| (6) | Makes settings when using | |
|
|
|
|
|
English | 41 |