2NAMES AND FUNCTIONS OF PARTS
9 10 13
1 | 2 | 3 | 4 | 5 | 6 |
|
1 |
|
|
|
| IN |
|
|
|
|
|
|
| |
|
|
|
|
|
| VIDEO |
2 |
|
|
|
| OUT |
|
|
|
|
|
|
| |
|
|
|
|
| MAIN | MON2 |
|
|
|
|
| MONITOR |
|
IN | OUT | MIC | IN | ||
|
|
|
|
|
|
|
| AUDIO |
|
| |
|
|
|
|
|
|
3 | 4 | 5 | 6 | 7 |
RS485
LAN A B
DO NOT CONNECT TO PHONE LINE
8 15 16
|
|
| ALARM |
|
|
|
| |
|
|
| FULL |
|
|
|
| |
|
| ALARM |
|
|
|
|
| |
ALARM IN |
| RISET |
|
|
|
|
| |
C 1 2 3 4 5 6 C |
|
|
|
|
|
|
| |
|
|
|
|
|
|
|
| AC IN |
SENSOR | C 1 2 3 4 5 6 C C |
| ALARM OUT | |||||
ALARM OUT |
|
|
|
|
|
|
|
|
| CL |
| CL | NON | EWARNIN | EXIT | 14 | |
| OCK | OCK |
| TI | ||||
| REMOTE |
|
| R |
|
|
| M |
| SET | S | C | G |
| |||
| RS485 | ET | OUT | OUT | FU | ER | ||
|
| IN | IN | LL | IN | |||
| TERMINATE C R1 R2 |
|
|
|
| C C | ||
| ON |
|
|
|
|
|
|
|
| ALL |
|
|
|
|
|
|
|
| RESET |
|
|
|
|
|
|
|
| OFF |
|
|
|
|
|
|
|
17
11 12
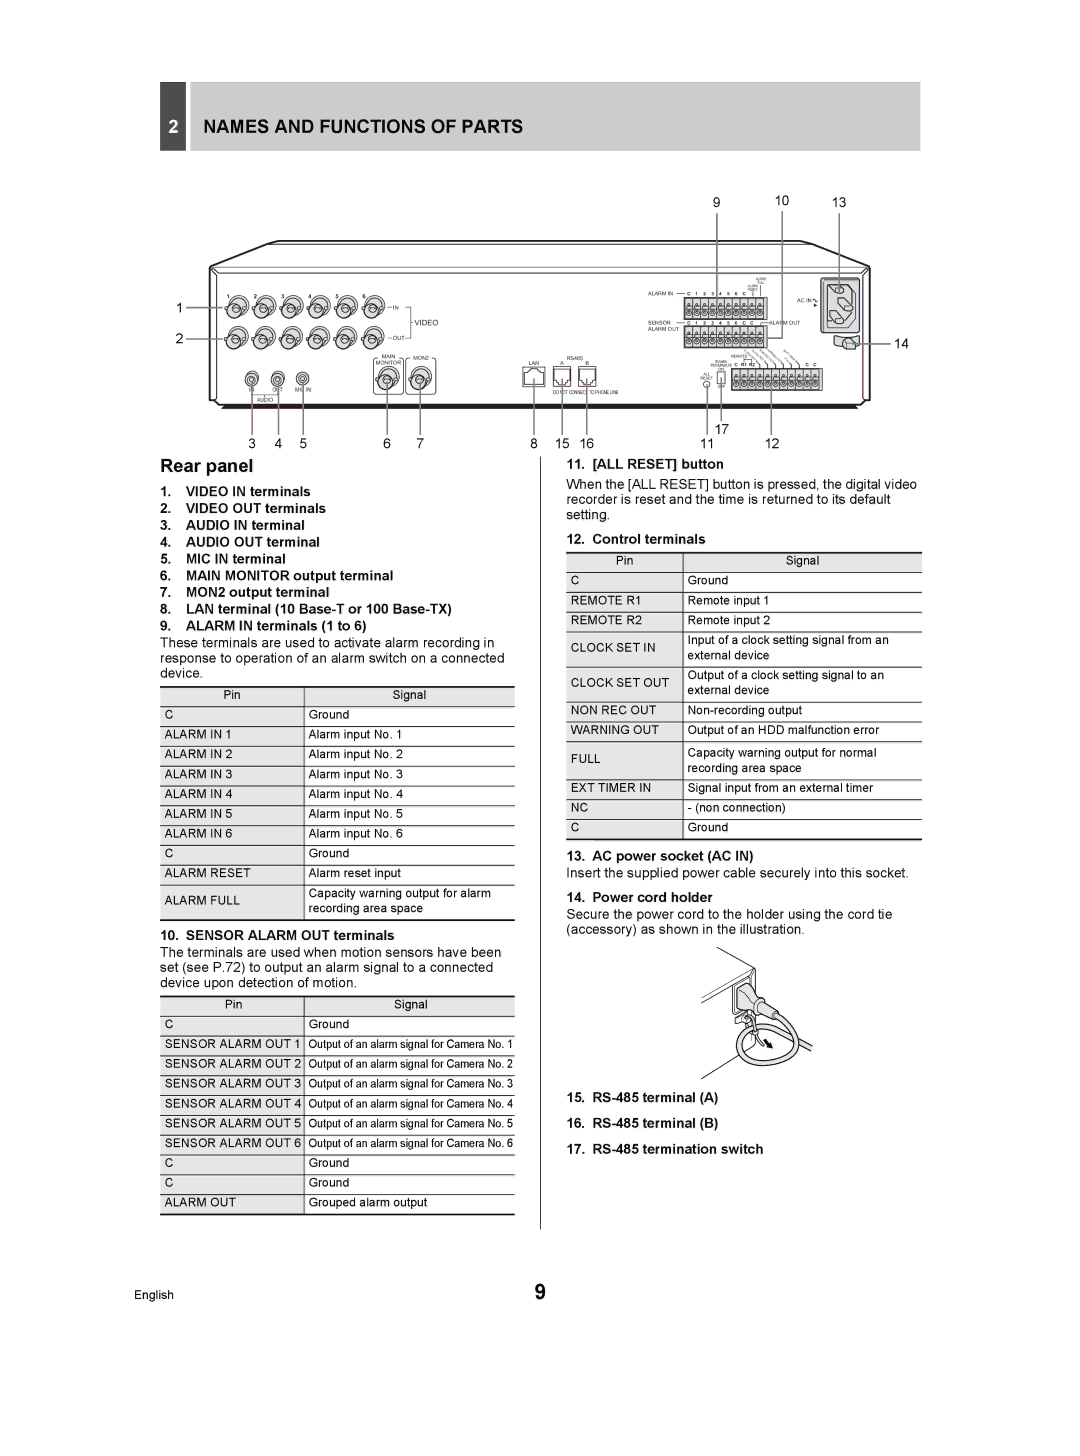
Rear panel
1.VIDEO IN terminals
2.VIDEO OUT terminals
3.AUDIO IN terminal
4.AUDIO OUT terminal
5.MIC IN terminal
6.MAIN MONITOR output terminal
7.MON2 output terminal
8.LAN terminal (10
9.ALARM IN terminals (1 to 6)
These terminals are used to activate alarm recording in response to operation of an alarm switch on a connected device.
Pin | Signal | |
C | Ground | |
ALARM IN 1 | Alarm input No. 1 | |
ALARM IN 2 | Alarm input No. 2 | |
ALARM IN 3 | Alarm input No. 3 | |
ALARM IN 4 | Alarm input No. 4 | |
ALARM IN 5 | Alarm input No. 5 | |
ALARM IN 6 | Alarm input No. 6 | |
C | Ground | |
ALARM RESET | Alarm reset input | |
ALARM FULL | Capacity warning output for alarm | |
recording area space | ||
| ||
|
|
10. SENSOR ALARM OUT terminals
The terminals are used when motion sensors have been set (see P.72) to output an alarm signal to a connected device upon detection of motion.
Pin | Signal |
C | Ground |
SENSOR ALARM OUT 1 | Output of an alarm signal for Camera No. 1 |
SENSOR ALARM OUT 2 | Output of an alarm signal for Camera No. 2 |
SENSOR ALARM OUT 3 | Output of an alarm signal for Camera No. 3 |
SENSOR ALARM OUT 4 | Output of an alarm signal for Camera No. 4 |
SENSOR ALARM OUT 5 | Output of an alarm signal for Camera No. 5 |
SENSOR ALARM OUT 6 | Output of an alarm signal for Camera No. 6 |
C | Ground |
C | Ground |
ALARM OUT | Grouped alarm output |
|
|
11. [ALL RESET] button
When the [ALL RESET] button is pressed, the digital video recorder is reset and the time is returned to its default setting.
12. Control terminals
Pin | Signal | |
C | Ground | |
REMOTE R1 | Remote input 1 | |
REMOTE R2 | Remote input 2 | |
CLOCK SET IN | Input of a clock setting signal from an | |
external device | ||
| ||
CLOCK SET OUT | Output of a clock setting signal to an | |
external device | ||
| ||
NON REC OUT | ||
WARNING OUT | Output of an HDD malfunction error | |
FULL | Capacity warning output for normal | |
recording area space | ||
| ||
EXT TIMER IN | Signal input from an external timer | |
NC | - (non connection) | |
C | Ground | |
|
|
13. AC power socket (AC IN)
Insert the supplied power cable securely into this socket.
14. Power cord holder
Secure the power cord to the holder using the cord tie (accessory) as shown in the illustration.
15.
16.
17.
English | 9 |