■Connecting the printer and installing the printer
drivers
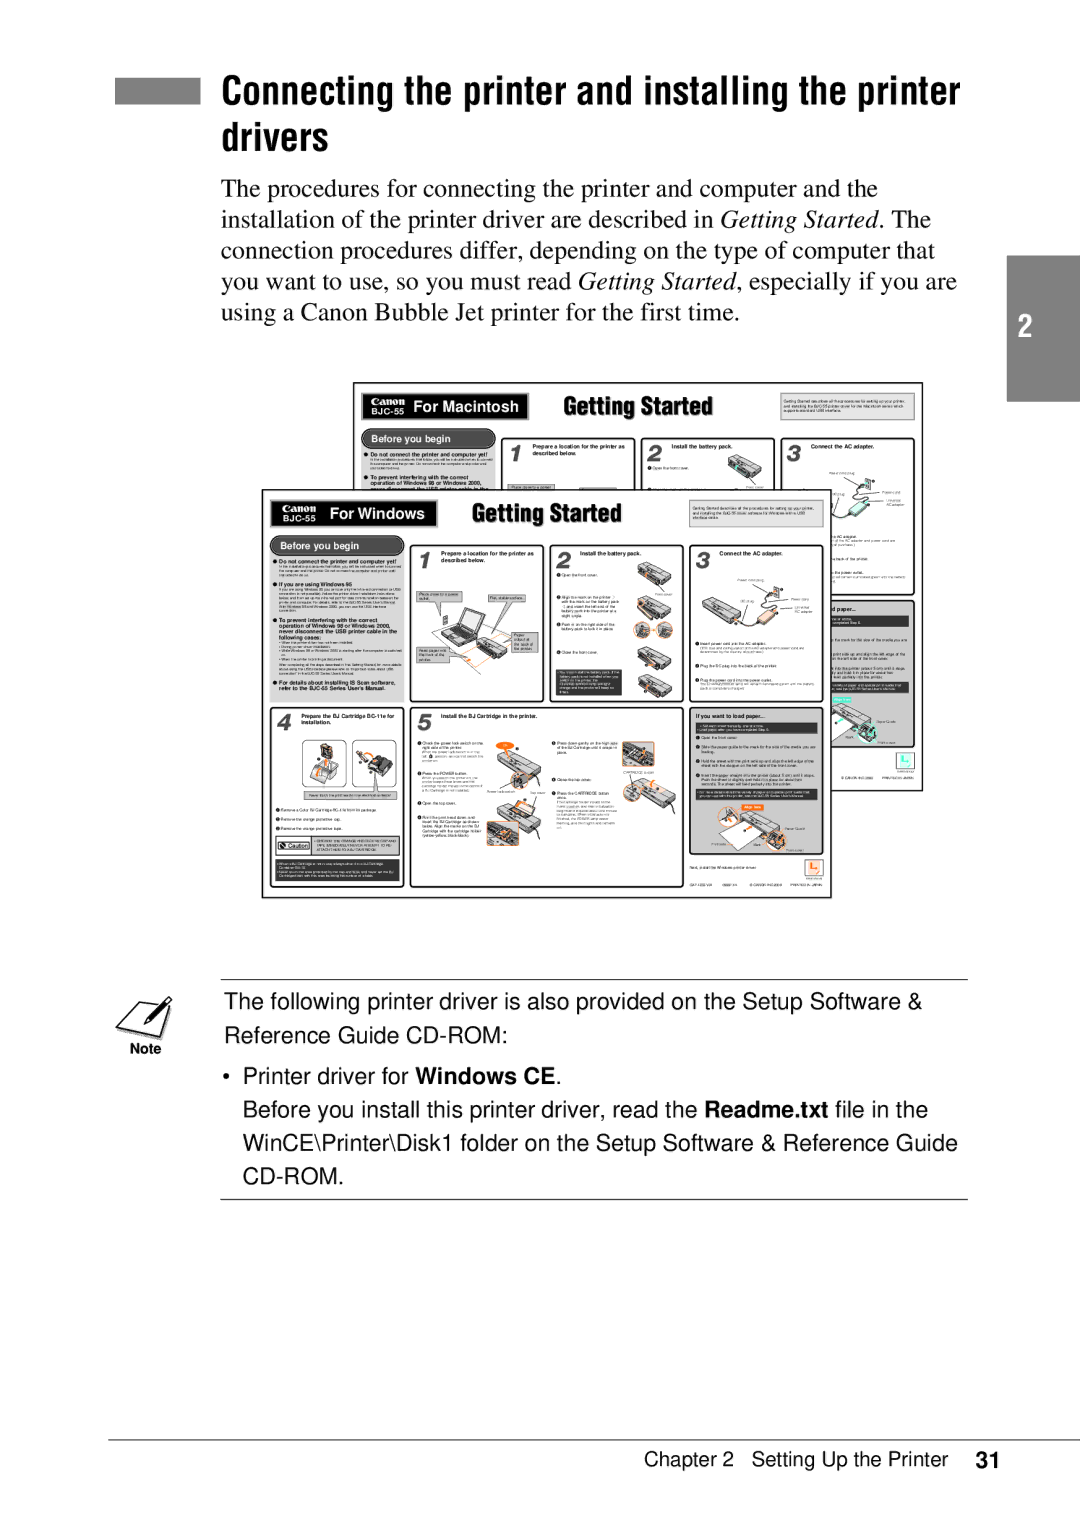
The procedures for connecting the printer and computer and the |
|
installation of the printer driver are described in Getting Started. The |
|
connection procedures differ, depending on the type of computer that |
|
you want to use, so you must read Getting Started, especially if you are |
|
using a Canon Bubble Jet printer for the first time. | 2 |
|
Before you begin
Getting Started
Getting Started describes all the procedures for setting up your printer, and installing the
| 1 | Prepare a location for the printer as | 2 | Install the battery pack. |
| 3 | Connect the AC adapter. |
|
● Do not connect the printer and computer yet! | described below. |
|
|
|
| |||
In the installation procedures that follow, you will be instructed when to connect |
|
|
|
|
| |||
the computer and the printer. Do not connect the computer and printer until |
|
| 1 |
|
| |||
instructed to do so. |
|
| q Open the front cover. |
|
|
|
| |
● To prevent interfering with the correct |
|
|
|
|
|
| Power cord plug |
|
|
|
|
|
|
| 3 |
| |
operation of Windows 98 or Windows 2000, | Place close to a power |
|
|
| Front cover |
|
| |
never disconnect the USB printer cable in the | w Align the mark on the printer u |
|
|
| ||||
| Flat, stable surface. |
|
| DC plug | Power cord | |||
|
| Getting Started |
| Universal |
For Windows | 1 | AC adapter | ||
interface cable. |
| |||
|
|
| Getting Started describes all the procedures for setting up your printer, |
|
|
|
| and installing the |
|
| the AC adapter. |
Before you begin | of the AC adapter and power cord are |
of purchase.) |
| 1 | Prepare a location for the printer as | 2 | Install the battery pack. |
| 3 | Connect the AC adapter. |
|
● Do not connect the printer and computer yet! | described below. |
|
|
| the back of the printer. | |||
|
|
|
| |||||
In the installation procedures that follow, you will be instructed when to connect |
|
|
|
|
| |||
the computer and the printer. Do not connect the computer and printer until |
|
| 1 |
| into the power outlet. | |||
instructed to do so. |
|
| q Open the front cover. |
|
| Power cord plug | lamp will remain illuminated green until the battery | |
● If you are using Windows 95 |
|
|
|
|
|
| . | |
|
|
|
|
|
|
|
| |
If you are using Windows 95 you can use only the |
|
|
|
|
|
|
| 3 |
|
| |
connection is not possible). Follow the printer driver installation instructions | Place close to a power | Flat, stable surface. |
| w Align the mark on the printer u |
| Front cover |
|
|
| ||
below, and then set up the | outlet. |
|
|
| DC plug | Power cord |
|
| |||
printer and computer. For details, refer to the |
|
|
|
| with the mark on the battery pack |
|
|
|
| ||
With Windows 98 and Windows 2000, you can use the USB interface |
|
|
|
| v and insert the left end of the |
|
| Universal | paper... |
| |
connection. |
|
|
|
|
| battery pack into the printer at a |
| 1 | AC adapter |
|
|
● To prevent interfering with the correct |
|
|
|
| slight angle. |
|
|
| one at a time. |
| |
|
|
|
|
|
|
|
|
| |||
operation of Windows 98 or Windows 2000, |
|
|
|
| e Push in on the right side of the | 2 | 2 |
| completed Step 8. |
| |
|
|
|
| battery pack to lock it in place. |
|
|
|
| |||
never disconnect the USB printer cable in the |
|
| Paper |
|
|
|
|
|
|
| |
following cases: |
|
| output at |
|
|
|
|
| to the mark for the size of the media you are | ||
• When the printer driver has not been installed. |
|
| the back of |
|
| q Insert power cord into the AC adapter. |
|
|
| ||
• During printer driver installation. | Feed paper into | the printer. | r Close the front cover. |
| (This size and configuration of the AC adapter and power cord are |
|
| ||||
• While Windows 98 or Windows 2000 is starting after the computer is switched |
|
|
| determined by the country of purchase.) |
| print side up and align the left edge of the | |||||
on. |
| the front of the |
|
|
|
|
|
| |||
• When the printer is printing a document. | printer. |
|
|
|
|
|
|
| on the left side of the front cover. | ||
After completing all the steps described in this Getting Started, for more details |
|
|
|
|
| 3 | w Plug the DC plug into the back of the printer. |
| into the printer (about 5 cm) until it stops. | ||
about using the USB interface please refer to “Important notes about USB |
|
|
|
|
|
|
|
| |||
connection” in the |
|
|
|
| • You must install the battery pack. If the |
|
|
| and hold it in place for about two | ||
|
|
|
|
|
| battery pack is not installed when you |
| e Plug the power cord into the power outlet. |
| feed partially into the printer. | |
● For details about installing IS Scan software, |
|
|
|
| switch on the printer, the |
|
|
|
| ||
|
|
|
| CHARGE/ERROR lamp will light | 4 | The CHARGE/ERROR lamp will remain illuminated green until the battery | variety of paper and special print media that | ||||
refer to the |
|
|
|
| times. | pack is completely charged. |
| see the | |||
|
|
|
|
|
| orange and the printer will beep six |
|
|
|
| |
|
|
|
|
|
|
|
|
|
| Align here |
|
4 | Prepare the BJ Cartridge | 5 | Install the BJ Cartridge in the printer. |
|
| If you want to load paper... |
|
|
| ||
installation. |
|
|
|
|
| • Set each sheet manually, one at a time. |
|
| Paper Guide | ||
|
|
|
|
|
| • Load paper after you have completed Step 8. |
| Mark |
| ||
|
|
|
|
|
|
|
| q Open the front cover. |
|
| |
|
| q Check the power lock switch on the | ON |
| t Press down gently on the high side |
| w Slide the paper guide to the mark for the size of the media you are |
| Front cover | ||
|
| right side of the printer. | 2 |
| of the BJ Cartridge until it snaps in | 5 |
|
| |||
|
| When the power lock switch is in the |
|
| place. |
| loading. |
|
|
| |
| 1 | left | position, you cannot switch the |
|
|
|
|
|
|
|
|
| ➋ | printer on. |
|
|
|
| e Hold the sheet with the print side up and align the left edge of the | . |
| ||
|
|
|
|
|
|
|
| sheet with the stopper on the left side of the front cover. |
|
| |
| ➌ | w Press the POWER button. |
|
|
| CARTRIDGE button | r Insert the paper straight into the printer (about 5 cm) until it stops. |
|
| ||
|
|
|
|
|
| © CANON INC.2000 | PRINTED IN JAPAN | ||||
|
| When you switch the printer on, the |
|
| y Close the top cover. |
| Push the sheet in slightly and hold it in place for about two | ||||
|
| printer beeps three times and the |
|
|
|
|
| ||||
|
| cartridge holder moves to the centre if | 1 |
|
|
| seconds. The sheet will feed partially into the printer. |
|
| ||
|
| a BJ Cartridge is not installed. | Power lock switch |
| u Press the CARTRIDGE button | 7 | 6 |
|
|
| |
| Never touch the print head or the electrical contacts! |
|
| Top cover |
| • For more details about the variety of paper and special print media that |
|
| |||
|
|
|
|
| once. |
| you can use with this printer, see the |
|
| ||
|
|
|
| 3 |
|
|
|
|
|
| |
|
| e Open the top cover. |
|
| The cartridge holder moves to the |
|
|
|
|
| |
q Remove a Color BJ Cartridge |
|
|
|
| home position, and then initialization |
| Align here |
|
|
| |
|
|
|
| begins and requires about one minute |
|
|
|
|
| ||
|
| r Point the print head down, and |
|
| to complete. When initialization is |
|
|
|
|
| |
w Remove the orange protective cap. |
|
| finished, the POWER lamp stops |
|
|
|
|
| |||
|
| insert the BJ Cartridge as shown |
|
| flashing, and then lights and remains |
|
|
|
|
| |
e Remove the orange protective tape. | below. Align the marks on the BJ | 4 |
| on. |
|
| Paper Guide |
|
| ||
Cartridge with the cartridge holder |
|
|
|
|
|
|
| ||||
|
|
|
|
|
|
|
|
|
| ||
• DISCARD THE ORANGE PROTECTIVE CAP AND | Print side | Mark |
TAPE IMMEDIATELY. NEVER ATTEMPT TO RE- | ||
ATTACH THEM TO A BJ CARTRIDGE. |
| Front cover |
• When a BJ Cartridge is not in use, always store it in a BJ Cartridge | Next, install the Windows printer driver. | |
Container | ||
• Never touch the area protected by the cap and tape, and never set the BJ Cartridge down with this area touching the surface of a table.
0999TXX | © CANON INC.2000 | PRINTED IN JAPAN |
The following printer driver is also provided on the Setup Software & Reference Guide
•Printer driver for Windows CE.
Before you install this printer driver, read the Readme.txt file in the WinCE\Printer\Disk1 folder on the Setup Software & Reference Guide