Large-Format Printers
DesignJet 5000 Series
Safety Symbols
DesignJet 5000 Series
Conventions
Using this Manual
Purpose
Readership Part Numbers
Table of Contents
System Error Codes
Service Tests and Utilities
Print Quality
Parts and Diagrams
Table of Contents
Glossary Index
Table of Contents
Troubleshooting
Phone Support
Guide to Troubleshooting the Printer
Troubleshooting System Error Codes
Introduction
Performing a Service Test on a Failed Assembly
Performing the Necessary Service Calibrations
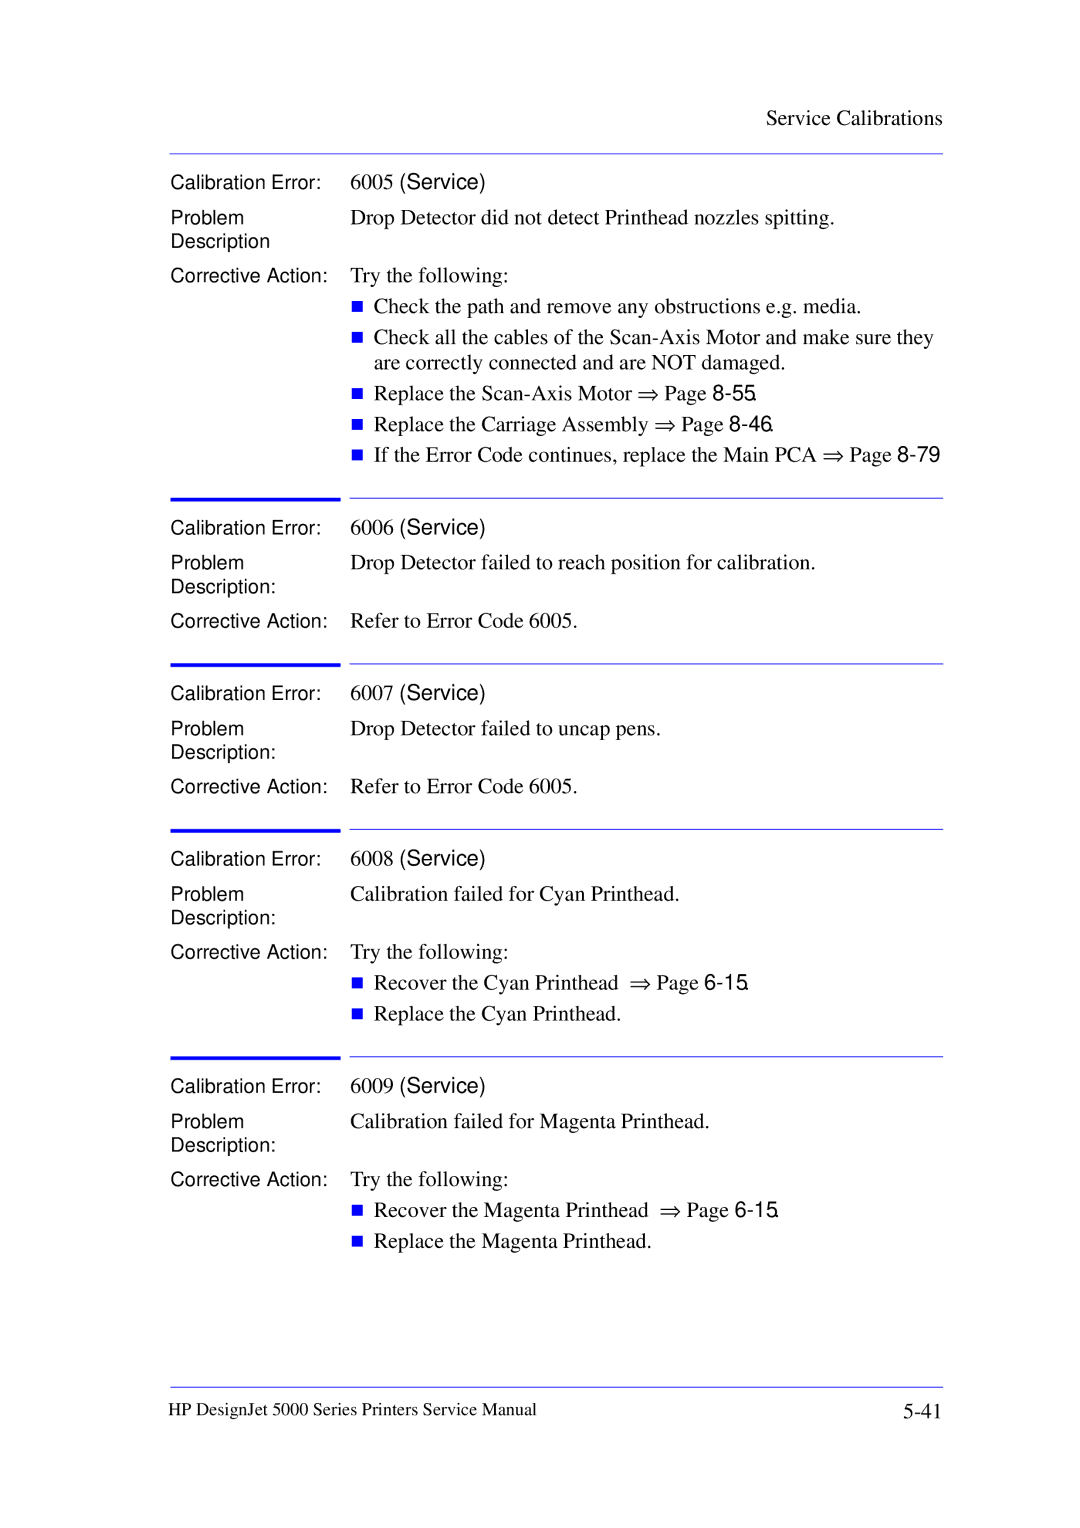
Troubleshooting Calibration Error Codes
Troubleshooting Ink Supplies Error Codes
Troubleshooting Initialization Self Diagnostic Errors
Solving Image Quality Problems
Status LED’s
Printer does not Power on
ALL the Front-Panel LEDs are Lit but Nothing Else Happens
Troubleshooting Media Jams/Printhead Crashes
If using HP Coated Media when problem occurred, please also
When clearing a media jam, sometimes media is stuck
Check Printhead Cleaner Path
Troubleshooting Shutdowns User Message
Each case, make sure that you power OFF the Printer before
Attempting any procedures to resolve the problem
Check Printhead Path
Check Paper Path
Replace Message xx15 Replace and xx16 Replace
Vacuum suction much lower at high altitudes
Problems with Vacuum
Color differences in different HP DesignJet Printers
Banding due to Ink Cartridge replacement while printing
Banding at variable extreme environmental conditions
Banding with unsupported Media
Black Smearing on HP Photo Imaging Gloss
Hue shift on HP Colorfast Adhesive Vinyl media
Dry Cockle on High Density Prints Using Paper Based Media
Worm marks cockle on part of plots on paper based media
Media Skew when Printing a Banner Plot
Drying Time Too Long for HP Studio Canvas
User message Media loaded incorrectly. Remove media
User message Warning Incorrect type of tubes system
User message Power Supply Error #1
Page
This problem is solved in any A.02.xx firmware release
Cutter Assembly Problems
Media-Axis Problems
Carriage and Scan-Axis Problems
Electronics Problems
Actual printing time is slower
Network configuration
Temperature reading to adjust the printing speed. This is
Time the printer takes to start printing is longer
Firmware Upgrade Does Not Work Through the Parallel Port
Language Selection is blocked in a brand new printer
Dry time at the end of the print is longer
Typical Failures After Exchanging the Ink Tubes
Solving Media-Handling Problems
Setup Menu
How to Navigate through the Front Panel Menus
Always Appear
Short, Full
Utilities Menu
DIC
Internal RIP Settings Menu
Queuing and Nesting Menu
Always Appear PostScript Only
HP-GL/2 Settings Menu
HP DesignJet 5000 Series Printers
Format Menu
Always Appear
Demos Menu
Roll/Sheet Info Vendor Name
Ink Level Capacity Part Number Manufacture Date Yes, No
Ink Cartridge Menu
Printhead Menu
Service Configuration Print
Printer Setup Options
Press Enter
Press Up and Enter
How to Use the Service Configuration Print
Removal and Installation
Safety Precautions
Required Tools
Electrostatic Discharge ESD Precautions
Removed
Chassis screws have a copper washer and should never be
Removal
Top Cover Assembly
Switch off the Printer and remove the power cable
Remove ALL the Ink Cartridges from
Printer
Page
Page
Installation of Left Hand Cover
When handling the Tubes make sure you do not damage them by
Twisting
P24
Right Hand Cover
Page
Page
Installation of Right Hand Cover
Switch off the Printer and remove the Power Cord
Front Panel Assembly
Left Rear Cover
Right Rear Cover
Extension Cover
Extension Cover 60 Model only
Remove the Left Rear Cover Refer
Remove 4 T-15 screws Type B from
Remove the Right Hand Cover Refer
Media Lever Assembly
Remove the Deflector closest to
Right Cover Refer to
Installation of the Media Lever Assembly
Sideplate in the UP position to avoid damaging the Lever
Spring in the Trim
P27
Right Hand Trim
Trim
Installation of Right Hand Trim
When installing the Media Lever in the Trim, install with
Lever in the UP position to avoid damaging the Lever spring
Left Hand Trim
Back Cover
Label to the new Back Cover before it is installed
Installation of the Back Cover
Open the Right Cover door and pull
Out the Printhead Cleaner Carriage
Page
Page
Page
Page
Installation of Ink Tubes System
INK Startup Initializing Printer Please wait 60 sec
Perform the following procedures
EMC Covers
Lower Right Cover
Release Encoder Strip
Encoder Strip
Installation of Encoder Strip
When Installing the Encoder Strip, make sure it is placed
Below
Trailing Cable
Ferrites if they fall into Carriage
Slide out
Guide to access the screw
Follows
Installation of Trailing Cable
Right Clip Slot Locating pin
Trailing Cables through Ferrites
Bubbles
Removal and Installation
Make sure the Trailing Cable
Is flat on the chassis without
Tensioner Assembly
Tighten screw
Page
Installation of Tensioner Assembly
Carriage Assembly and Belt
Page
Page
Page
Press down in center to release
Slide out
Slider Rods Lubrification Kit Refer to the User’s Guide
Installation of Carriage and Belt
Page
Page
Scan-Axis Motor
P23
Slider Rods Lubrification Kit Refer to
Installation of the Scan-Axis Motor
When installing the Encoder Strip, make sure it is inserted
Encoder Sensor on the rear of the Carriage Assembly
Open the Top Cover
Cutter Assembly
Page
Page
Page
Ink Supply Station ISS
Inside View Front
Installation of ISS
Air Pressurization System APS
Switch off the Printer and remove the Power Cord
Installation of APS
When Installing the Air Pressurization System make sure
Following steps
Service Station Assembly
Remove the Printhead Cleaners
Remove the Right Rear Cover Refer
P15
Page
Press clip to disconnect
Drop Detector Assembly
Move the Drop Detector
Following Service Calibration
Hard Disk Drive HDD
Installation of Hard Disk Drive
LAN Card
Memory and BootROM DIMM’s
Installation of DIMM’s
Position as shown in the diagram
Modules
Electronics Module Cover
Installation of the Electronics Module Cover
When Installing the Electronics Module Cover make sure
They pass through the slot in the Cover
Main PCA
Page
Page
When the Main PCA has been reinstalled or replaced, perform
Installation of Main PCA
Must perform ALL Service Calibrations ⇒ Page 5-3
Eerom Setup Service Utility ⇒
PCA PS Connector
Power Supply Unit PSU
Press PS Fans PS Switch PS Socket
Plastic protective cover over the unit
Installation of the Power Supply Unit PSU
After installing the Power Supply Unit, remember to place
Power Supply Unit connections are illustrated below
Ink Supply Station ISS PCA
J3P3
Installation of the ISS PCA
Ink Leak Detector
Remove the Ink Leak Detector from the Printer
Cooling Fans
Page
Electronics Module as one complete Assembly
Pinch-Wheels
Installation of Pinch-Wheels
During installation, make sure you install the White Pinch
Wheels at each end of the Printer axis
Pinch-Wheel Cam
Page
Installation of Cam
P19
Vacuum Fan
Guides in the Sideplate
Installation of Vacuum Fan
P10 P12
Paper-Axis Motor Assembly
Page
Installation of Paper-Axis Motor Assembly
Screws are tight
Apply grease to the Helical Gear
Booster Fan
Media Sensor
Installation of Media Sensor
When installing the Media Sensor, insert the moving part as
Shown in the diagram
Entry Roller
Center Guide Assembly
108
Fully tightened
Installation of Gear
Drive Roller Gear
Remove the Drive Roller Gear
Remove the Left Hand Trim Refer to
Front Platen Assembly
Page
Removing the Platen Assembly
Center Platen Assembly
Wheels
Installation of the Center Platen Assembly
Deflectors
Preventive Maintenance
Service Preventive Maintenance
Maintenance information can be obtained from Printer Setup
Utilities/Service Configuration Print
Ink Tube Maintenance Advised
Contact HP
Ink Tube Maintenance Required Now
If Printing is , the Tubes can break causing a
Have Ink Tube Replaced or Risk Printer Damage
Lens Maintenance
Routine Maintenance
Printhead
Do not handle or attempt to clean the Nozzles on the bottom
Avoid oil spills and make sure you remove any excess oil
This procedure is for Service Engineers only. Users should
Perform the procedure described in the User’s Guide
Roller Lubrification Kit
Slider Rods Lubrification Kit
Power Off the Printer and remove the Power Cord
Preventive Maintenance
Cleaning the Platen
Belt Swelling
General Cleaning
Moisture on the Printer
Noisy Carriage Bushing
Firmware Upgrade
Upgrade Instructions
Functional Overview
Electrical System
Scan Axis
Front Panel
Paper Axis
Ink Cartridge
Ink Delivery System IDS
Tubes System
Ink Supply Station ISS
Printheads
Leak Detect System LDS
Air Pressurization System APS
Print Head Cleaner PHC
Service Station
PJL, PML
Printer Specifications
At 3000m altitude the printer may have operational problems
Temperature it may stop to protect its ink systems
10-12
Interface Specifications
Printing using the Parallel Cable is not recommended
Printable Area
10-14
Centronics
Default
Ansi size
Application
JIS size
Input/output
Inked area
ISO size
Printing area
Raster
Pen
Platen
Glossary
Index
Page
ISS
Page
PCA
PCA