HP Color LaserJet CM6049f MFP User Guide
Page
HP Color LaserJet CM6049f MFP
Copyright and License
Copyright Hewlett-Packard Development Company, L.P
Trademark Credits
Table of contents
Software for Windows
Use the product with Macintosh
Network configuration
Connect the product
Paper and print media
Use product features
Print tasks
Use color
Copy
Scan and send to e-mail
13 Fax
Manage and maintain the product
Solve problems
Appendix a Supplies and accessories
Appendix B Product specifications
Appendix C Regulatory information
295
Xiv
Product introduction Product features Product walkaround
Product basics
Product introduction
Product features
1Features
Environmental features
Security features
Copying and sending
Product walkaround
Front view
HP Color LaserJet CM6049f MFP
Back view
Interface ports
Serial number and model number location
Model name Model number HP Color LaserJet CM6049f MFP CE799A
Enww
Control panel
Use the control panel
Control-panel layout
Ready light
Data light
Home screen
Copy Fax Mail Secondary E-mail
Status line, see Buttons on the touchscreen on
Sign Out
Buttons on the touchscreen
Control-panel help system
Control-panel help system on
Navigate the Administration menu
Information menu
1Information menu
Menu item Sub-menu item Values Description
Default Job Options menu
Default Options for Originals
Administration Default Job Options
2Default Options for Originals menu
Image adjustment
Administration Default Job Options Image Adjustment
3Image Adjustment menu
Menu item Values Description
Default Copy Options
Administration Default Job Options Default Copy Options
4Default Copy Options menu
Default Fax Options
Administration Default Job Options Default Fax Options
5Fax Send menu
6Fax Receive menu
Default E-mail Options
Administration Default Job Options Default E-mail Options
Document File Type Select the file format for the e-mail
Default Send to Folder Options
300
400
600
Default Print Options
Administration Default Job Options Default Print Options
7Default Print Options menu
Administration Time/Scheduling
Time/Scheduling menu
8Time/Scheduling menu
Sleep Time Monday
Tuesday Custom
Saturday Sunday
Create PIN
Administration Management
Management menu
9Management menu
Disable Color
Color copying access Enable Color default
Color/Black Mix Automatic default
Color If Allowed
Initial Setup menu
Administration Initial Setup
Administration Initial Setup Networking and I/O
Networking and I/O
Default IP
IPV6 Settings Enable
Dhcp Release
Dhcp Renew
AppleTalk Enable
Proxy Server
Proxy Port
Frame Type
Reset Security
Diagnostics Embedded Tests
Security Print Sec
Secure Web
Snmp Test
Data Path Test
Select All Tests
Execution Time H
Ping Results
Packets Sent
Packets Received
Percent Lost
Link Speed
Print Protocols
Fax Setup
Administration Initial Setup Fax Setup
12Fax Setup menu
Fax Send Settings Fax Dial Volume
Error Correction
Mode Disabled
TCF T.30 Delay
Detect Dial Tone Enabled
Fax Receive Settings Rings To Answer
Ringer Volume Off
Redial Interval
Mail Setup
Send Setup menu
Administration Initial Setup E-mail Setup
Administration Initial Setup Send Setup
Administration Device Behavior
Device Behavior menu
15Device Behavior menu
Tray Behavior Use Requested Tray Exclusively default
First
Manually Feed
Prompt Unless Loaded
Staples None
Offset
A4/Letter Staple Normal
Menu item Sub-menu item Values Description
Fold Legal & JISB4
Copy Interrupt Enabled
Letterhead Mode
Fold 11X17 & A3
A3 size paper booklet maker only
Manual Feed Enabled
Wide A4 Enabled
Print PS Errors Enabled
Enabled Disabled default Personality
Orientation Portrait default
Symbol Set
Form Length
Font Source
Administration Print Quality
Print Quality menu
16Print Quality menu
Auto Sense Mode Tray 1 sensing
Default for Trays
Gloss Mode
Tray
Cleaning frequency
Heavy Mode
Restore Optimize
Resolution Image REt
Calibration/Cleaning Process Cleaning
Delay Calibration At
Wake/Power On
Quick Calibration
Troubleshooting menu
Administration Troubleshooting
17Troubleshooting menu
All consumable-related errors are ignored
Default is Specified source as part of the test
Order to test specific paper paths
Select whether to use the duplexer in the test
100 500
Manual Sensor Test
Component Test Transfer Motors Belt Only Image Drum Motors
Magenta Laser
Scanner
Yellow Laser
Repeat Once Default
Default Specify a stop time. The next job that is sent
Process
Resets menu
Administration Resets
Service menu
Administration Service
Enww
Software for Windows
Supported operating systems for Windows
Supported printer drivers for Windows
SAP
UPD installation modes
HP Universal Print Driver UPD
Select the correct printer driver for Windows
HP PCL 6 driver description
HP postscript emulation description
HP PCL 5 description
Priority for print settings
Change printer-driver settings for Windows
Change the default settings for all
Print jobs Settings
Click the Device Settings tab
HP Web Jetadmin
Supported utilities for Windows
Embedded Web server
Software for other operating systems
Software
Enww
Use the product with Macintosh
Priority for print settings for Macintosh
Software for Macintosh
Supported operating systems for Macintosh
Supported printer drivers for Macintosh
Change printer-driver settings for Macintosh
HP Printer Utility features
Software for Macintosh computers
HP Printer Utility
Supported utilities for Macintosh
Embedded Web server
Use features in the Macintosh printer driver
Create and use printing presets in Macintosh
Print
Resize documents or print on a custom paper size
Use watermarks
Print multiple pages on one sheet of paper in Macintosh
Print on both sides of the page duplex printing
Set the stapling options
Use automatic duplex printing
Print on both sides manually
Use the Services menu
Store jobs
Set the color options
Select Device Maintenance
Enww
Connect the product
USB connection Network connection
USB connection
1USB connection
Network connection
Network cable Network port
Enww
Network configuration
Benefits of a network connection
Service name Description
Supported network protocols
2Network device discovery
3Messaging and management
Configuring network settings
Configure IP parameters
Internet Protocol IP
Transmission Control Protocol TCP
Dynamic Host Configuration Protocol Dhcp
Default gateway
Subnets
Gateways
Configure TCP/IPv4 parameters
Input or change the IP address
Set the subnet mask
Configure TCP/IPv6 parameters
Set the default gateway
Touch Manual Settings Touch Subnet Mask
Touch Manual Settings Touch Default Gateway
Network utilities
Other components and utilities
Windows
Paper and print media
Understand paper and print media use
Size Dimensions Tray Trays 3, 4
Size Dimensions Tray Trays 2, 3, 4
Supported paper and print media sizes
1Supported paper and print media sizes
148 x 210 mm
83 x 8.27
105 x 148 mm
13 x 5.83
12 x 305 x 457 mm 12 x 18 B4 JIS 257 x 364 mm 10.12 x 14.33
305 x 430 mm
12 x 16.93
320 x 450 mm
Type Specifications Quantity Settings Paper orientation
Supported paper types
4Tray 1 paper information
5Trays 2, 3, 4, and 5 paper information
Supported paper types
Special paper or print media guidelines
Media type
Load paper and print media
Load Tray
Load trays 2, 3, 4, or
Print envelopes
Load standard-sized media into trays 2, 3, 4, or
Address type Left margin Top margin
Enww
Load undetectable standard-sized media into Tray 2, 3, 4,
Load custom-size media into tray 2, 3, 4, or
Load letterhead, pre-printed, or pre-punched paper
Load large size paper into Tray 3, 4, or
Change the Image Rotation setting
Paper type Image orientation Duplex mode Staple location
Tray Options
Letterhead or Pre- Landscape
Printed Tray Letterhead or Pre- Portrait
Printed Trays One right, two right
Letterhead or Pre- Landscape Sided
Configure trays
Configure a tray when loading paper
Configure a tray to match print job settings
Automatic media type sensing auto sense mode
Auto sense settings
Select the paper by source, type, or size
Source
Type and Size
Optional output accessories
Bin stapler/stacker features
Choose an output location
Standard output bins
Booklet maker finisher features
Accessory walkaround
83-bin stapler/stacker features
9Booklet-maker finisher features
Use the booklet-making feature
2Booklet-maker finisher accessory
Create a booklet from the print driver
Create a booklet from a copy
Configure the accessory operation mode
Select the operating mode at the control panel
Select the operating mode in the printer driver
Select the operating mode in the printer driver Mac OS
Select the Installable Options panel
Enww
Use product features
Economy settings
Set the sleep delay
Sleep and wake
Set the wake time
Click Settings and then Wake Time
Set economy modes from the EWS
Use the stapler
Supported paper sizes for stapling
LGL, B4 A4 R, LTR R
Staple print jobs
Select the stapler at the control panel for printed jobs
Job storage features for print jobs
Gain access to the job storage features
Use the proof and hold feature
Create a proof and hold job
Print the remaining copies of a proof and hold job
Delete a proof and hold job
Use the personal job feature
Print a personal job
Delete a personal job
Use the QuickCopy feature
Create a QuickCopy job
Print additional copies of a QuickCopy job
Delete a QuickCopy job
Use the stored job feature for copy jobs
Create a stored copy job
Print a stored job
Delete a stored job
Enww
Configure the paper tray
Print photos or marketing material
Supported glossy paper
Configure the driver settings
Print weatherproof maps and outdoor signs
Supported tough paper
HP LaserJet Tough Paper Q1298A Letter HP Tough Paper Q1298B
Set the duplex alignment
Print tasks
Cancel a print job
Stop the current print job from the control panel
Stop the current print job from the software program
Use features in the Windows printer driver
Open the printer driver
Use printing shortcuts
Set paper and quality options
Set document effects
Set document finishing options
Set product output options
Set job storage options
Set color options
Obtain support and product-status information
Printer Features section. b In the Print All Text as Black
Set advanced printing options
Click the Device and Supplies Status icon. The Device
Use color
Manage color Match colors Advanced color use
Automatic or manual color adjustment
Manage color
Manual color options
Halftone options
Touch Color printing access or Color copying access
Print in grayscale
Restrict color use
RGB Color Color Themes
Enww
Match colors
Sample book color matching
Printing color samples
Touch Administration and then touch Information
Pantone color matching
Advanced color use
HP ImageREt
Paper selection
SRGB
Enww
Copy
Set the default copy options
Use the Copy screen
Copy from the scanner glass
Copy from the document feeder
Adjust the copy settings
Option name Description
Copy two-sided documents
Copying two-sided documents manually
Copy two-sided documents automatically
Make two-sided copies from one-sided documents
Touch 2-sided original, 2-sided output
Make one-sided copies from two-sided documents
Touch 2-sided original, 1-sided output
Copy mixed-size originals
Touch Original Size
Change the copy-collation setting
Touch Staple/Collate or Collate
Copy photos and books
Copy a photo
Copy a book
Combine copy jobs by using Job Build
Touch Job Build On
Cancel a copy job
Scan and send to e-mail
Configure e-mail settings
Configure e-mail server settings
Supported protocols
Find the Smtp gateway
Configure the Smtp gateway address
Touch Initial Setup
Test the Smtp settings
Use the Send E-mail screen
Perform basic e-mail functions
Load documents
Send documents
Send a document
Use the address book
Create a recipient list
Use the auto-complete function
Use the local address book
Add e-mail addresses to the local address book
Delete e-mail addresses from the local address book
Change e-mail settings for the current job
Button Description
Original Sides
Optimize Text
Scan to a folder
Scan to a workflow destination
13 Fax
Analog fax Digital fax
Connect the fax accessory to a phone line
Configure and use the fax features
Analog fax
Analog fax
Digital fax
Manage and maintain the product
Information pages
Usage
File directory
Fax reports
Font lists
Open the embedded Web server by using a network connection
Embedded Web server
Embedded Web server sections
Tab or section
Information tab
Tab or section Options Settings tab
Tab or section Options Digital Sending tab
Fax tab
Networking tab
Use HP Web Jetadmin software
Security features
Secure the embedded Web server
Secure Disk Erase
Data affected
DSS authentication
Gain access to Secure Disk Erase
Lock the control-panel menus
Additional Information
Set the real-time clock
Set the date format
Set the date
Set the time format
Enww
Manage supplies
Print-cartridge storage
HP policy on non-HP print cartridges
HP fraud hotline and Web site
Supply replacement guidelines
Replace supplies
Locate supplies
Approximate replacement intervals for supplies
Change print cartridges
Replace print cartridges
Enww
Change image drums
Replace image drums
Enww
Install memory
Install DDR memory DIMMs
Enww
Push down on the Dimm until both latches engage the Dimm
Enable memory
Enable memory for Windows 2000 and XP
Enww
Enww
Replace the staple cartridge
Replace the staple cartridge
Enww
Replace saddle stitch staple cartridges in the booklet maker
Enww
Close the front door of the booklet maker
Clean the product
Clean the outside of the product
Clean the touchscreen
Clean the scanner glass
Clean the ADF delivery system
Clean the ADF rollers
Close the ADF cover
ADF maintenance kit
Reset the ADF maintenance-kit count
Touch Reset Supplies Touch ADF Maintenance Kit
Touch Troubleshooting Touch Calibrate Scanner
Calibrate the scanner
Upgrade the firmware
Determine the current firmware version
Download new firmware from the HP Web site
Transfer the new firmware to the product
Use FTP to upgrade the firmware on a network connection
Use HP Web Jetadmin to upgrade the firmware
Use MS-DOS commands to upgrade the firmware
Use the HP Jetdirect firmware
Enww
Enww
Solve problems
Solving general problems
Troubleshooting checklist
Restore factory settings
Factors that affect product performance
Control-panel message types
Control-panel messages
Jams
Common causes of jams
Product is jammed
Paper and print media sizes on
Jam locations
Clear jams
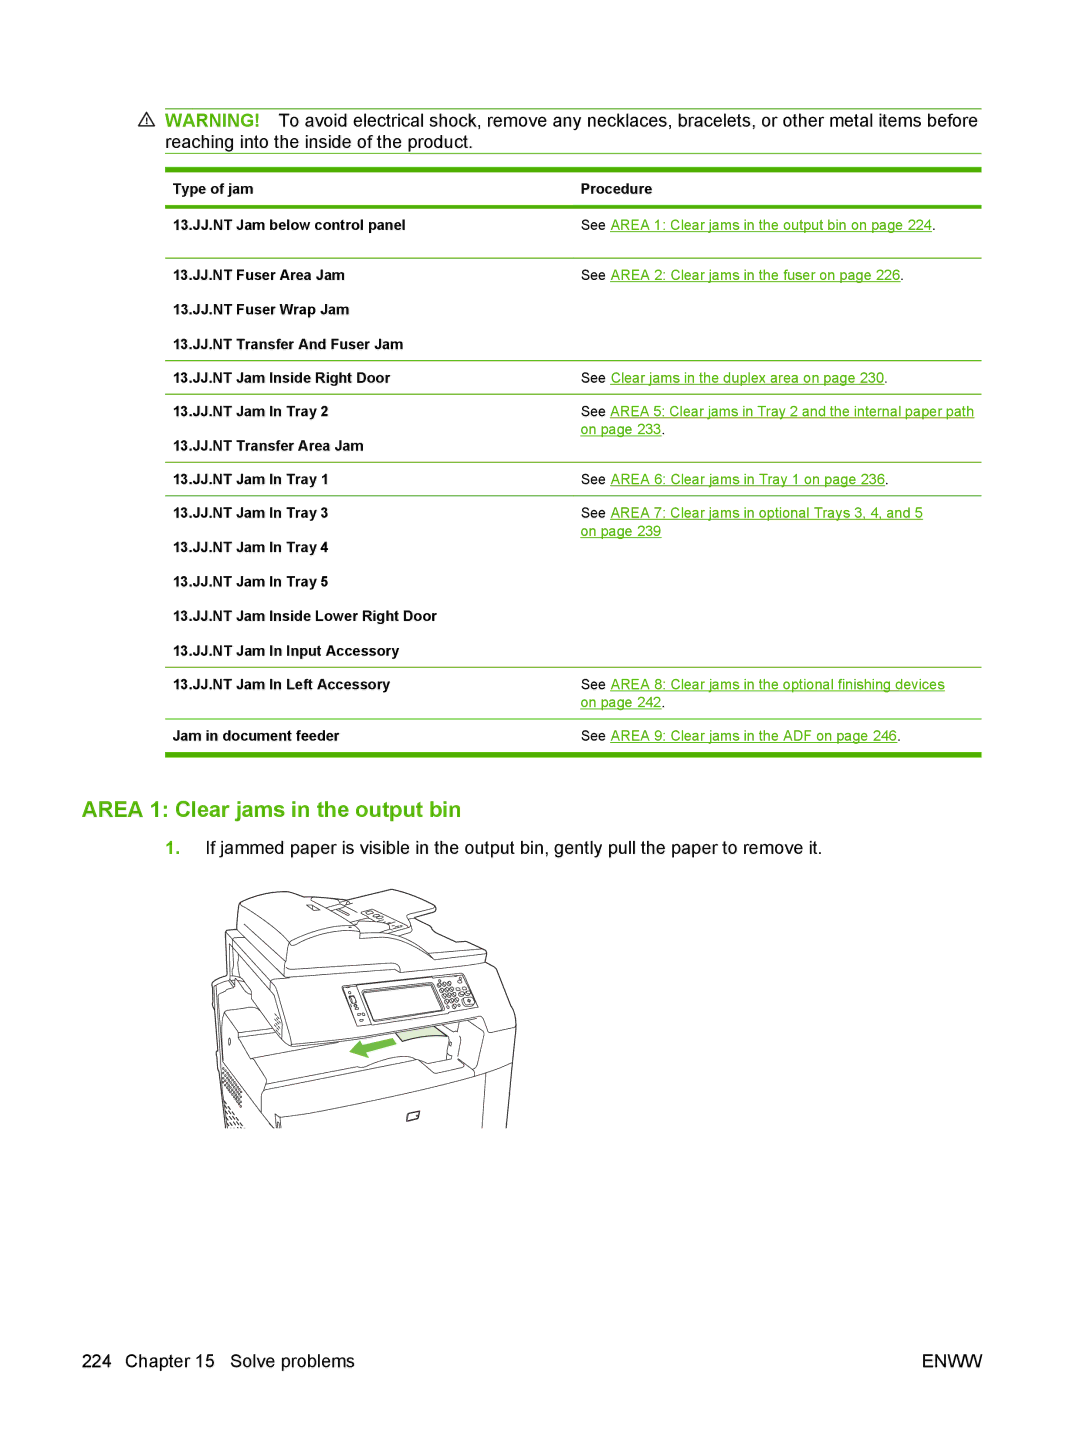
Area 1 Clear jams in the output bin
Enww
Area 2 Clear jams in the fuser
Enww
Enww
Enww
Clear jams in the duplex area
Enww
Enww
Area 5 Clear jams in Tray 2 and the internal paper path
Enww
Enww
Area 6 Clear jams in Tray
Enww
Enww
Area 7 Clear jams in optional Trays 3, 4,
Enww
Enww
Clear jams in the output-accessory bridge
Area 8 Clear jams in the optional finishing devices
Clear jams in the sorter area
Clear jams in the booklet maker
Enww
Area 9 Clear jams in the ADF
Clear staple jams
Clear staple jams in the main stapler
Clear staple jams in the booklet maker
Enww
Enww
Jam recovery
Set the jam recovery feature
Paper-handling problems
Product feeds multiple sheets
Product feeds incorrect page size
Product pulls from incorrect tray
Paper does not feed automatically
Paper does not feed from Tray 2, 3, 4, or
Paper does not feed automatically
Paper does not feed from Tray 2, 3, 4, or
Transparencies or glossy paper will not feed
Transparencies or glossy paper will not feed
Product. However, letting paper rest in humid environments
May also cause blisters
Envelopes jam or will not feed in the product
Output is curled or wrinkled
Envelopes jam or will not feed in the product
Output is curled or wrinkled
Under Installable Options , click Update Now
Automatic Configuration list
Product will not duplex or duplexes incorrectly
Right-click the HP product icon, and then click
Understand lights on the formatter
HP Jetdirect LEDs
Heartbeat LED
Correct print quality and copy quality problems
Example print quality problems
Repetitive defects ruler
36mm 40mm 50mm 71mm 82mm 94mm 144mm 148mm
Print quality problems associated with the environment
Print quality problems associated with jams
Optimize and improve image quality
Clean the fuser
Respond to control panel error messages
Create and use the cleaning
Touch Calibration/cleaning Touch Process cleaning
Clean the registration second transfer assembly
Enww
Use manual print modes
Print-quality-troubleshooting pages
Touch PQ Troubleshooting
Performance problems
Problem Cause Solution
Real life technologies on the Paper
Speed
Solve fax problems
Solve e-mail problems
Validate the Smtp gateway address
Validate the Ldap gateway address
Solve network connectivity problems
Solve network printing problems
Verify communication over the network
Solve network connectivity problems
Solve common Macintosh problems
1Problems with Mac OS
Print job was not sent to the product that you wanted
Print queue might be stopped
You are unable to print from a third-party USB card
Software troubleshooting
Hardware troubleshooting
Supplies and accessories
Order parts, accessories, and supplies Part numbers
Order parts, accessories, and supplies
Accessories
Maintenance kits
Part numbers
Print cartridges
Memory
Cables and interfaces
Roller kit CB459A Transfer kit CB463A ADF roller kit CE487A
Large or complex print jobs
Product specifications
Physical specifications
Table B-1Product dimensions
Product Height Depth Width Weight
Electrical specifications
Table B-3Power requirements HP Color LaserJet CM6049f MFP
Specification Volt models
Product model Printing Ready Sleep Off
Acoustic specifications
Sound power level Declared per ISO
Sound pressure level Declared per ISO
Environmental specifications
Environmental condition Recommended Allowed Storage/standby
Enww
Regulatory information
Compliance with FCC regulations
Declaration of Conformity
Environmental product stewardship program
Return and recycling instructions
Paper
Material restrictions
United States and Puerto Rico
Material Safety Data Sheet Msds
For more information
Certificate of volatility
Types of memory
Volatile memory
Non-volatile memory
Safety statements
Laser safety
Canadian DOC regulations
General telecom statement
Laser statement for Finland
Substances Table China
Enww
Symbols/Numerics
Index
USB
EWS
Msds
TCP/IP
Quality
EWS
TCP
Page
CE799-90904* *CE799-90904