Okifax
Handbook
Handbook
Contents
Using Your Fax with Your Computer
Setting Basic Features
Relay Faxing
Copying
Broadcasting
Advanced Operations
Reports
Problem Solving
123
148
Security
Safety
Service and Support
User Function Settings
Dial Parameter Settings
Features
Introduction
Product Options
Handbook
Installation
For Your Safety Installation Hints
Where to Install Your Fax Machine
Getting Started
Unpacking
What You Should Receive
Attaching the Document Stacker
Removing the Protective Sheet
Installing the Toner Cartridge
Handbook
Toner Cartridge and Image Drum Unit Handling
Emergency First Aid
Loading Paper
Replace the paper tray. Push it forward until it locks
Connecting the Telephone Line
Connecting an External Telephone or Answering Machine
Connecting The External Handset Option
Connecting Power
Programming Required Information
FCC Telephone Consumer Protection Act
3CLOCK Adjustment
Date and Time
Fax Identification
Sender ID
To Program Your Fax ID
1FUNC. Programming
4SYSTEM Data PRG
NO=TSI/CSI, ID=SENDER ID
NO=CALL Back no
Front of the Unit
Getting to Know Your Fax Machine
Component Identification
Back of the Unit
Locating the Serial Number
Inside the Unit
Image Drum Cartridge
Toner Cartridge
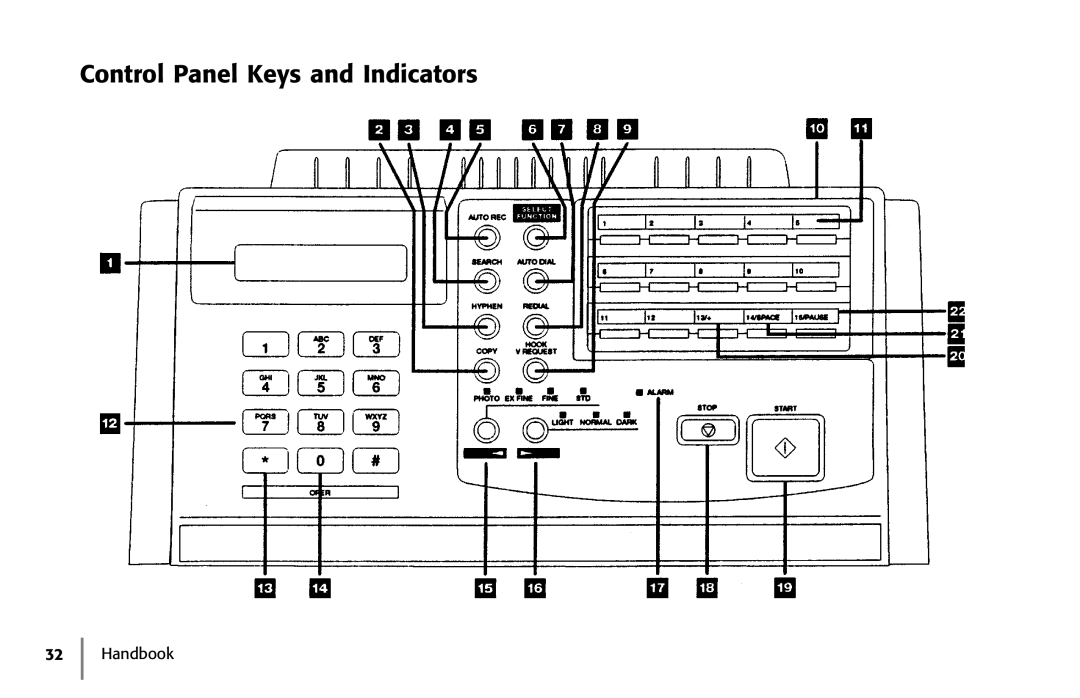
Control Panel Keys and Indicators
Copy key
Hyphen key
Search key
Auto Rec key
Auto Dial key
Redial key
Hook/V. Request key
One Touch labels
Transmit Resolution/Yes key
Alarm indicator
13 */Tone key
14 0/Unique key
Stop key
Start key
Plus key
Space key
Using the One Touch Keys for Dialing
Delayed TX key
Speed Dial One Touch Keypad
List of One Touch Keys with Descriptions
Confidential TX key
Relay Initiate TX key
Polling key
Report Print key
Signal Tones
10/Message Print From Memory key
Dual Access
Using Your Fax with Your Computer
Connect to Your Computer
Setting Basic Features
Navigating Programming Levels
Viewing Your Current Settings
User Function Settings
User Function Settings List
MCFSINGLE-LOC
Monitor Volume
Setting Distinctive Ring
Function no
Setup FAX Ring Call FAX Number NOW
Using the Other setting, with MFP Option installed
Distinctive RING, OFF
Distinctive RING, SET
14 2’ND Paper Size
Feeder TX YESLOC. NO→
BROADCAST/MEMORY TX YESLOC./# NO→
Changing Your User Function Settings
Remote Diagnosis
Dial Parameter Settings
Dial Parameter Settings List
MFTONE/DP Pulse
Service Function Settings
Changing Your Dial Parameter Settings
Service Function Settings List
2DIAL Parameter
Answering Mode
Setting the Answering Mode
Changing the Language
Function NO. Enter
Changing the Answering Mode
Answering Mode Options
Auto Receive Mode FAX
Manual Receive Mode TEL
Using Your Fax with an Answering Machine TAD
Memory Reception Mode MEM
Fax Forwarding Mode FWD
PC Mode PC
Incoming Call Parameters
Ring Response User Function
Incoming Ring User Function
Distinctive Ring User Function
Setting Distinctive Ring
PC/Fax Switch MFP Option User Function
Monitor Volume User Function
Buzzer Volume User Function
Remote Receive User Function
Paper Size Settings
Connecting to a PBX
Using the Other setting, with MFP Option Installed
First Paper Size User Function
2DIAL Parameter
Basic Faxing Operations
Preparing Documents for Faxing
Guidelines
Document Size
Multiple Page Documents
Loading Documents
To dial using the numeric keypad
Sending a Fax to a Single Location
COMMUN. Error
Dialing
Calling
SENDING/XX.X
Search Key Dialing
Redialing
Real-Time Dialing
Confirming Results
NO=5551212 the fax number you entered ID=
Stopping a Transmission
Shortcut Fax Number Programming
NO=LOCATION
Receiving Faxes
Receiving Faxes Manually
Auto Receive Mode
Receiving Faxes in Memory
MSG. in Memory
Programming
MSG. in MEMORY, Printing
Canceling Messages Stored in Memory
CANCEL?
Power Failures and Memory
08CLOSED Network nnn
Using Voice Request
Initiating a Voice Request
Answering a Voice Request
Lift HANDSET, Press Voice Request
Programming One Touch Keys
Programming Your Speed Dial Directory
One Touch Faxing
NO=FAX NO., ID=LOCATION ID
NO=OR Location
List of One Touch Keys
Confidential TX key
Chain Dialing
Creating a Chain Dial Number
Auto Dial Faxing
Press OT/AD/SRCH KEY
Location Programming
NO=FAX no ID=LOCATION ID
Auto Dial no
Making Copies
Quantity and Resolution
Copying
Using the Manual Paper Feeder
Handbook
Handbook
Sending a Fax to Multiple Locations Broadcasting
Performing a Broadcast Operation
Handbook
What is a Group?
Sending a Fax to a Group
Programming Groups
Search
Add
Number of your current group Select LOC.S
Select LOC
Delete
Sending to a Group
What is Relay Faxing?
Relay Faxing
Relay Password
Relay Initiating Station
Relay Key Station
Relay Broadcast Report
Relay Password Enter
Relay Password
Initiating a Relay Broadcast
Remote List no
Select Location
Features and Limitations
Sending a Delayed Fax from the Document Feeder
Advanced Operations
Sending a Fax at a Later Date and Time
Sending a Delayed Fax from the Document Feeder
Sending a Delayed Fax from Memory
PRG. Start Date
PRG. Start Time
Sending a Delayed Fax from Memory
Feeder TX
BROADCAST/MEMORY TX
Select Locations
Confidential Faxes Security Feature
Canceling a Delayed Transmission
Communication Cancel
Creating a Personal Confidential Mailbox
Changing Your Password
5PERSONAL BOX PRG
Personal BOX no
Personal BOX Close
PRG. Password
Personal BOX Conf
Closing Deleting a Mailbox
Delete Personal BOX
Sending Confidential Faxes
Receiving Confidential Faxes
Personal Mailboxes Security Feature
Printing Confidential Messages
Print Memory MSG.?
Print Personal BOX
What is Standard Polling?
What is Bulletin Polling?
Polling
Bulletin Poll
To Cancel Polling
MSG Confirmation Printing
NO.=MAIL BOX no
Polling RX, Select Location
Fax on Demand Bulletin Polling
Opening a Personal Box for Polling
What is it?
Transmit Preparation
Loading a Document for Polling
Bulltin Poll
NO=FORWARDING no
Setting the Forwarding Number Call Forwarding
6FORWARDING NO. PRG
What You Can Do While Receiving a Fax
Working with Dual Access
What You Can Do While Sending a Fax
What You Can Do While Making Copies
Reports
Understanding Reports
Activity Report
What information does it provide?
How to Print
How to Interpret
Broadcast Confirmation Report MCF
1ACTIVITY Report
Broadcast Entry Report
Configuration Report
Confidential Reception Report
User Function Settings List
Message Confirmation Report MCF
Is for MCFMULTI-LOC
Automatic
Is for MCFSINGLE-LOC
Phone Directory
On Demand Manual
Power Outage Report
Printing Reports
Communication Codes
Using 6/Report Print One Touch key
Codes Used in Reports
Service Codes
Result Codes
Problem Solving
Clearing a Document Jam
Clearing a Paper Jam
Lift the image drum cartridge out and set it aside
Handbook
Printing a Cleaning
Replacing the Toner Cartridge
Handbook
Handbook
For Your Safety Handling the Toner Cartridge
Working with the Image Drum Cartridge
For Your Safety Handling the Image Drum
Change Drum Soon Message
When to Replace the Image Drum Cartridge
Replacing the Image Drum Cartridge
Handbook
Handbook
Resetting the Drum Counter
Error Messages
Display Panel Messages
Normal Display
Change Drum Soon
Error
Cover Open
Document JAM
Confirm and Stop
Printer Alarm
Please Confirm Printer Alarm 4 FAX
No Paper
Replace Paper
Problem Checklist
Nothing happens when you press the control panel keys
Reading the Print Counters
Display is blank
Your documents jam in the scanner
Your fax machine won’t dial
Display shows a communication error
You sent a fax but it was received completely blank
You keep getting reports you do not want
Image received on your fax machine was very poor
Your fax machine does not answer the phone or receive faxes
Your fax machine will not poll a remote fax machine
Your received faxes sometimes look distorted
Echo PROTECTION, OFF
23ONE Touch Param
Upgrading Your Firmware
Firmware Serial Number of Your Fax Machine
Identifying Your Current Firmware Version
Security
Confidential Faxes
Rejecting Unsolicited Junk Fax Messages
Closed Network Option
1FUNC. Programming
Safety
Installation Hints
Toner Cartridge
Operation and Maintenance
Handling the Consumables
Emergency First Aid
Image Drum Cartridge
Service and Support
Your Dealer
Okidata on the Internet
Contacting Okidata Customer Support
Options
Purchasing Supplies and Options
Supplies
User Function Settings
User Function Settings List
Image in MCF
TX Mode Default
Distinctive Ring
Incoming Ring
Changing Your User Function Settings
Dial Parameter Settings List
Dial Parameter Settings
Dial Parameter Settings
MFTONE/DP Pulse
Changing Your Dial Parameter Settings
Service Function Settings
Service Function Settings List
Glossary
Database polling. See Polling
Handbook
Handbook
Handbook
Handbook
Handbook
Handbook
Handbook
Handbook
Symbols
Index
Handbook
Handbook
Image in MCF
Handbook
Handbook
Handbook
Handbook