Visioneer Strobe XP USB Scanner Users Guide
for Windows
Visioneer Strobe XP USB Scanner User’s Guide
F O R W I N D O W S
Technical Support
C O P Y R I G H T I N F O R M A T I O N
Restricted Rights Legend
FCC Radio Frequency Interference Statement
T A B L E O F C O N T E N T S
Creating a New Scan Configuration
Index
iv TABLE OF CONTENTS
WELCOME
WHAT’S IN THE BOX
Paper guide LED Number Destination Selector button Simplex button
THE VISIONEER STROBE XP 470 SCANNER
Power switch Power jack
Duplex button Status light Output tray ADF cover release
Universal Serial Bus USB port-Connects the scanner to the computer
An IBM-compatible PC with
WHAT YOU NEED
DOCUMENTATION
A VGA Monitor
BEFORE YOU BEGIN
INSTALLATION
Please make sure of the following before you begin installation
Installation is a quick, four-step process 1. Assemble the scanner
STEP 1 ASSEMBLE THE SCANNER
To assemble the scanner
6. Flip open the extension on the output tray so it is fully extended
7. Proceed to “Step 2 Install the Software.”
STEP 1 ASSEMBLE THE SCANNER
STEP 2 INSTALL THE SOFTWARE
To install the software
3. On the installation menu, select Install ScanSoft PaperPort
Select Remind me in 7 days and click OK
The Welcome to the OneTouch 4.0 Setup Wizard opens 12. Click Next
STEP 2 INSTALL THE SOFTWARE
14. Choose the option you want
15. Click Next
14 VISIONEER STROBE XP 470 SCANNER USER’S GUIDE
TO INSTALL ANOTHER DRIVER
b. Double-click on Add/Remove Programs
STEP 3 CONNECT AND POWER ON THE SCANNER
To connect your Visioneer Strobe XP 470 scanner
STEP 4 CONNECT THE USB CABLE
18 VISIONEER STROBE XP 470 SCANNER USER’S GUIDE
2. When you’re certain that the software has completely loaded, return to the “Complete the installation by connecting your hardware” window and click OK to complete the installation process
3. Click Close at the OneTouch 4.0 Installation Complete window
20 VISIONEER STROBE XP 470 SCANNER USER’S GUIDE
To install OmniPage
INSTALL OMNIPAGE 12 AND ADDITIONAL SOFTWARE
To install additional software
3. At the next set of menu options, click on More Great Software
2. Select Additional Software and Guides
22 VISIONEER STROBE XP 470 SCANNER USER’S GUIDE
That’s it! You are now ready to scan
To register your scanner
REGISTER YOUR SCANNER
RegID
Scanning
LOAD AND SCAN DOCUMENTS
For Simplex one-sided scans, load the documents face down
To Cancel scanning, click the Cancel button
The current name of the setting
CHECK THE SCAN SETTINGS BEFORE SCANNING
The icon indicates the Destination Application for this setting
This number corresponds to the LED on the scanner
Use this window to reset the button settings for the destination applications, file formats, and so forth. See “Configuring the OneTouch Buttons” on page 35 to reset the settings
want to use to scan
SCAN FROM THE ONETOUCH BUTTON PANEL
Click the button you
through the 9 buttons
USING THE ONETOUCH BUTTON PANEL
The Button View
2. To scan from the panel, click the icon you want to use to scan
SCANNING FROM OTHER SOFTWARE
ABOUT THE ONETOUCH BUTTON PANEL’S NAMES AND ICONS
Button
THE DEFAULT ONETOUCH SETTINGS ON YOUR SCANNER
Preconfigured Settings
Name
CONFIGURING THE ONETOUCH BUTTONS
To open the OneTouch Properties window
Click to select options
ABOUT THE ONETOUCH PROPERTIES WINDOW
The button number and name
The file format of the images of the scanned item
The settings on the Properties window are
SELECTING NEW SETTINGS FOR A BUTTON
Destination Application, Scan Configuration, and Document Format
To select new settings for the Scanner Button
SETTING DESTINATION APPLICATION PROPERTIES
2. Click OK 3. Click OK or Apply on the OneTouch Properties window
TEXT DOCUMENTS PROPERTIES
42 VISIONEER STROBE XP 470 SCANNER USER’S GUIDE
The Add Text Based Link dialog box appears
The options will apply to all the applications in the group
STORAGE PROPERTIES
You’ll see a message when it’s time to click the Burn to CD button
See the steps on page 45 to add an application
5. Select the options for color document handling
SELECTING PAGE FORMAT OPTIONS
To select a JPEG or PDF file size
TEXT FORMATS
To select a file type for the text format
Excel Spreadsheet-The .xls file format used by Microsoft Excel
RENAMING A ONETOUCH BUTTON
To change the button names
SELECTING OPTIONS FOR A BUTTON
To select options
PDF applications are for documents scanned to PDF format
5. Click OK to save the options for the selected button
CREATING A NEW SCAN CONFIGURATION
To create a new configuration
3. Click the New button
60 VISIONEER STROBE XP 470 SCANNER USER’S GUIDE
7. Click the Page Settings tab to select page settings
Original Image
Inverted Image
8. Click the Advanced Settings tab
The scanned item with the red filtered out
10. Click OK to save the new configuration
2. Click OK or Apply
1. Click on the Storage Options tab
To edit or delete a scan configuration
EDITING OR DELETING SCAN CONFIGURATIONS
CONFIGURING THE ONETOUCH BUTTONS
CONFIGURING BEFORE SCANNING
To configure before scanning
Select Configure Before Scan
Click the arrows to select the button
SCANNING WITH OPTICAL CHARACTER RECOGNITION OCR
To scan with OCR
USING OMNIPAGE OCR OPTIONS
To select OmniPage OCR options
72 VISIONEER STROBE XP 470 SCANNER USER’S GUIDE
6. Choose the options you want from the OCR window
Click the Font Matching button to see the Font Matching dialog box
When bringing in a new image-Click the menu arrow and select where you want new pages added to your current document. The choices are After last page, After current page, Before current page, and Before first page
User interface language-English is the interface language
Automatic-Choose this option to let the OCR process determine the layout of the pages. It is the fastest type of format processing. Typically you select this option when the document has different or unknown types of layouts, pages with multiple columns and a table, or pages containing more than one table. The OCR process will then determine if text is in columns, an item is a graphic or text, and tables are present
78 VISIONEER STROBE XP 470 SCANNER USER’S GUIDE
SCANNING WITH SPDF OR NPDF AND SEARCHING FOR TEXT
To scan with sPDF or nPDF
6. Choose a Scan Configuration 7. Click Apply or OK
12. Enter the text you want to find, and click the Find button
SCAN AND BURN TO A CD
To scan and burn to a CD
The OneTouch 4.0 Link Properties window appears
SCANNING WITH EVENT FORWARDING
To scan with event forwarding
CONFIGURING THE ONETOUCH BUTTONS
6. Start scanning using the button you selected for event forwarding
7. Select the application in the box and click OK
To scan and create an HTML web page
CREATING AN HTML WEB PAGE FROM YOUR SCANNED DOCUMENTS
7. Now on the OneTouch Button Panel, click Button 6 or if you used another button, click it
88 VISIONEER STROBE XP 470 SCANNER USER’S GUIDE
TRANSFERRING SCANNED DOCUMENTS TO STORAGE
Click the arrows until Button 7 is on the panel, then click Button
To Use OCR Before Transferring to Storage
Your scanned documents will be stored at this location
5. Choose a Scan Configuration 6. Click Apply or OK
CHECKING THE HARDWARE AND SETTING THE LAMP POWER SAVE MODE
CONFIGURING THE ONETOUCH BUTTONS
2. Click the Properties button
4. Click OK to save the changes and close the dialog box
To return the scanner to its factory settings, click Reset Device
94 VISIONEER STROBE XP 470 SCANNER USER’S GUIDE
Scanning from PaperPort
Scan icon Folders Pane
SCANNING FROM THE BASIC INTERFACE OR ADVANCED INTERFACE
To scan an item from PaperPort 1. Start ScanSoft PaperPort
96 VISIONEER STROBE XP 470 SCANNER USER’S GUIDE
1. From the Scanner list, choose Visioneer Strobe XP
To select Settings
SELECTING SETTINGS
2. Click the Output tab
If you select JPEG or PDF as the file type, you can also click the
SCANNING FROM THE BASIC INTERFACE
See “The Single Page Items Check Box” on page
8. On the PaperPort Scan message box, click Done
PaperPort User’s Guide on the CD
PaperPort User’s Guide on the Installation CD
To learn more about the PaperPort software please see the ScanSoft
SCANNING FROM THE ADVANCED INTERFACE
2. Click one of the icons to select a configuration
Page
ADJUSTING THE IMAGE WITH THE ADVANCED INTERFACE
To adjust a setting
Click to close the settings panel
The following figure shows the resolution options
To adjust the resolution
ADJUSTING THE BRIGHTNESS AND CONTRAST
To adjust the brightness and contrast
ADJUSTING GAMMA, SATURATION, AND COLOR HUE
To adjust the color settings
ADJUSTING INPUT SIZE
To set the image size
size and position of the area
The Scan Info box shows the
The selected scan area
To set the ruler units
THE RULER UNITS
THE SCAN INFO BOX
To create a new profile
CREATING A NEW ADVANCED INTERFACE PROFILE
To change or delete a profile you created
DISPLAY THE DEVICE CONFIGURATION
1. Click the Device Configuration button
SCANNING WITH THE WINDOWS IMAGE ACQUISITION
To scan an item
120 VISIONEER STROBE XP 470 SCANNER USER’S GUIDE
9. Adjust settings of the previewed image as desired
The Advanced Properties dialog box opens
To select the scanner settings before you scan
FINE TUNING YOUR SCANS
122 VISIONEER STROBE XP 470 SCANNER USER’S GUIDE
2. Select the options for scanning
Maintenance
CLEANING THE AUTOMATIC DOCUMENT FEEDER
CLEARING PAPER JAMS
To clear a paper jam
REPLACING THE ADF PAD ASSEMBLY
To replace the ADF Pad assembly
TROUBLESHOOTING
Installation is not complete. What do I do?
Problem During installation I got the error message PaperPort
Problem How do I uninstall PaperPort?
STATUS LIGHT TROUBLESHOOTING CODES
See the steps on page 92 to turn the lamp on and off. Re-boot
Error
Problem DescriptionSolution
Code
UNINSTALLING YOUR SCANNER
To uninstall PaperPort 9.0 from Windows 2000 or XP
STEP 2 UNINSTALLING THE PAPERPORT SOFTWARE
To uninstall PaperPort 9.0 from Windows Me
4. Select PaperPort 9.0 and click Remove
The PaperPort software is removed
UNINSTALLING YOUR SCANNER
5. Close all open windows and restart your computer
VISIONEER STROBE XP 470 SCANNER SPECIFICATIONS
VISIONEER STROBE XP 470 SCANNER PARTS LIST
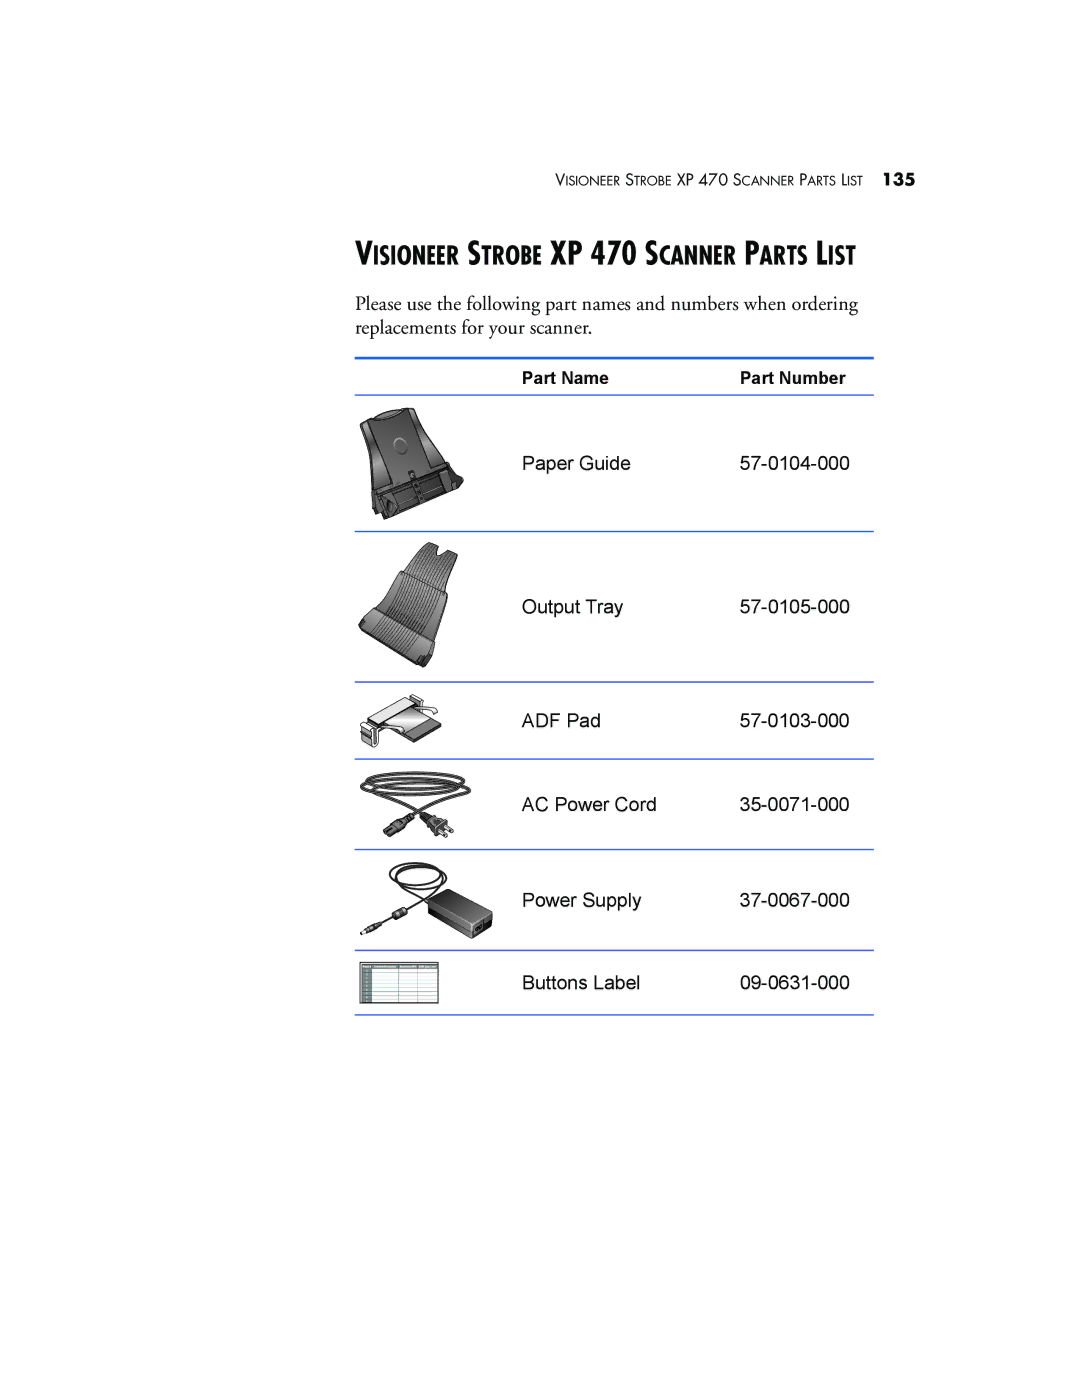
136 VISIONEER STROBE XP 470 SCANNER USER’S GUIDE
I N D E
Page
Page
INDEX
Copyright 2005 Visioneer, Inc
visioneer
05-0687-000