ZN ZT – RC In: L
1 0 0 0 – 0 0 RF: 1
↓Zone Number
1 0 Zone Type
Pe r ime te r | 0 3 |
Entry for Zone Type 03
shown
1 0 Re por t Code
1 st 0 3 2 nd 1 2 3 C
10 Input Dev: LP #
Rf Trans. RF: 1
10 Input Dev: LP#
RF Trans. RF: 1
10 Learn S/N?
0 = No, 1 = Yes 0
10 Input S/N: L A X X
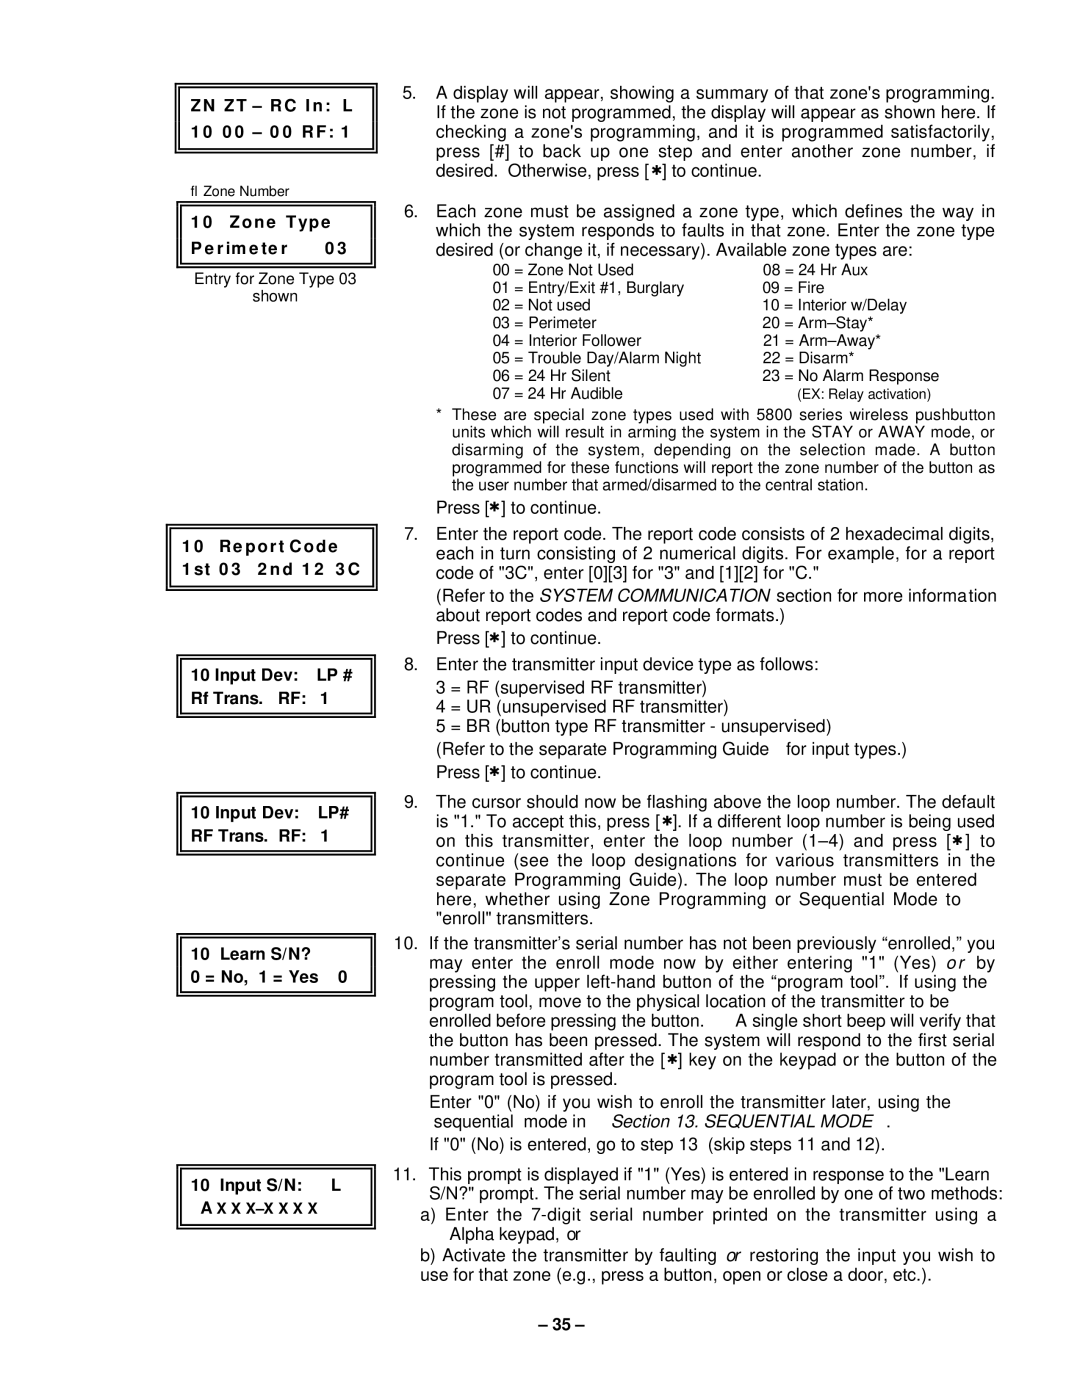
5.A display will appear, showing a summary of that zone's programming. If the zone is not programmed, the display will appear as shown here. If checking a zone's programming, and it is programmed satisfactorily, press [#] to back up one step and enter another zone number, if desired. Otherwise, press [ ✱] to continue.
6.Each zone must be assigned a zone type, which defines the way in which the system responds to faults in that zone. Enter the zone type desired (or change it, if necessary). Available zone types are:
00 | = Zone Not Used | 08 = 24 Hr Aux | |
01 | = Entry/Exit #1, Burglary | 09 | = Fire |
02 | = Not used | 10 | = Interior w/Delay |
03 | = Perimeter | 20 | = |
04 | = Interior Follower | 21 = | |
05 | = Trouble Day/Alarm Night | 22 = Disarm* | |
06 | = 24 Hr Silent | 23 | = No Alarm Response |
07 | = 24 Hr Audible |
| (EX: Relay activation) |
*These are special zone types used with 5800 series wireless pushbutton units which will result in arming the system in the STAY or AWAY mode, or disarming of the system, depending on the selection made. A button programmed for these functions will report the zone number of the button as the user number that armed/disarmed to the central station.
Press [✱] to continue.
7.Enter the report code. The report code consists of 2 hexadecimal digits, each in turn consisting of 2 numerical digits. For example, for a report code of "3C", enter [0][3] for "3" and [1][2] for "C."
(Refer to the SYSTEM COMMUNICATION section for more information about report codes and report code formats.)
Press [✱] to continue.
8.Enter the transmitter input device type as follows:
3 = RF (supervised RF transmitter)
4 = UR (unsupervised RF transmitter)
5 = BR (button type RF transmitter - unsupervised)
(Refer to the separate Programming Guide for input types.) Press [✱] to continue.
9.The cursor should now be flashing above the loop number. The default is "1." To accept this, press [ ✱]. If a different loop number is being used on this transmitter, enter the loop number
10.If the transmitter’s serial number has not been previously “enrolled,” you may enter the enroll mode now by either entering "1" (Yes) o r by pressing the upper
Enter "0" (No) if you wish to enroll the transmitter later, using the “sequential” mode in Section 13. SEQUENTIAL MODE .
If "0" (No) is entered, go to step 13 (skip steps 11 and 12).
11.This prompt is displayed if "1" (Yes) is entered in response to the "Learn S/N?" prompt. The serial number may be enrolled by one of two methods:
a)Enter the
b)Activate the transmitter by faulting or restoring the input you wish to use for that zone (e.g., press a button, open or close a door, etc.).
– 35 –
