E1441-90003
User/Service and SCPI Programming Manual
Where to Find it - Online and Printed Information
Agilent E1441A
Page
Chapter
Contents
Edition
Chapter
Appendix B
Chapter
Appendix A
Appendix C
Performance Verification Tests
6 Contents
Certification
AGILENT TECHNOLOGIES WARRANTY STATEMENT
DURATION OF WARRANTY: 1 year
U.S. Government Restricted Rights
Trademarks
Safety Symbols
Documentation History
WARNINGS
Measurement Product Generation Unit
Safety
DECLARATION OF CONFORMITY
Conforms with the following European Directives
Notes
Notes
Notes
Function/Arbitrary Waveform Generator
Module Setup
Agilent E1441A
Chapter
Figure 1-1.Setting the Logical Address
Setting the Module Address Switch
Chapter
Installing into the Mainframe
Interrupt Priority
Option 001 Phase-Lock10 MHz Reference Terminals
Faceplate Indicators and Connectors
Faceplate Indicators
Standard Input/Output Terminals
Initial Operation
Chapter
Functional Capabilities
Output Configuration
Agilent E1441A Application Information
Chapter
Valid Function/ Modulation Modes
Table
Table
FUNCtion:SHAPe SIN|SQU|TRI|RAMP|NOIS|USER|DC
Chapter
22 Agilent E1441A Application Information
Table
FREQuency <frequency>|MINimum|MAXimum
Chapter
Parameter
Page
Use the following command to set the dc offset
Use the following command to set the duty cycle
sync signal, you can disable the Sync terminal
Amplitude Modulation AM
AM Carrier Waveform Shape
Amplitude Modulation Depth
Amplitude Modulating Waveform Shape
Amplitude Modulating Waveform Frequency
FREQuency <frequency>|MINimum|MAXimum
Frequency Modulation FM
Amplitude Modulating Source
FM Carrier Waveform Shape
FM Carrier Frequency
32 Agilent E1441A Application Information
FM Peak Frequency Deviation
Chapter
“Counted Burst Mode” on page
“Burst Phase” on page
•“Burst Modes” on page
“Gated Burst Mode” on page
trigger source
The command sequence to configure this mode is
The command sequence to configure this mode is
34 Agilent E1441A Application Information
Gated Burst Mode
Burst Trigger Source For Counted Burst Mode
EXTernal
IMMediate
INTernal
TTLTRG<n>
Maximum Frequency
Number of Arb Points
Minimum Frequency
Carrier Frequency
Burst Count
BM:NCYCles <# cycles>|INFinity|MINimum|MAXimum
Use the following command to set the burst count
Use the following command to set the burst rate
BM:INTernal:RATE <frequency>|MINimum|MAXimum
•“FSK “Hop” Frequency” on page
Frequency-Shift Keying FSK Modulation
•“FSK Carrier Frequency” on page
•“FSK Rate” on page •“FSK Hop Source” on page
FREQuency <frequency>|MINimum|MAXimum
Use the following command to set the frequency
Use the following command to set the FSK rate
FSKey:FREQuency <frequency>|MINimum|MAXimum
42 Agilent E1441A Application Information
Internal Hop Source
External Hop Source
Chapter
•“Sweep Time” on page •“Sweep Mode” on page
Sweep Start and Stop Frequencies
•“Sweep Start and Stop Frequencies” on page
•“Sweep Trigger Source” on page
Sweep Trigger Source External Sources
Internal Source
TRIGger:SOURce IMMediate|EXTernal|TTLTRG<0-7>|BUS
Sweep Trigger Signal TRIG:SOUR INT shown
Figure 2-9.Frequency Sweep with Internal Trigger
Chapter
Arbitrary Waveforms
Creating Arbitrary Waveforms
Creating and Storing an Arbitrary Waveform
48 Agilent E1441A Application Information
Waveforms
Figure
Chapter
PHAS:ADJ
Phase-Lock Capabilities Opt
APPL:SIN 10E+6,
90DEG
Figure
To Phase Lock Multiple Function Generators
requires Option
50 Agilent E1441A Application Information
Send these commands to both function generators
To Phase Lock Using the Counted Burst Mode
requires Option
Trigger Slope
Triggering the Function Generator
Trigger Source Choices
Trig / FSK / Burst Input Terminal” on page
Internal Triggering
External Triggering Including TTLTRG lines
Software BUS Triggering
54 Agilent E1441A Application Information
Ext Trig / FSK / Burst Input Terminal
Figure
Chapter
System-RelatedOperations
Firmware Revision Query
SCPI Language Version Query
Feature
Power-Onand
Reset State
Power-Onand Reset State
Program Example Programs
Application Program Examples
CLanguage Programs Compiling and Linking a C
Burst Modulation Program
Agilent E1441A Application Information
Chapter
iferr != VI_SUCCESS err_handlerfuncgen, err
60 Agilent E1441A Application Information
AM Modulation and Instrument State Storage
Chapter
Chapter
Arbitrary Waveform Example
Agilent E1441A Application Information
62 Agilent E1441A Application Information
Chapter
Agilent E1441A Application Information
end of main Error handling function
Chapter
close the device session */ viClosefuncgen
64 Agilent E1441A Application Information
Chapter
Command Index by Function
Agilent E1441A SCPI Command Reference
Chapter
66 Agilent E1441A SCPI Command Reference
Modulation Commands
Chapter
Trigger Commands
Sweep Commands
Arbitrary Waveform Commands
Agilent E1441A SCPI Command Reference
Status Reporting Commands
System-RelatedCommands
Calibration Commands
68 Agilent E1441A SCPI Command Reference
Agilent E1441A SCPI Command Reference
The IEEE-488.2Common Commands
Option 001 Phase-LockCommands
Chapter
SCPI Command Format
Command Fundamentals
Common Command Format
Abbreviated Commands
Implied Commands
Linking Commands
Parameters
SCPI Command Reference
Command Guides
COUNt?
CALibration
CALibration?
Subsystem Syntax
SECure:STATe
SECure:CODE
Parameters
SECure:STATe?
SETup
SETup?
STRing
VALue?
STRing?
VALue
Parameters
VOLATILE
DATA
Subsystem Syntax
DAC VOLATILE
ATTRibute CFACtor?
ATTRibute:AVERage?
Downloading a Binary Block of Data
80 Agilent E1441A SCPI Command Reference
ATTRibute:POINts?
ATTRibute PTPeak?
Chapter
Agilent E1441A SCPI Command Reference
CATalog?
COPY
Chapter
DELete
NVOLatile:CATalog?
DEL:ALL
NVOLatile:FREE?
BORDer?
FORMat
BORDer
•Related Commands
STATe:RECall:AUTO
MEMory
STATe:DELete
•Related Commands: *RCL, *SAV
STATe:RECall:AUTO?
Comments • Returned Value: 0 or
LOAD?
OUTPut
LOAD
Parameters
TRIGger:IMMediate
SYNC
SYNC?
TRIGger:STATe
enable TTLTRG2 line to source a trigger
TTLTrg<n>:STATe?
Agilent E1441A SCPI Command Reference
enable TTLTRG7 line to source a trigger
Subsystem Syntax PHASe
PHASe
ADJust
Only valid with Option
UNLock:ERRor:STATe?
ADJust?
UNLock:ERRor:STATe
REFerence
Subsystem Syntax
SOURce
92 Agilent E1441A SCPI Command Reference
Chapter
Parameters
Amplitude Modulation AM Commands
AM:DEPTh
•*RST Condition: 100%
AM:INTernal:FUNCtion?
AM:DEPTh?
AM:INTernal:FUNCtion
AM:INTernal:FREQuency
AM:STATe?
AM:SOURce?
AM:STATe
•*RST Condition: BOTH
APPLy Command Parameters
APPLy Commands
Syntax
in the waveform see below
98 Agilent E1441A SCPI Command Reference
Chapter
±10 Vdc into an open circuit
APPLy:RAMP
APPLy:DC
APPLy NOISe
APPLy:SINusoid
APPLy:USER
APPLy:SQUare
APPLy:TRIangle
APPLy?
BM NCYCles?
BURST MODULATION COMMANDS
BM:NCYCles
BurstCount
BM:INTernal:RATE
BM:PHASe
BM:PHASe?
Parameters
BM:SOURce
FM COMMANDS
BM:INTernal:RATE?
BM:SOURce?
FM:INTernal:FREQuency
FM:DEViation
FM:DEViation?
Parameters
FM:INTernal:FUNCtion?
FM:INTernal:FREQuency?
FM:INTernal:FUNCtion
FM:STATe
Agilent E1441A SCPI Command Reference
FREQuency?
FREQuency:STARt
Parameters
FREQuency:STOP
Frequency-ShiftKeying FSK Commands
FREQuency:STARt?
FREQuency:STOP?
FSKey INTernal RATE
FSKey:FREQuency
FSKey FREQuency?
FSKey:INTernal:RATE?
FSKey:STATe
Selecting an Arbitrary Waveform
FSKey:SOURce?
FSKey:STATe?
Agilent E1441A SCPI Command Reference
FUNCtion:USER?
FUNCtion:SHAPe
Chapter
112 Agilent E1441A SCPI Command Reference
FUNCtion:SHAPe?
PULSe:DCYCle
Parameters
SWEep:SPACing?
PULSe:DCYCle?
SWEep:SPACing
SWEep:TIME
VOLTage
SWEep:STATe
SWEep:STATe?
114 Agilent E1441A SCPI Command Reference
Agilent E1441A SCPI Command Reference
VOLTage?
VOLTage:OFFSet
Parameters
VOLTage:UNIT
VOLTage:OFFSet?
VOLTage:UNIT?
QUEStionable :CONDition?
PRESet
STATus
QUEStionable :EVENt?
QUEStionable :ENABle
QUEStionable :ENABle?
Figure
Agilent E1441A SCPI Command Reference
Chapter
VERSion?
ERRor?
SYSTem
Subsystem Syntax
SLOPe?
TRIGger
SLOPe
SOURce
the *TRG IEEE-488.2common command
SOURce?
Related Commands *RST Condition TRIG SOUR IMM
124 Agilent E1441A SCPI Command Reference
IEEE 488.2Common CommandReference
Command
Category
Comments • Coupled command: No
ESE?
ESR?
•Related Commands: STATus:PRESet
OPT? option
IDN?
OPC?
Comments • Coupled command: No
Comments • Coupled command: No
PSC?
•Coupled command: No
•*RST Condition: none
Power-OnCondition no bits are enabled
•Coupled command: No
Comments • Coupled command: No
Parameters
TST?
SRE?
STB?
Comments • Coupled command: No
Power-Onand Reset State
Agilent E1441A Power-Onand Reset State
Feature
130 Agilent E1441A SCPI Command Reference
Agilent E1441A SCPI Command Reference
SCPI Command Quick Reference
Chapter
132 Agilent E1441A SCPI Command Reference
Chapter
SOURce
Agilent E1441A SCPI Command Reference
Chapter
134 Agilent E1441A SCPI Command Reference
Chapter
Sinewave Spectral Purity
Agilent E1441A Specifications
Appendix A
Frequency Characteristics
Resolution
Signal Characteristics Square wave
Output Characteristics 1,5 Amplitude into 50Ω:2
Triangle, Ramp, Arb
Frequency Sweep
Characteristics
Modulation
Faceplate Inputs5
Cooling/Slot
System Characteristics Configuration Times
Arb Download Times
Operating Environment
Faceplate Output: Ref Out terminal
Option 001 Specifications Timebase Accuracy
Phase Offset
Trigger
140 Agilent E1441A Specifications
Appendix A
Appendix B
Agilent E1441A Error Messages
Execution Errors
102 Syntax error
112 Program mnemonic too long
108 Parameter not allowed
109 Missing parameter
113 Undefined header
158 String data not allowed
170to -178 Expression errors
151 Invalid string data
161 Invalid block data
221 Settings conflict; frequency has been adjusted
221 Settings conflict; offset has been adjusted
222 Data out of range; frequency
222 Data out of range
222 Data out of range; amplitude
222 Data out of range; offset
580Phase-lockedloop is unlocked
350 Too many errors
550Command not allowed in local
440 Query UNTERMINATED after indefinite response
590I/O processor reset 601Trigger test failed
Self-TestErrors
Calibration Errors
701Cal security disabled by jumper
703Invalid secure code
707Cal signal measurement out of range
702Cal secured
704Secure code too long
851Negative offset gain cal required CAL:SETup
Arbitrary Waveform Errors
850Cal setup invalid
852Flatness DAC gain cal required CAL:SETup
786Cannot delete a built-inarb waveform
783Arb waveform name too long
785Specified arb waveform does not exist
788Cannot copy to VOLATILE arb waveform
Option 001 Phase-LockErrors
580Phase-lockedloop is unlocked
152 Agilent E1441A Error Messages
Appendix B
Appendix C
Agilent E1441A Function Generator Tutorial
Direct Digital Synthesis
154 Agilent E1441A Function Generator Tutorial
Figure C-2
Figure C-3
Appendix C
Appendix C
Signal Imperfections
Agilent E1441A Function Generator Tutorial
Figure C-5
Output Amplitude Control
Figure C-4
156 Agilent E1441A Function Generator Tutorial
Appendix C
Floating Signal Generators
Attributes of AC Signals
Agilent E1441A Function Generator Tutorial
158 Agilent E1441A Function Generator Tutorial
Modulation
1 + D ⋅ Am 〈 t〉 ⋅ sin2π ⋅ Fc ⋅ T
Appendix C
For wideband FM
Appendix C
Agilent E1441A Function Generator Tutorial
Start Frequency + Stop Frequency
160 Agilent E1441A Function Generator Tutorial
Deviation = Hop Frequency – Carrier Frequency
Appendix C
624for FM
Table C-1
for AM
Appendix C
y = mX + b
Fs = 1 / 9 x 200 ∝s = 555.555 kHz
Points P = C/S / Fs =
162 Agilent E1441A Function Generator Tutorial
Service Procedures
Appendix D
Closed-CaseElectronic Calibration
Agilent Technologies Calibration Services
Automated Verification and Calibration Procedures
Calibration Interval
Recommended Test Equipment
Test Considerations
Performance Verification Tests
Quick Performance Check
Frequency Verification
Performance Verification Tests
168 Service Procedures
Function Gain and Linearity Verification
DC Function Offset Verification
Table D-4.DC Function Offset Verification
Table D-5.AC Amplitude Verification High Z
AC Amplitude Verification
Service Procedures
Appendix D
Table D-6.AC Amplitude Verification 50 Ohms
170 Service Procedures
Appendix D
Table D-7.Amplitude Flatness Verification
Amplitude Flatness Verification
Service Procedures
Appendix D
Optional Performance Verification Tests
AM Modulation Depth Verification
Square Wave Duty Cycle Verification
Table D-10.Distortion Verification
Distortion Verification
Service Procedures
Appendix D
To re-secure
Calibration Security Code
To unsecure for calibration
To change security code
Unsecuring the Function Generator
Calibration Count
Calibration Message
General Calibration/Adjustment Procedure
Calibration Example
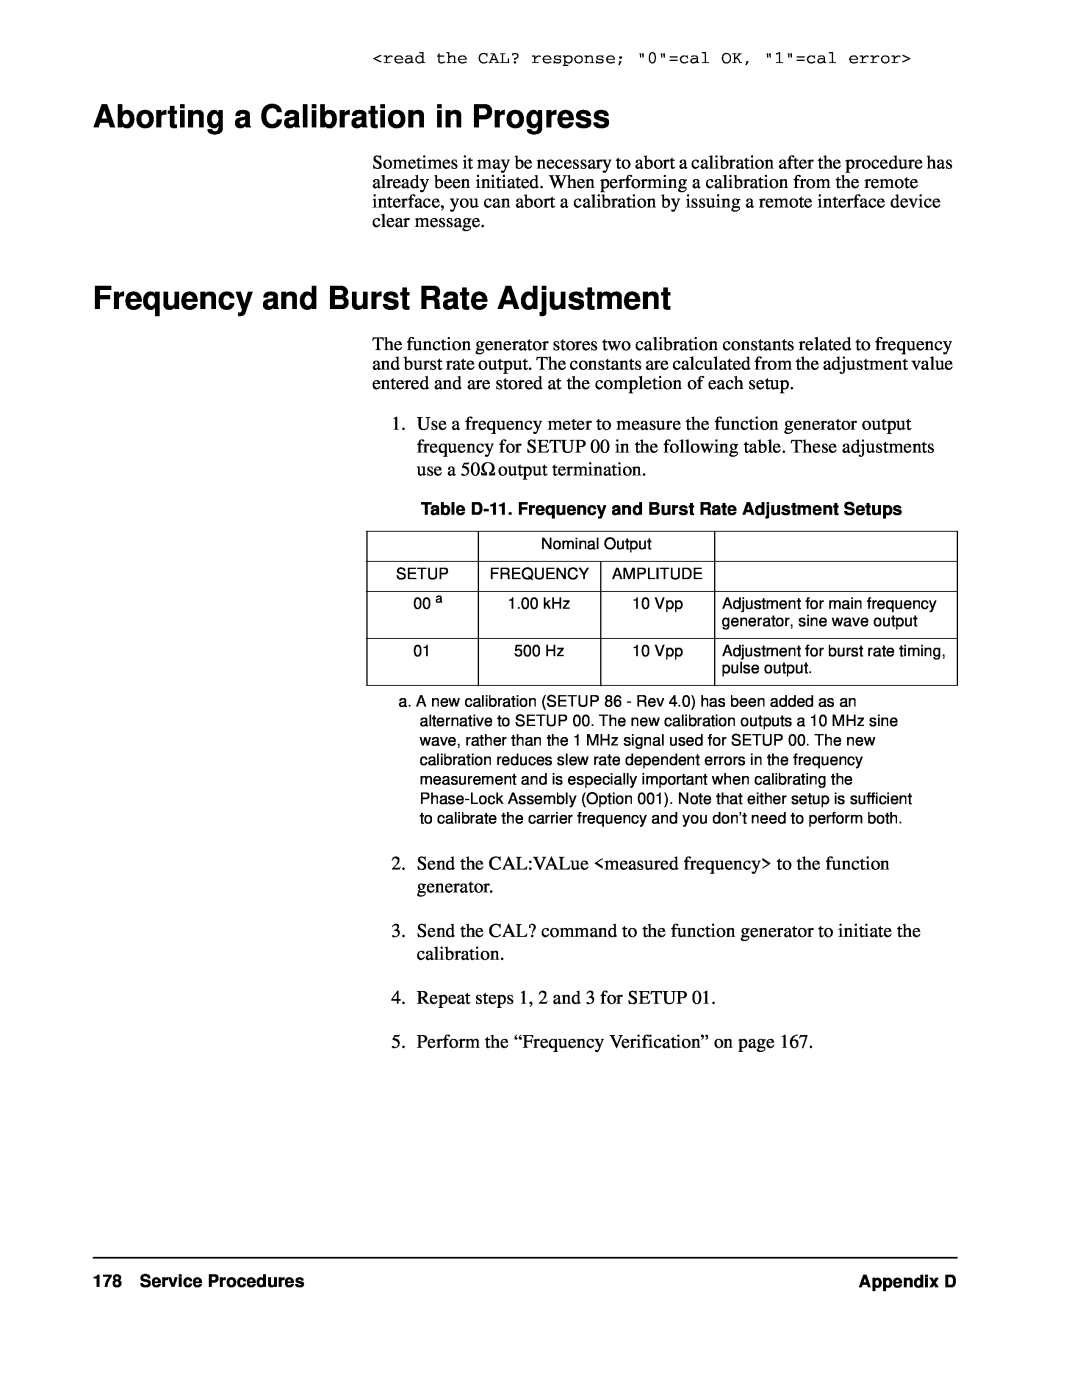
Frequency and Burst Rate Adjustment
Aborting a Calibration in Progress
Function Gain and Linearity Adjustment
AC Amplitude Adjustment High-Z
Modulation Adjustment
182 Service Procedures
AC Amplitude Adjustment 50 Ohms
Table D-15.50 Ohm Adjustment Setup
Appendix D
Service Procedures
7.Repeat steps 4, 5 and 6 for SETUP 35 through
Table D-16.AC Amplitude 50 Ohms Adjustment Setups
8.Perform the “AC Amplitude Verification” on page
DC Output Adjustment
Duty Cycle Adjustment
AC Amplitude Flatness Adjustment
1 kHz to 100 kHz
Service Procedures
Table D-22.AC Flatness Adjustment Setups
Appendix D
Table D-24. Self-TestError Messages
Error Messages
Table D-23.System Error Messages
188 Service Procedures
Service Procedures
Table D-25.Calibration Error Messages
Appendix D
Test Accuracy Ratio TAR
Performance Test Record
Test Limits Measurement Uncertainty
MaximumValue – ExpectedReading
Appendix D
Model No
Appendix D
Test Equipment Used Description
Trace No
Agilent E1441A DC Function Offset
Agilent E1441A Frequency Accuracy
Agilent E1441A Function Gain and Linearity
Appendix D
Agilent E1441A AC Amplitude High Z
Appendix D
Agilent E1441A AC Amplitude 50 Ohms
Appendix D
Agilent E1441A AM Modulation
Agilent E1441A Amplitude Flatness
Appendix D
Agilent E1441A Distortion
Optional Performance Verification Tests
Agilent E1441A Square Wave Duty Cycle
Appendix D
Appendix D
Symbols
Index
CODE, STATe,
ALL,
AVERage?, CFACtor?, POINts?, PTPeak?,
CATalog?, FREE?,
IDN?, 124,
ERRor STATe, STATe?,
FM, 32, FSK, 41,
OPC, 124, 126 *OPC?
DELete,
RST, 124,
STB?, 124,
SRE?, 124,
DEPTh, DEPTh?, INTernal FREQuency, FUNCtion,
Vpp, 25, Vrms, 25,
WAI, 124,